

If you're staring at a torn window screen in Phoenix, there's a good chance it didn't fail all at once. The mesh got brittle in the sun, dust packed into the corners, then one hard monsoon gust or a pet push finished the job. That pattern is common across the Valley, and it's why a generic screen kit guide usually leaves out the part that matters most here: Arizona is rough on screens.
A good screen kit can absolutely solve the problem on a standard window. But the right result depends on choosing the right materials, cutting the frame correctly, and building it with our climate in mind. In Phoenix, Scottsdale, Tempe, Chandler, and Gilbert, a screen that works fine somewhere milder can start looking tired fast if the frame is light, the mesh is wrong for the opening, or the corners weren't fitted tightly.
Choosing the Right Screen Kit for the Arizona Sun
The first mistake most homeowners make is buying a screen kit by package label instead of by actual use. A west-facing bedroom window, a shaded patio opening, and a dog-door area don't need the same mesh or the same frame strength. In Arizona, that matters more because heat, UV exposure, fine dust, and monsoon wind all test weak components quickly.
Start with the mesh. Fiberglass screen is usually the easiest to work with in a DIY screen kit. It rolls in smoothly and is forgiving if you're doing your first repair. For many standard windows, it's a practical choice. The downside is that in strong sun, cheaper fiberglass can lose its nice tight feel over time.
Aluminum mesh is stiffer and holds shape well, but it can be less forgiving during installation. If you overwork it or crease it, you'll see it. For homeowners who want a more rigid feel, it can be a solid option, but it isn't always the easiest path for a first-time repair.
Then there are specialty choices:
- Pet-resistant mesh works well where dogs or cats lean into the screen.
- Solar screen material makes sense on punishing sun exposures where glare and heat are the bigger issue than airflow alone.
- Standard insect screen is still the right call for many shaded or lower-stress openings.

Match the frame to the opening
In Arizona, I pay close attention to the frame before I worry about the mesh. A flimsy frame might look fine on the workbench and still flex too much once it's back in the window. That's where homeowners get corner gaps, poor seating in the track, and repeated rattling after windy weather.
A heavier frame is usually the smarter buy for larger openings and screens exposed to regular wind. Small bathroom or laundry windows can often get by with a basic kit. Big sliders, broad front-facing windows, and patio-adjacent openings usually benefit from stronger frame stock and tighter corner hardware.
Practical rule: If the opening already had a bowed or loose screen, replacing the mesh alone won't fix the real problem. Start with frame strength.
Real installs also aren't always perfect rectangles. Non-mitered corners and odd angles show up more often than DIY packaging suggests. Product pages for hardware like Screen Tight wall angle connectors and other specialty corner options make clear that choosing the right geometry upfront prevents gaps and weak joints in real-world installations, especially when you're dealing with porch systems or unusual layouts, as noted in these specialized connector details for angled screen installations.
Think beyond the kit aisle
For larger properties or buildings with repeated screen maintenance needs, it helps to think about the whole opening, not just the screen insert. These insights for facility managers are useful because they connect screen work with sealing, dust control, and overall window performance. That's especially relevant in Phoenix, where fine dirt works its way into every track and corner.
If you're building out a patio or exterior sitting area instead of a basic window repair, this guide on the best porch screen options for Arizona homes is worth reviewing before you buy materials. Porch applications often need a different decision process than a standard snap-in window screen.
Accurate Measuring and Frame Preparation
The most common DIY screen failure isn't bad mesh. It's bad math.
Homeowners measure the opening, cut the frame to match, press the corners in, and then wonder why the finished screen is too large to fit. A manufacturer instruction for one common frame kit says to measure the opening height and width, then cut the frame members to H − 1 1/2 in. and W − 1 1/2 in. because each corner connector adds 3/4 in. to the finished size, and if the frame exceeds 3 ft in height, an added cross-brace cut to W − 1 1/2 in. is recommended for rigidity, along with using a hacksaw and 9/64 in. or .160 spline for screening and trim work with a utility knife after the spline is rolled in, according to these window screen frame kit instructions.

What to do before you cut
Get a tape measure, a pencil, and a flat surface. Measure the actual opening, not the old damaged screen unless you're certain the old frame was correct. Old screens get bent, and once that happens they stop being a reliable template.
Then prep the channel and surrounding area before you build anything. In Phoenix homes, tracks and corners collect packed dust, bits of old spline, pet hair, and dry debris. If you skip that cleanup, even a well-built new screen may not sit flush.
Use this quick prep checklist:
- Vacuum first: Pull loose dirt out of the track and corners.
- Check for old material: Remove any broken spline, tabs, or corner fragments.
- Wipe the channel: A damp cloth helps lift the stubborn dust film.
- Inspect the opening: Look for bent lips, cracked corners, or warped frame sections.
If your window tracks are especially dirty, this guide on how to clean window tracks without making a bigger mess is a useful companion before you install the new frame.
A clean channel won't fix a bad cut, but it does make a good cut seat properly.
Why precision matters more in Arizona
In a mild climate, a slightly imperfect fit may only look sloppy. Here, it creates a working problem. Fine dust sneaks through loose edges, insects find corner gaps, and wind keeps stressing weak contact points until the screen starts rattling or popping loose.
That's why I always tell homeowners to slow down at the measuring stage. The screen kit goes together fast. The correction work after a bad cut doesn't.
Assembling and Installing Your New Screen
This is often the most satisfying part. You can see progress quickly, and if your cuts are right, the job starts feeling straightforward. The trick is not to rush just because the pieces finally fit together.
Lay your frame members on a flat surface and dry-fit the corners first. Don't force them. If a corner feels wrong, check the cut end for burrs or slight deformation from the saw before you push harder. Once all four sides are seated, confirm that the frame is square by checking that it lies flat and the corners don't rock.
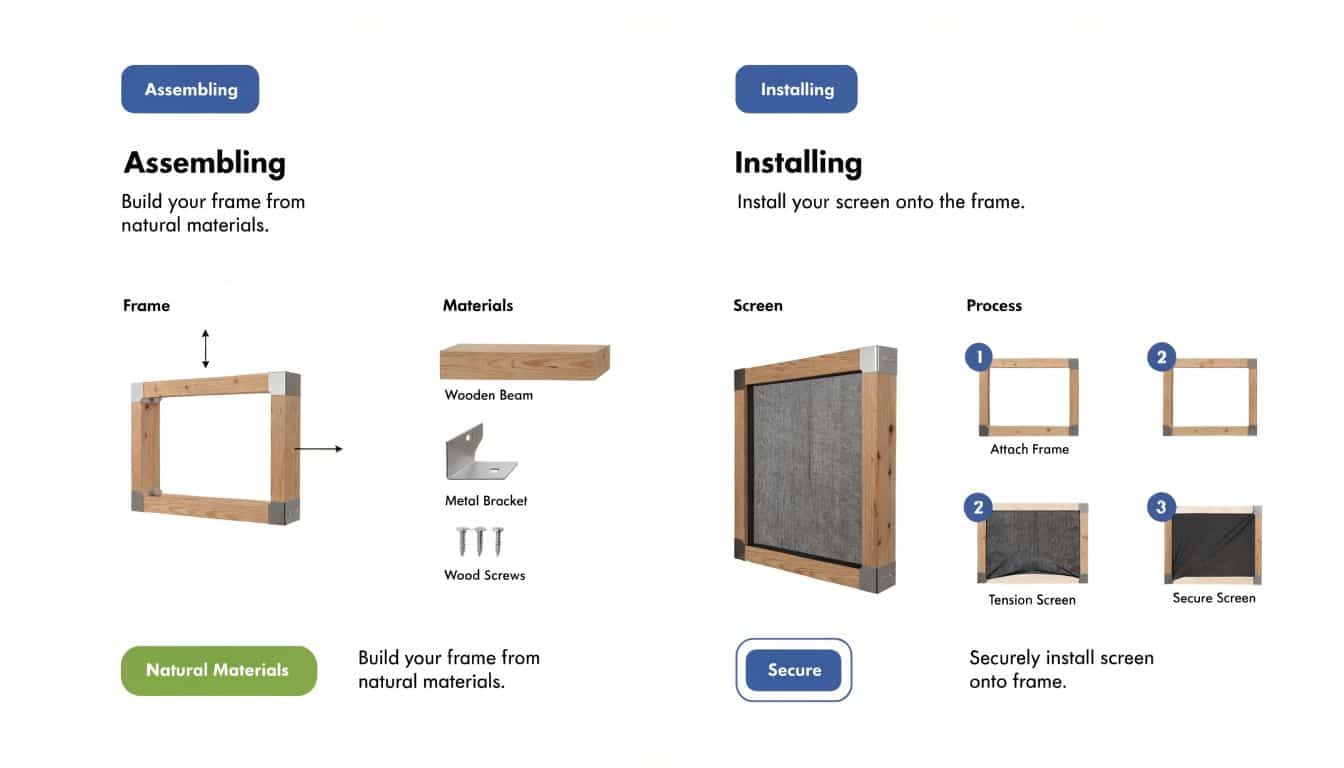
Build the frame without fighting it
A hacksaw is the standard tool for cutting many aluminum frame kits, and a simple miter box helps keep your cuts clean even when you're not making mitered corners. After cutting, smooth rough edges so the corners seat completely.
If your opening is tall and the frame feels flexible, add the recommended cross-brace if your kit allows it. A large screen without support can bow once the mesh tension is applied. That's a common issue on bigger Arizona windows where sun and wind work together on the frame.
A practical assembly sequence looks like this:
- Dry-fit all parts first so you catch any cut issue before mesh goes on.
- Seat the corners fully by hand on a flat table.
- Check for square by making sure the frame sits flat and even.
- Install any brace before the mesh, not after.
- Test-fit the bare frame in the opening if you want extra insurance.
Set the mesh with controlled tension
Roll the mesh over the frame with a few inches of extra material on all sides. Don't pull it drum-tight before the spline goes in. That usually creates a warped frame or diagonal wrinkles.
Instead, keep the mesh flat and lightly tensioned by hand. Start the spline on one side using a spline roller, then move to the opposite side. After that, do the remaining sides. This keeps tension more balanced across the frame.
Keep the mesh flat, not stretched hard. The spline creates the hold. Your hands just guide the material.
For many kits, 9/64 in. or .160 spline is the recommended size in the frame groove, based on the kit instructions cited earlier. Use the spline size your frame calls for. If the spline is too small, it won't hold well. If it's too large, you'll fight the roller and may damage the mesh edge.
Roll, trim, and test-fit
As you roll the spline in, use steady pressure. Don't jab at it. Let the wheel track the groove. Corners are where most first-time installers lose control, so slow down there and keep the mesh aligned.
After the spline is fully seated, trim the excess mesh with a utility knife. Keep the blade angled away from the spline so you don't nick the material you just installed.
A few final checks help avoid having to redo the work:
- Look across the surface: Small ripples may relax, but major waves mean uneven tension.
- Inspect each corner: The spline should sit fully down in the groove.
- Hold the frame upright: If it bows dramatically, tension may be too high.
- Test the fit gently: It should sit securely without being jammed into place.
Some DIY habits from other assembly projects carry over well here. Clear sequencing, hardware organization, and not forcing a part because you're in a hurry all matter. These DIY gate kit building tips make that same point from a different kind of outdoor project, and the mindset fits screen work surprisingly well.
If you're repairing a patio entry or exterior access point instead of a simple window insert, the build details change. A screen door repair and replacement guide can help with the different frame, roller, and fit issues those openings bring.
Troubleshooting Common DIY Screen Problems
A screen kit job usually goes wrong in small ways, not dramatic ones. That's good news, because small problems are usually fixable without starting from scratch.
The screen looks wrinkled
Wrinkles usually mean the mesh tension wasn't balanced as the spline went in. If the frame is still square, pull the spline back out on the problem side and one adjacent side, lay the mesh flat again, and re-roll it with lighter hand tension.
If the wrinkle runs diagonally, check whether the frame twisted during assembly. That's less about the mesh and more about how the corners seated.
The spline keeps popping out
This is common at corners. It can happen because the spline size doesn't match the groove well, or because the installer rushed the turn and never seated it fully.
Try pressing the corner section in again with controlled roller pressure. If the frame groove is dirty or damaged, clean it out carefully and inspect for obstruction before reinstalling.
A popped corner usually means the problem started earlier. Either the groove wasn't clean, the spline wasn't seated, or the frame was under too much tension.
The frame bows in the middle
That usually points to one of two issues. The mesh was pulled too tight, or the frame stock is too light for the opening. On tall frames, a brace would have helped.
Remove and reset the mesh with less tension if the bow is minor. If the frame still flexes too much, the better answer may be rebuilding with stronger components.
The finished screen fits badly
If it's too tight, the cut dimensions were likely off. If it's loose in the opening, the frame may be undersized or the corners may not be fully seated. This is one of those moments where honest diagnosis saves time.
Homeowners run into the same kind of repair frustration with blinds, where the visible problem isn't always the underlying cause. This homeowner guide to fixing broken blinds is useful for that reason. It follows the same practical logic: identify the symptom, then fix the part causing it.
Arizona-Specific Screen Care and Maintenance
A new screen kit repair isn't finished when the screen goes back in the window. In Arizona, maintenance is what determines whether that repair lasts.
Dust is the first enemy. It settles into the mesh, cakes around the frame edge, and turns routine airflow into grime buildup. Then the sun takes over. Constant exposure dries materials out, especially on windows that face the hardest afternoon heat. After that, monsoon season tests every loose corner and weak edge.

A simple routine that works
You don't need an elaborate process. You do need consistency.
- Brush or vacuum loose dust first: Wet cleaning packed dust without removing it first can grind debris deeper into the mesh.
- Wash gently: Mild soap, water, and a soft brush are usually enough.
- Rinse fully: Residue attracts more dirt than people realize.
- Inspect after storms: Check corners, spline lines, and frame seating after windy weather.
Harsh cleaners are a bad gamble on sun-exposed screens. If a chemical leaves the material dried out or chalky, you've shortened the life of the repair.
Why upkeep matters
Phoenix homeowners often focus on the glass because that's what they see every day. But dirty screens block the view, cut airflow, and wear out faster when grime sits in them. Routine care is cheaper and easier than repeated replacement.
If you want a practical cleanup method for regular maintenance, this guide on how to clean window screens the right way is a helpful starting point. South Mountain Window Cleaning, LLC also provides screen cleaning and screen repair as one option for homeowners who'd rather not remove, wash, and reinstall multiple screens themselves.
When a DIY Screen Kit Isn't the Answer
A screen kit makes sense when the opening is standard, the frame path is accessible, and the repair is limited to one or a few manageable screens. Outside of that, DIY can turn into a time drain quickly.
Second-story windows are the first obvious cutoff. If you need a ladder setup that already makes you uneasy, that's not a screen project anymore. It's a safety decision. The same goes for awkward commercial windows, deep-set openings, and screens installed in places with limited footing or roofline interference.
Custom shapes are another point where a store-bought screen kit often stops being practical. Odd angles, bent original frames, and oversized openings usually demand more than a basic replacement pack can handle. You can spend a lot of time trying to make the wrong kit work when the smarter move is to have the screen built correctly from the start.
Then there's job scale. One screen is a weekend chore. A full house of sun-damaged screens, or a property with repeated wear from dust and wind, is a different commitment. If you're already juggling glass cleaning, track cleanup, exterior dust, and screen repair, handing off the screen work can be the cleaner solution.
The goal isn't proving you can do everything yourself. It's getting a screen that fits, stays in place, and holds up through Arizona weather without wasting a Saturday on rework.
If your screens are torn, loose, sun-damaged, or just too many to tackle on your own, South Mountain Window Cleaning, LLC can help with screen care as part of your window maintenance plan. For homeowners and property managers across Phoenix, Scottsdale, Paradise Valley, Chandler, Tempe, and Gilbert, it's a practical way to keep windows, tracks, and screens working together instead of treating each problem separately.