

You're standing inside a Phoenix-area home, looking through windows filmed with desert dust, mineral spotting, and a fine haze from months of intense sun. The frames may still be solid, but the sash sticks, the glazing has cracked, and a cool room feels uncomfortable near the glass. Cleaning alone won't solve that problem.
Learning how to restore window glass and frames starts with separating appearance from performance. Some windows need careful polishing and reglazing. Others need new weatherstripping, storm inserts, or replacement because the frame has failed. In Arizona, that decision matters because ultraviolet exposure, heat, dust, and dry conditions can make a small defect worse while masking the underlying cause of drafts or condensation.
Assessing Window Condition and Restoration Viability
Before reaching for a scraper, rotary polisher, or heat gun, inspect the complete window assembly. Start with the frame and sash. Press gently against corners, check for movement, and look for softened wood, open joints, corrosion, or distortion in metal. A durable original frame can often support targeted restoration, but a sash that flexes or a sill that has lost its structural material may not provide a stable base for new glazing.
Arizona dust deserves special attention. Fine abrasive particles settle into tracks, weatherstripping, and glazing edges, while strong sunlight dries and embrittles coatings and sealants. Glass can look dirty when it's etched, and a frame can look serviceable while allowing air to pass around the sash.
A practical inspection sequence
- Check the glass: Separate removable dirt and mineral deposits from scratches, light etching, cracks, or chips.
- Test the sash: Open and close it without forcing the hardware. Binding can indicate debris, damaged rollers, swollen components, or frame movement.
- Inspect the glazing: Look for cracked, missing, loose, or powdery glazing compound around the pane.
- Find air paths: On a breezy day, feel around meeting rails, pulley openings, corners, and the frame-to-wall joint.
- Look for moisture evidence: Interior condensation, staining, mildew, and deteriorated paint point to air leakage or moisture-management problems, not merely dirty glass.
Window restoration has a meaningful cost advantage in many situations. One independent industry source reports that restoring original wood windows can save up to 58% compared with replacement, with restoration projects averaging about $400 per window and ranging from $80 to $1,800, depending on condition and scope. The same source places average U.S. replacement at about $650 per window. See the window restoration and replacement cost comparison for the underlying figures.
Practical rule: Restore the assembly when the frame is sound and the failure is selective. Replace it when structural damage, persistent air leakage, or failed insulated components makes repeated repairs a cycle rather than a solution.
Choosing restoration, inserts, or replacement
Targeted restoration makes sense when the defects are limited to reglazing, sash repair, seal replacement, hardware, or surface glass damage. Storm inserts can add another air-control layer when the original window is historically valuable or structurally sound but performs poorly. Full replacement becomes more reasonable when the frame is badly deteriorated, the opening is distorted, or the existing assembly can't hold a durable seal.
Older windows also carry design value. Historic window craftsmanship became part of a broader conservation movement during the Victorian period, and preservation literature identifies 1870 to 1930 as the high point for stained glass in the United States. The history of stained-glass conservation helps explain why original windows in churches, civic buildings, and older commercial properties are often treated as repairable heritage assets rather than disposable components.
The visual role of a window matters too. Before changing the glass pattern, muntins, or frame color, review these Pinnacle Property Media design tips for a useful perspective on how windows affect a room's proportions and perceived light.
For a deeper look at mineral buildup before deciding whether glass needs polishing or replacement, use this guide to mineral deposits on glass.
Polishing Glass and Removing Surface Scratches
Glass polishing is controlled material removal. It isn't the same as washing, and it won't safely correct every scratch. If a defect catches a fingernail, crosses a large viewing area, or has created a deep gouge, aggressive polishing can produce optical distortion before it produces a clean result.
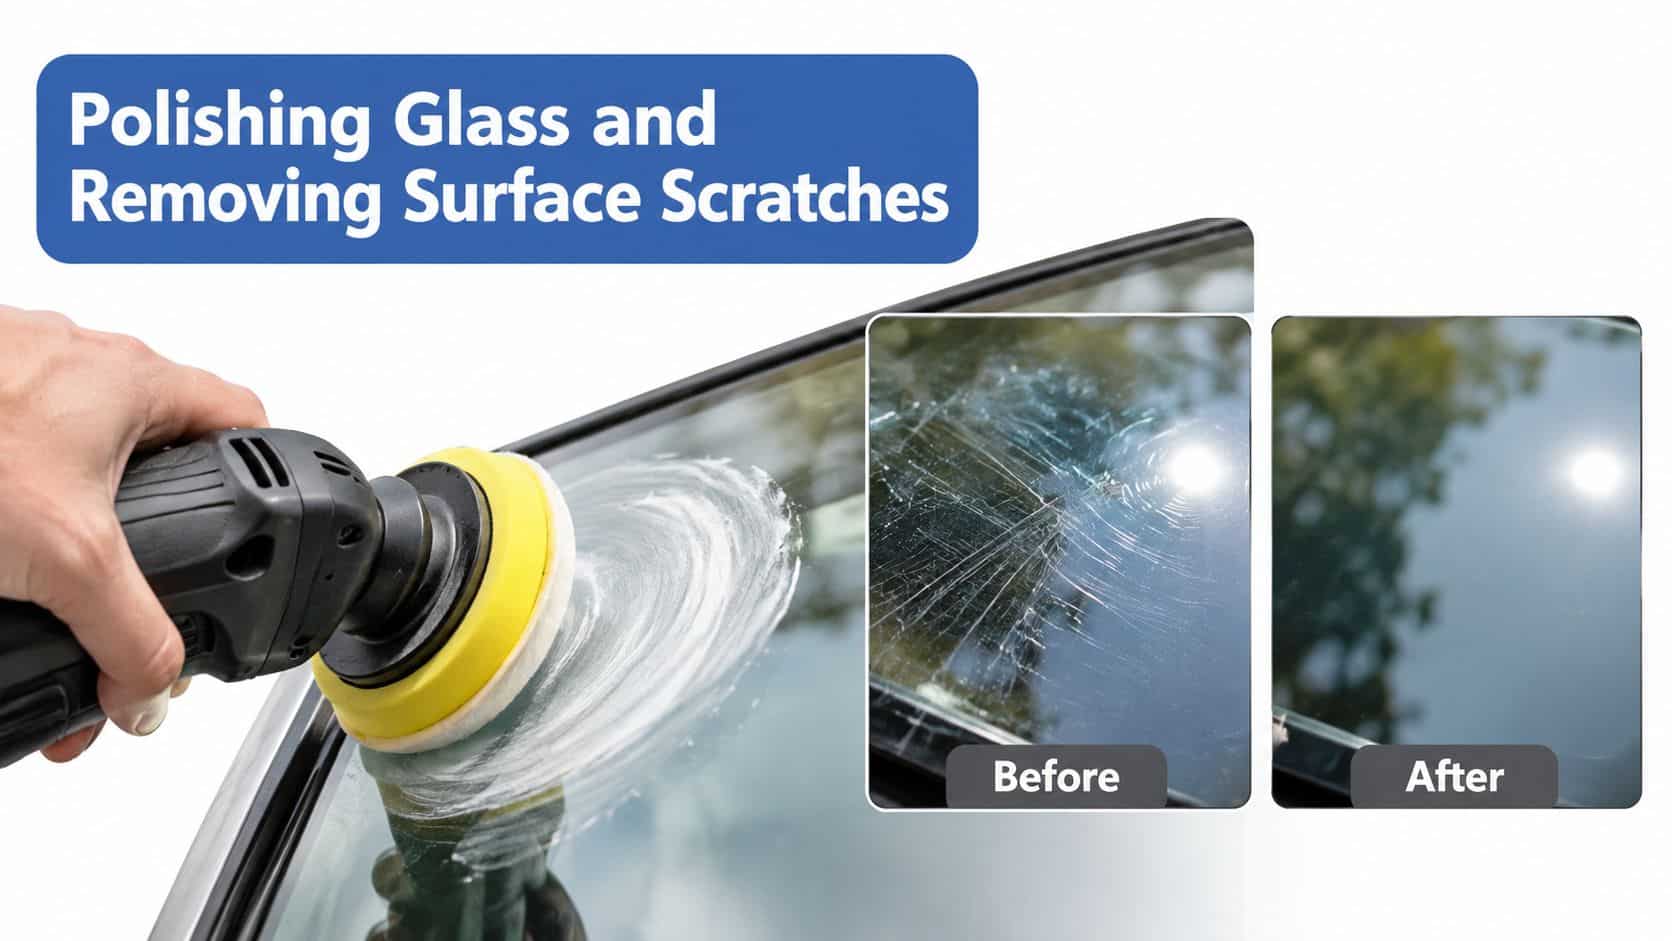
For light scratches, hard water marks, and surface etching, the working area must stay clean, cool, and damp. The International Window Cleaning Association recommends using the densest felt wheel available with a cerium-oxide slurry containing at least 70% pure cerium oxide. Its glass restoration field guide also emphasizes temperature control and inspection from multiple angles.
Prepare the pane and equipment
Clean the glass completely, then mark the defect so you don't lose it in the wet work area. Use a true rotary polisher, not an improvised drill attachment that makes speed and pressure difficult to control. A field method uses a working range of about 1000 to 1800 RPM, with overlapping cross-hatch passes and abrasive stages such as 180, 360, 500, and 1000 grit before the finishing compound.
Keep the slurry damp. If it starts to dry, stop and re-wet it rather than adding pressure. A dry compound drags across the pane, raises friction, and makes overheating more likely.
Work gradually
Begin with the least aggressive process that can address the defect. Hold the felt wheel flat, keep it moving, and use light, consistent pressure. Cross the defect in one direction, then change direction to create overlapping passes. This pattern helps expose uneven work instead of leaving a polished-looking strip that still distorts reflected light.
The common failures are predictable:
- Overheating: Heat can create visible distortion in the pane.
- Excess pressure: Heavy pressure removes glass unevenly and enlarges the damaged area.
- Dry slurry: Dried compound increases friction and reduces control.
- Skipping inspection: Haze and swirl marks can remain even when the original scratch looks less obvious.
Optical benchmark: Inspect the pane against a bright light from several angles. If you see haze, swirls, or a warped reflection, return to controlled polishing rather than declaring the repair complete.
Hard water deposits may need a different first step from scratch removal. Before using abrasive equipment, follow this guide on how to remove hard water stains from glass. Chemical or mechanical treatment should match the deposit and the glass condition. Polishing a mineral crust without removing loose contamination can grind debris across the surface.
Repairing and Reglazing Wood and Metal Frames
Reglazing is a structural repair. The glazing compound creates the seal between the pane and the frame, but it can only bond well when the rabbet, the channel holding the glass, is clean, stable, and properly prepared.

For cracked, broken, or missing panes, the U.S. General Services Administration specifies a sequence that applies to both wood and metal windows. The GSA procedure for replacing broken glass calls for removing damaged glazing, cleaning and priming the rabbet, installing new glass and glazing compound, and replacing cracked or missing putty.
Remove failed material without damaging the frame
Wear eye protection and cut-resistant gloves. Remove loose putty and failed compound with a sharp glazing tool, but don't lever aggressively against fragile wood or thin metal. If the pane is broken, stabilize the pieces before removal and support the frame so it doesn't twist.
Old coatings require additional caution. Historic wood windows may contain lead-based paint, so test suspect coatings and use lead-safe containment and cleanup practices. Heat tools can soften old paint and glazing, but don't direct heat at the glass. Excessive heat can break the pane, damage the frame, or release hazardous material.
Prepare the rabbet
Many reglazing jobs fail at this stage. Scrape out every loose fragment, brush away dust, and remove contamination from the glazing channel. Bare wood or metal should be primed before glazing. Damp, unstable, dirty, or unprimed surfaces reduce bond quality and allow water to work behind the seal.
Set the new pane on a compatible bedding layer, then retain it with glazing points or an equivalent system suited to the frame. Apply a continuous glazing seal with consistent contact. Avoid gaps, thin spots, and abrupt transitions at the corners.
The finished repair should shed water and hold the glass firmly without forcing the pane into a stressed position. Give compatible materials the time they need to cure before painting or operating the sash.
Account for metal frame problems
Metal assemblies may need corrosion treatment before new glazing. Rust under the glazing edge can lift compound, reduce the bonding surface, and continue spreading beneath fresh coatings. Review this resource on rust prevention for metal windows before sealing a frame with active corrosion.
If you're comparing repair methods for broken panes or damaged frames in another market, SuperiorPRO's guide to fix broken windows in Atlanta offers a useful example of how repair scope can vary by assembly and damage type. The principle remains the same in Arizona: preserve sound material, remove unstable material, and prepare the substrate completely.
Replacing Seals and Weatherstripping for Efficiency
A window can have clean glass and fresh glazing compound and still leak air around the sash. In Arizona, that leakage can make conditioned rooms uncomfortable and increase the temperature contrast at the interior surface. Replacing seals is often the step that turns a visually restored window into a more functional one.
Start by locating the actual leak. Check the meeting rail, side jambs, corners, pulley openings, and the perimeter where the frame meets the wall. A smoke pencil or a thin strip of tissue can help reveal moving air, but don't confuse a failed seal with a blocked weep path or a condensation problem caused by indoor humidity.
Match the seal to the movement
Compression weatherstripping works where the sash closes against a stop and compresses the material. Pile weatherstripping is better suited to sliding contact, such as channels where the sash moves vertically or horizontally. The seal must close the gap without making the window too tight to operate.
Caulk belongs at stationary joints, not along moving sash edges. Use a compatible exterior sealant at the frame-to-wall joint and repair open corners before installing new interior weather seals. A continuous seal is more useful than a heavy bead applied over dust, loose paint, or damp material.
The Department of Energy and ENERGY STAR identify restoration measures that can include caulking, weatherstripping, pulley and cord repairs, and sash-glass modifications. Their window replacement, rehabilitation, and repair guidance also connects condensation control with airtight interior surfaces, managed ventilation, and appropriate drainage or weep-hole design.
Treat condensation as a building problem
Condensation isn't automatically proof that the window needs replacement. It can indicate warm, humid indoor air contacting a cold surface, inadequate ventilation, or an assembly that allows uncontrolled air movement. Seal the interior side where appropriate, keep drainage paths open, and address moisture sources rather than just adding more caulk.
Storm inserts can provide another performance layer when the original frame is sound but the window remains drafty. Replacement is more appropriate when the sash can't close evenly, the frame is structurally compromised, or the glass assembly has failed in a way that restoration can't correct.
Don't pack weep holes with sealant. They need to discharge water from the track or frame. A sealed window that can't drain will trade an air leak for trapped moisture and eventual deterioration.
Maintaining Tracks and Screens for Smooth Operation
Desert dust turns a window track into an abrasive paste. Every opening cycle can drag that material across rollers, guides, and finished surfaces, so a sash that sticks isn't always suffering from a failed frame. Often, the track needs to be emptied before the hardware can be judged fairly.
Clean the track without grinding in the grit
Vacuum loose dust first with a narrow attachment. Follow with a soft brush and a barely damp cloth, working into corners without flooding the track. For stubborn deposits, use a plastic scraper rather than a metal blade that can gouge painted finishes or aluminum.
Inspect rollers and guides while the track is open. Replace cracked components instead of compensating with excessive lubricant. Heavy oil attracts more dust and creates a grinding compound, especially on exterior-facing assemblies.
Use a dry lubricant or a silicone-based product compatible with the hardware. Apply sparingly, move the sash through its range, and wipe away residue. The goal is smooth travel, not a wet track.
For a more detailed cleaning sequence, use this guide to clean window tracks.
Screens and drainage need equal attention
Remove the screen and clean it separately. Brush away dust, rinse gently, and inspect the spline, frame corners, and mesh. A small tear can spread when the screen flexes, while loose spline allows the mesh to sag and pull away from the frame.
Screen replacement requires even tension. Set the mesh over the frame, press spline into the channel progressively, and avoid stretching one corner so tightly that the opposite side bows. Trim only after the spline is seated and the frame remains square.
Clear weep holes with a soft probe or manufacturer-approved method. Don't enlarge them or block them with debris. Water needs a controlled exit from the track, and blocked drainage can keep wood damp or leave metal exposed to corrosion.
Operating hardware tells you whether the restoration is working. The sash should close squarely, the locks should engage without force, and the screen should seat without gaps. If those results don't appear after cleaning and adjustment, the issue may be bent hardware, a distorted frame, or a sash that needs disassembly.
Safety Protocols and When to Hire Professionals
Ground-floor restoration is within the reach of a careful homeowner when the pane is intact, the frame is accessible, and lead or structural hazards aren't present. The risk changes sharply on upper floors, commercial façades, sloped roofs, and high-rise condominiums. At that point, access planning and fall protection matter as much as glass-cleaning technique.
High-rise window washing commonly uses rope-descent systems with roof-level anchors, a working line, and an independent safety line. Those systems are designed for irregular façades and setbacks, but they depend on correct anchor selection, inspection, backup protection, and trained operation.
Verify access and insurance
In the United States, OSHA requires each rope-descent anchorage to be identified, tested, certified, and maintained to support 5,000 pounds in any direction for each attached worker. OSHA also limits rope-descent systems to 300 feet above grade, unless no other access method is feasible or safer. These requirements are summarized in this high-rise window cleaning safety guidance.
Property managers should request a current certificate of insurance, confirm workers' compensation, and verify general liability coverage of at least $1 million, as outlined in this commercial window cleaning risk guidance. For higher-risk work, ask for training records and applicable credentials such as OSHA 10 or OSHA 30, IRATA, or SPRAT.
A professional assessment should also account for fragile glass, historic coatings, active corrosion, inaccessible sashes, and façade conditions that aren't visible from inside. Don't send an untrained worker onto a roof because the glass looks like a simple cleaning job.
Use the right system for the building
Pure-water systems can reduce chemical use and ladder dependence. One manufacturer states that its systems can clean windows up to five stories without ladders or lifts, while another industry source says water-fed poles can reach up to 55 feet while keeping workers on the ground. The pure-water window cleaning system overview explains why purified water can dry without the mineral spotting associated with ordinary tap water.
For residential, commercial, and high-rise properties in Phoenix, Scottsdale, Paradise Valley, Chandler, Tempe, and Gilbert, South Mountain Window Cleaning, LLC provides window washing with pure-water systems and professional squeegees, along with screen and track care. The team is licensed, bonded, insured, and equipped for work ranging from homes to larger exterior maintenance projects.
DIY restoration has a place, but it has limits. If the glass is damaged at height, the frame needs lead-safe preparation, the roof access is uncertain, or the property requires recurring exterior service, hire a company that can document its safety practices and scope the work before tools go up.
South Mountain Window Cleaning, LLC can inspect and clean Arizona windows affected by desert dust, mineral deposits, worn screens, and difficult access, serving residential, commercial, and high-rise properties across the Valley. Visit South Mountain Window Cleaning, LLC to request a fast, free quote and choose the right service for restoring the appearance and function of your windows.