
You can usually tell when a roofline is about to turn into a weekend project. The box of generic clips is already in the cart, the ladder is out, and then you look up at a metal roof and realize the usual shingle tricks aren't going to help. That's where the right christmas light clips for metal roof make the difference between a clean seasonal setup and a mess of slip-offs, bent seams, or finish damage.
A metal roof changes the job. The surface is slicker than asphalt, the attachment points are different, and the wrong fastener can leave a problem long after the lights come down. On a roof system that was built for durability, the attachment method needs to protect that durability, not fight it.
Why Metal Roofs Need Specialized Light Clips
The most common mistake I see is simple. A homeowner buys a pack of universal holiday clips, climbs up expecting a quick install, then finds out the clips were made for shingles, not metal. On a standing-seam roof or a metal panel roof, those generic pieces either won't grip correctly or they'll encourage people to reach for nails, screws, or staples, which is exactly where roof damage starts.
That matters more now because holiday lighting is mainstream, not a niche habit. A 2024 Drive Research survey found that 48% of Americans hang Christmas lights outside their homes, which helps explain why roof-safe attachment methods have become a common need, not a specialty item. For homeowners in Phoenix, Scottsdale, Chandler, and the rest of the Valley, metal roofs are common enough that the attachment method has to match the roof, not the decorating aisle.
Practical rule: if the clip needs to puncture the roof to stay put, it's the wrong clip for a metal roof.
Metal roofing is built to shed water and last. That's good news for your home, but it also means the surface won't behave like asphalt shingles with exposed edges. Penetrating the roof can compromise the waterproof seal, and on a high-value roof system that's a repair nobody wants to create just to hang lights. A clean seasonal setup should leave the roof exactly as it was before the first clip went on.
South Mountain Window Cleaning's holiday lighting service follows that same mindset, with roofline attachment methods designed to stay removable and controlled, not destructive. If you want a visual of how that kind of roofline work fits into a home's exterior presentation, their Christmas lights on homes page gives a useful reference point.
Identifying Your Metal Roof Type Before Buying Clips
The first thing to verify is the roof material itself. That one detail decides whether magnetic clips can hold, whether seam clamps make sense, or whether you need a different non-penetrating system.
Ferrous or non-ferrous changes everything
A ferrous roof contains steel or iron, so magnets can hold. A non-ferrous roof, like aluminum, will not hold a magnet at all. That is why magnetic Christmas light clips can work well on some metal roofs and fail completely on others. The most practical field check is still a household magnet on a safe test spot at the roof edge. If it grabs firmly, you are dealing with a magnetic-friendly surface. If it slides or will not hold, that roof is not a candidate for magnetic attachment.
That test saves time and prevents bad assumptions. Painted coatings can reduce grip, weak magnets can slip in wind, and aluminum will never hold a magnetic clip no matter how solid the packaging looks. On a ferrous roof, I still watch for finish condition and panel shape before I trust a magnetic setup. On a non-ferrous roof, I move straight to seam clips or adhesive options instead of forcing a magnetic system to do a job it cannot do.
For homeowners who want to reduce corrosion risk on metal assemblies, South Mountain Window Cleaning's rust prevention for metal page is a useful related read, especially when the roof is part of a larger exterior maintenance plan.
Common roof profiles and what they mean for clips
Standing seam roofs are the easiest to work with because the raised seams give you a natural attachment line. Corrugated panels can also work with the right edge or seam-friendly clip, but they are less forgiving if you try to improvise. Metal shingles are different again, since the roof profile looks closer to traditional shingles while still requiring non-penetrating methods.
| Metal Roof Types and Compatible Clip Systems | Magnetic Clips | Seam Clamps | Adhesive Clips |
|---|---|---|---|
| Steel or iron roof surfaces | Works well | Can work on standing seam styles | Sometimes used when needed |
| Aluminum roof surfaces | Does not work | Works when seam profile allows | Often needed |
| Standing seam profiles | Often works if material is ferrous | Best fit | Fallback option |
| Corrugated or formed panels | Sometimes usable | Limited by profile | Used where surface prep allows |
The right choice comes from the roof, not the light kit box. Measure the roof edge, identify the metal type, then match the clip to the surface. That order avoids wasted money, extra ladder trips, and the kind of hardware mix-up that leaves high-value roof systems scratched, bent, or fitted with the wrong attachment method.
Step-by-Step Installation Process for Metal Roofs
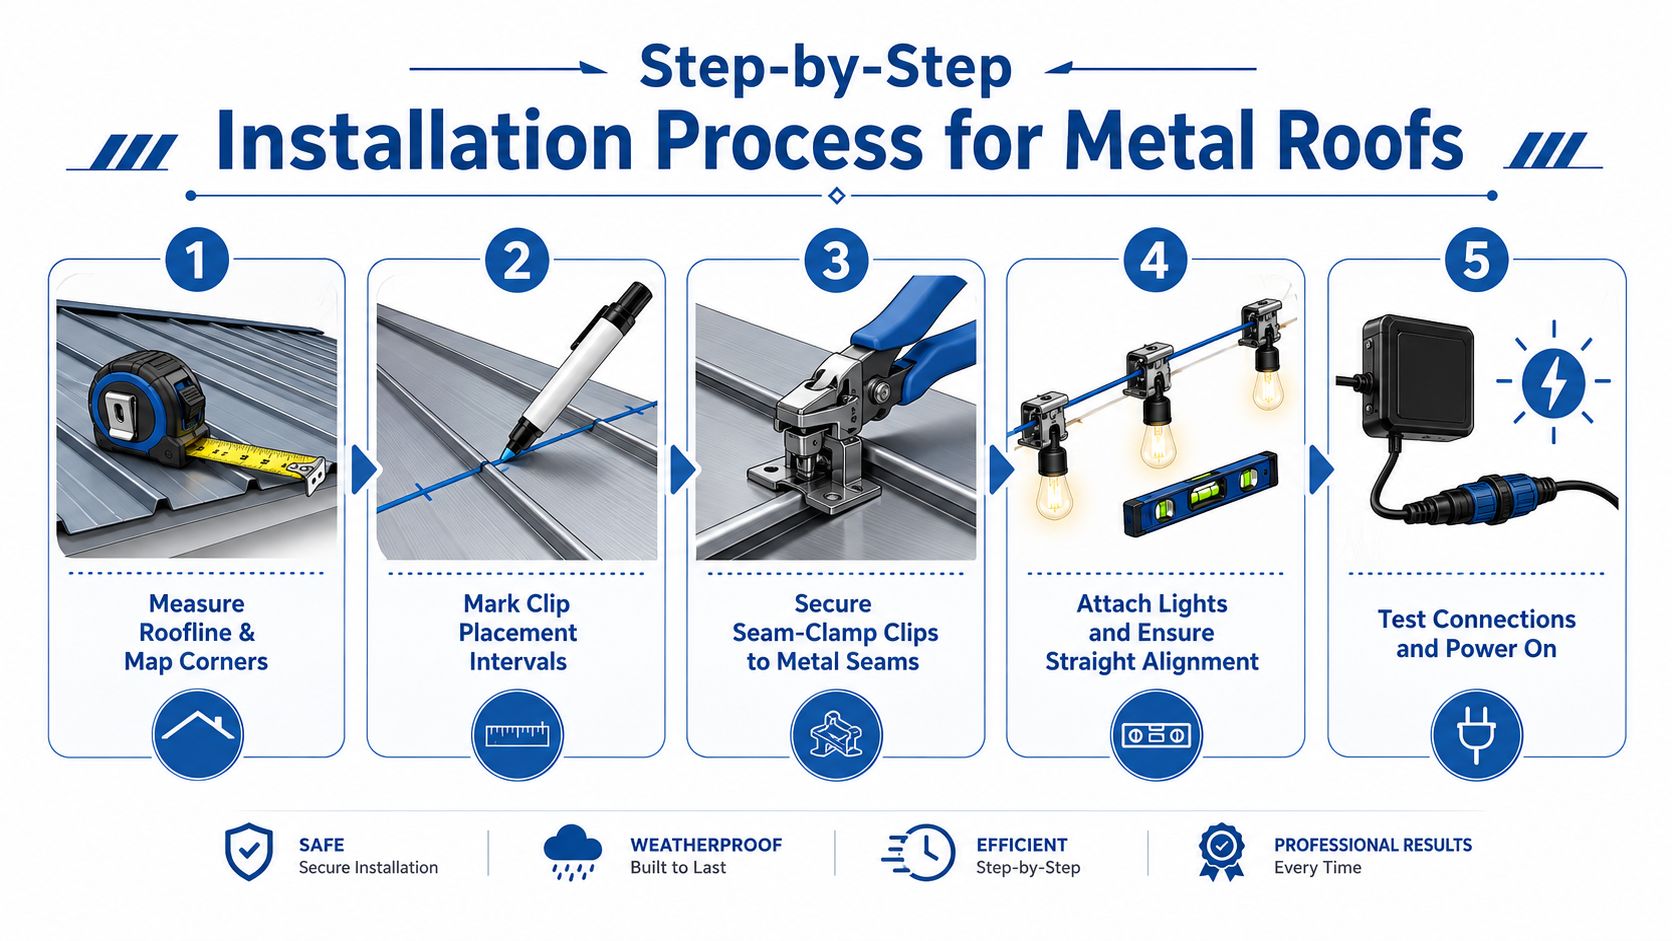
A straight roofline starts with the roof itself, not the first clip. I measure the edge, identify the metal type, and mark every corner, valley break, and jumper before I go up with lights in hand. On Arizona metal roofs, that prep saves time and protects painted panels, because a line that starts off-center will drift, sag, or kick out at every change in direction.
Set the layout before climbing high
Clip spacing should match the bulb style and the roof surface. For mini lights, one expert guide recommends one clip every 12 inches. For larger bulbs like C7 or C9, the spacing tightens to one every 8 inches UGC PH guide on hanging Christmas lights on metal roofs. On a 100-foot roofline, that can mean roughly 100 to 150 clips, depending on the bulb size and the path the run takes across the roof. The goal is simple, keep the line even and keep the load distributed without stressing the finish.
Start at the corners, not the middle. A roofline anchored at the endpoints stays straighter and is much easier to tension correctly.
Ferrous and non-ferrous surfaces change the whole plan. Steel and iron can accept magnetic hardware, while aluminum will not hold a magnet, so the clip choice has to follow the metal, not the lighting kit.
Build the line in order
Standing seam roofs give you the cleanest attachment path because the raised seam holds a clamp without drilling into the panel. That is the safest approach for high-value roof systems that need to stay watertight and unmarked. On ferrous panels, I test magnet hold on-site before I commit to a run, then place clips at the socket or support points that match the bulb style. For C7 and C9 strings, the spacing at each socket keeps the line controlled and reduces bounce in wind Christmas Light Source magnetic clips.
Once the clips are set, hang the lights and step back before you add any more sections. A crooked run usually means the first anchor point was off, not that the roof is the problem. Wind is another real factor, so keep cords tidy, remove slack, and avoid loose loops that can tug on seams or pull a line out of shape. If you want to see how a full residential roofline install gets organized, the Christmas light setup page is a useful reference.
Use a simple safety sequence
- Inspect the roof and ladder setup before going up.
- Measure the roofline and mark corners, ends, and any jumps.
- Place clips at the correct spacing for the bulb size.
- Hang the lights and step back to check the line.
- Test the connections and power on only after everything is secure.
A clean install comes from the layout, the spacing, and the decision to use the right attachment method for the roof metal. Get those three right and the line stays straight, the finish stays intact, and the roof avoids the kind of clip damage that turns a holiday job into a repair call.
Comparing Magnetic, Seam-Clamp, and Adhesive Clip Options
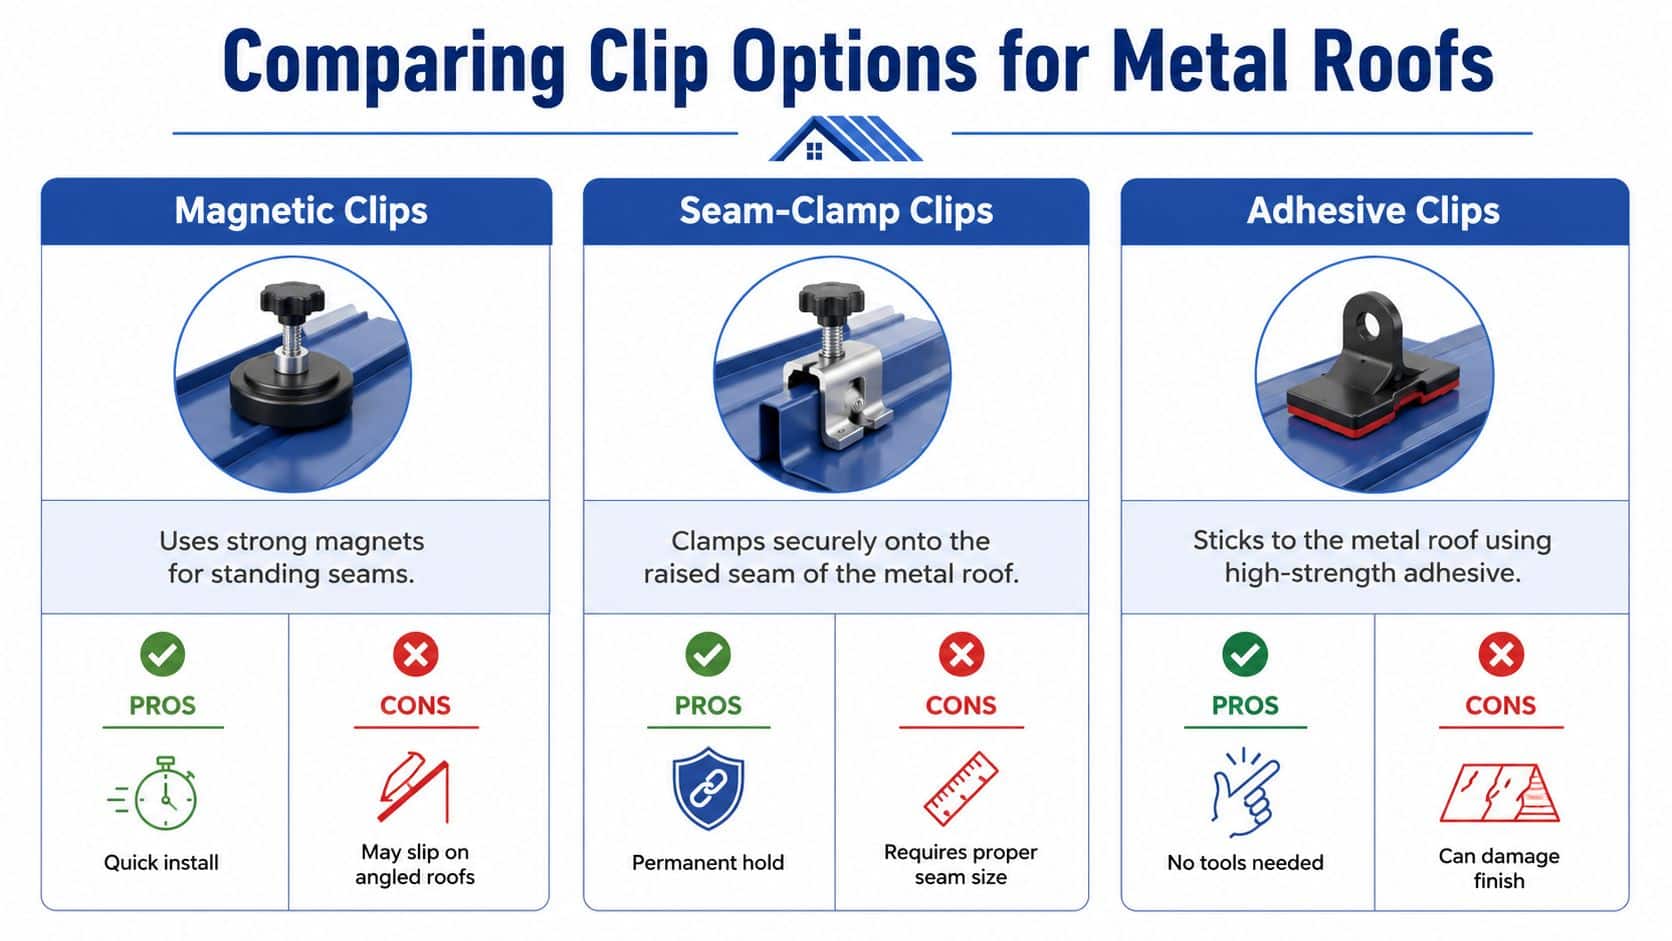
On a metal roof, the clip choice usually comes down to what the roof is made of, how the panels are formed, and how much finish protection you need to preserve. A ferrous steel roof gives you different options than aluminum, and that difference matters more than most shopping guides admit. I have seen good clips fail because the installer treated every metal roof like the same surface.
Magnetic clips
Magnetic clips are the fastest choice on ferrous steel or iron roofs. They go on cleanly, need no penetration, and let you move quickly across straight runs and small corrections. They are a poor match for aluminum, because aluminum is non-ferrous, and they can also lose grip on heavily painted, chalky, or slick-coated panels.
In the field, magnetic clips are best when the surface test is already settled and the roof finish is in good shape. If the magnet only grips weakly, the run will usually drift once wind load and temperature changes start working on it. That is where the roof material decides the method, not the installer's preference.
Seam-clamp clips
Seam-clamp clips are the right fit for standing-seam roofs when the seam profile matches the clip. They clamp without drilling, which keeps the panel surface intact and avoids the kind of point damage that can turn into a service call later. On a premium roof system, that no-penetration setup is the main reason I use them.
Fit is the trade-off. A clamp that is even slightly wrong for the seam shape can twist, slip, or pinch too hard, and that is a bad outcome on a roof with a high-value finish. The best result comes from matching the clip to the actual seam profile, then spacing it consistently so the line stays straight under wind movement.
Adhesive clips
Adhesive-backed clips are the fallback when the roof will not take magnets and the seam profile does not suit a clamp. They can work on the right surface, but only if the panel is clean, dry, and prepared well before the first clip goes down. Surface contamination, moisture, and heat all reduce bond quality, so this is the option that leaves the least room for shortcuts.
They also ask for the most care during removal. On coated or fragile finishes, bad adhesive cleanup can leave residue or mark the surface if the clip is pulled off too aggressively. For that reason, adhesive clips make sense for limited problem areas, not as the first choice for a full roofline when a better attachment method is available.
Professionals prefer non-penetrating clips because they protect the roof assembly better than staple-secured runs. A comparative analysis reported zero measurable granule loss after 90 days of simulated winter exposure with properly installed clips, while staple-secured sections showed 12 to 18% localized granule depletion under the same conditions UGC PH guide on hanging Christmas lights on metal roofs. That comparison was not limited to one roof type, but the point still holds for metal systems, if you avoid penetration and match the clip to the surface, you reduce the chance of finish damage.
If you want a service-based option instead of doing it yourself, South Mountain Window Cleaning does offer Christmas light installation and removal as part of its exterior service lineup, which can help homeowners who would rather stay off the roof.
Common Installation Mistakes and How to Avoid Them
The worst holiday-light problems usually come from small decisions made too early. Someone skips the magnet test, starts in the middle of the roofline, or assumes a tighter clip pattern will automatically look better. In practice, those shortcuts create the exact failures they were supposed to avoid.
The mistakes I see most often
- Skipping the surface test. Magnetic clips depend on a ferrous surface, so a quick household magnet test should happen before the first clip is bought or installed. If the magnet won't hold, the system won't either.
- Anchoring in the middle first. That usually leaves the line crooked because the corners never got established as fixed points.
- Forcing the wrong clip on the wrong seam. Standing-seam roofs need a clamp that fits the profile, not a generic accessory that squeezes too hard.
- Overcrowding or under-spacing the clips. Too few clips lets the line sag, but random extra clips don't fix a bad layout.
A light run looks professional when the spacing is consistent and the corners are controlled. It looks amateur when the installer keeps correcting the line one clip at a time.
What actually solves the problem
Painted and low-adhesion surfaces are a common reason magnetic clips fail, especially when wind loads pick up. The cure is not to “make it work harder,” it's to switch to the correct clip type for the roof material. On standing seam roofs, drilling holes is the error that causes the most lasting trouble because it creates leak paths and can violate the roof's intended assembly.
I see the same pattern on homes that have beautiful roofing and cheap holiday hardware. The roof survives the first season, then the finish starts showing wear where the clips were over-tightened or repeatedly adjusted. That's why a clean install is less about force and more about matching the attachment to the roof geometry.
Maintenance, Troubleshooting, and Seasonal Storage
A good install still needs care once the season ends. Clips that stay dirty, bent, or stored wet rarely perform as well the next year, and light lines that were never checked before removal tend to tangle or fail the following season. The lifecycle matters as much as the install.
Keep the hardware clean and dry
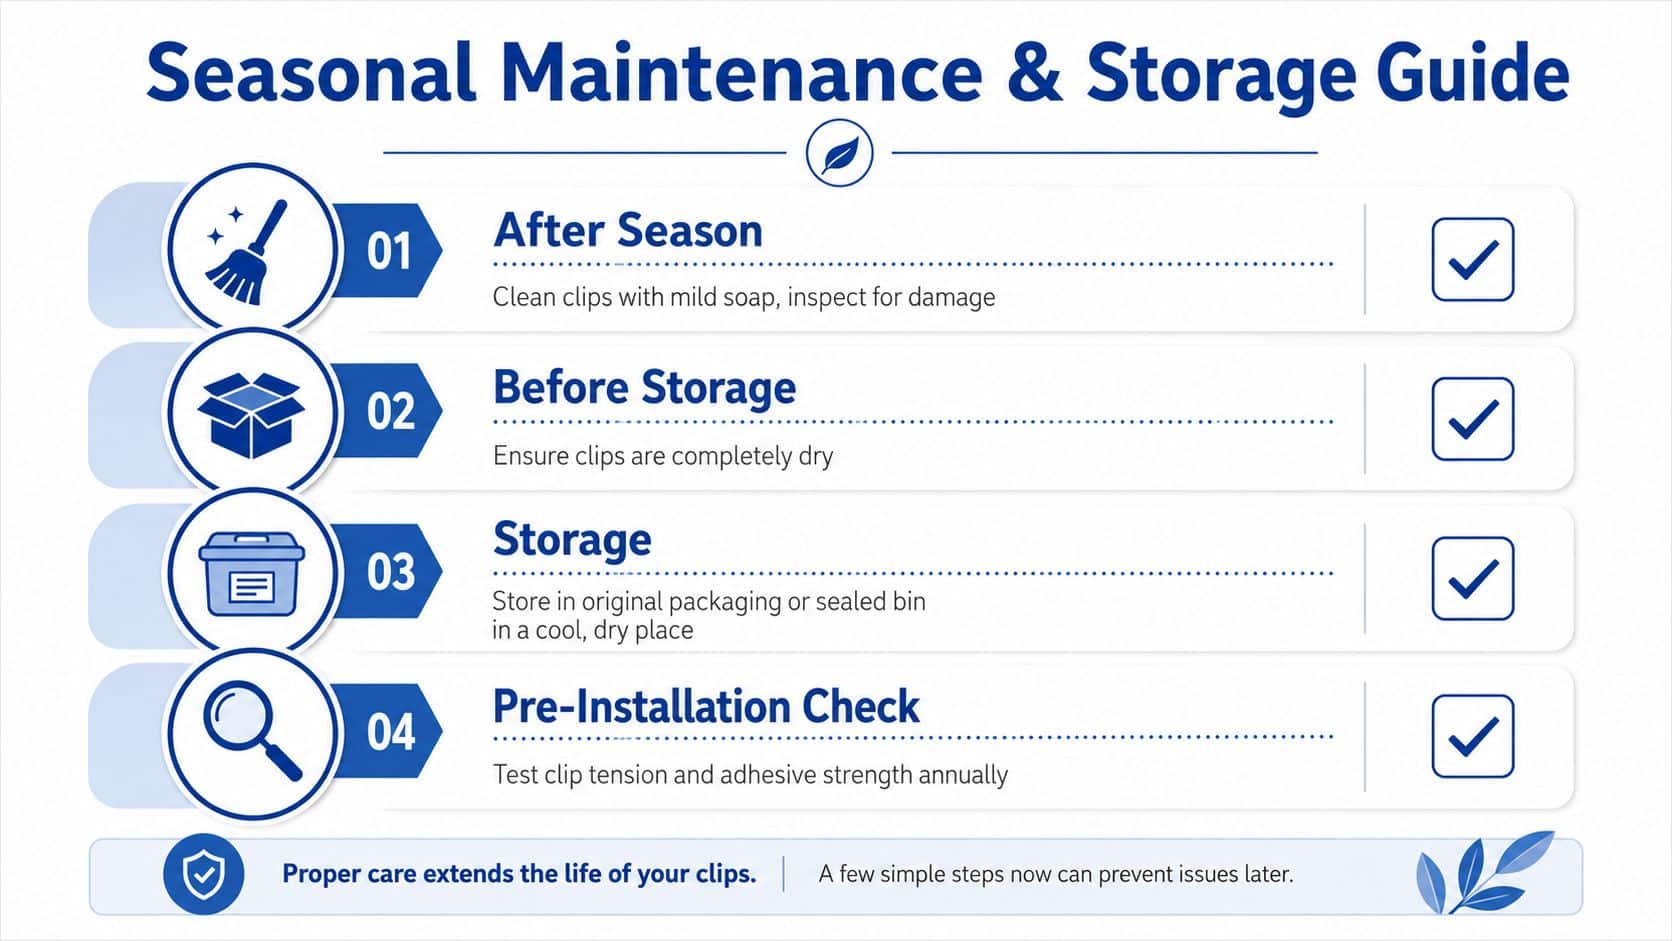
After the season, remove the clips carefully and wipe away dust, pollen, and residue with mild soap and water. Magnetic clips last longer when they're stored clean and dry, because corrosion and grime reduce performance over time. If a clip shows wear, bent hardware, or weak hold, replace it before the next install instead of gambling on one more year.
Troubleshoot before the ladder goes up
If lights won't stay attached during wind, the problem is usually hold strength, spacing, or surface compatibility. A roofline that looked fine in calm weather can reveal its weak points once the first gust hits. Before the next season starts, test the clips on the ground, inspect the cords, and make sure the attachment plan still matches the roof material.
Store each set in a sealed bin or its original packaging, and keep it in a cool, dry place.
Test before the season starts
A pre-installation check saves a lot of time. Inspect the clip tension, confirm adhesive strength where applicable, and test the light strings before climbing. If you use a tester for the bulbs and connections, South Mountain Window Cleaning's bulb tester for Christmas tree lights page is a relevant companion reference for anyone keeping holiday lighting in working order.
For steep roofs, high roofs, or commercial properties, this is also where a professional service starts to make sense. Clean removal, proper storage, and a careful re-installation plan protect both the lights and the roof, which is the whole point of using clips in the first place.
South Mountain Window Cleaning, LLC handles residential, commercial, and high-rise exterior work across the Valley, and that includes Christmas light installation and removal with a focus on roof-safe methods. If you want help with metal roof lighting, window cleaning, or other exterior maintenance in Phoenix, Scottsdale, Paradise Valley, Chandler, Tempe, or Gilbert, visit South Mountain Window Cleaning, LLC to request service and get a closer look at what they offer.