

You've probably got a sprinkler head that's now in the wrong place. Maybe a new walkway covers its spray pattern, a planting bed has changed, or you're reworking an irrigation zone and want that one head gone. Removing the head is easy. Capping it correctly is what keeps the repair from becoming a hidden leak.
A visible cap can stop water at the head, but it doesn't always mean the underground branch line has been permanently taken out of service. That distinction matters in a Phoenix yard, where dry soil can hide a slow leak until plants decline, a patch of ground stays damp, or water reaches nearby masonry. This guide explains how to cap off a sprinkler head, how to test the repair, and when the better choice is to isolate the lateral line instead.
Why Proper Sprinkler Head Capping Matters
A homeowner often starts with a simple observation: one head is spraying against a wall, into a future hardscape area, or across a section of ground that no longer needs irrigation. The quick fix is to unscrew the head and install a cap. That can work, but only if the cap matches the fitting, seals properly, and leaves the rest of the zone operating as intended.
An irrigation zone is a pressurized network. When the valve opens, water travels through the main supply and lateral piping to each connected head. A missing head, loose fitting, cracked riser, or mismatched cap becomes a weak point. Water may escape underground even when the surface looks dry, wasting water and gradually washing soil away around the connection.
Practical rule: A cap should stop flow at a sound threaded connection. It shouldn't be used to hide damaged pipe or an unidentified fitting.
That's why a proper repair deserves the same attention as other routine property maintenance. Homeowners already use an annual home maintenance checklist to catch small issues before they become expensive repairs. A capped sprinkler connection belongs on that same mental list, especially near foundations, retaining walls, patios, and newly installed hardscape.
The history of sprinkler caps also shows that a cap isn't merely decorative hardware. Henry S. Parmelee patented the first practical automatic sprinkler head in 1874. By 1875, his design used a cap held by solder over a perforated distributor, allowing heat to melt the solder so water pressure could release the cap and discharge water, as described in this historical sprinkler systems handout. Modern irrigation caps serve a different purpose, but the underlying lesson remains useful: the closure must work reliably under pressure.
Gathering the Right Tools and Materials
The cap is only as reliable as the connection below it. Before digging, identify whether you are removing a head from a riser, closing a fitting, or dealing with a branch line that may need to be abandoned farther back. Buying hardware by appearance alone can leave the underground branch pressurized, creating a leak risk even after the visible head is gone.

Match the cap to the connection
Residential irrigation commonly uses threaded connections around 1/2 inch or 3/4 inch NPT. Confirm the size rather than judging it by sight. Measure the fitting, or take the removed head to an irrigation supplier. Similar-looking irrigation threads are not always interchangeable.
A cap fits over male threads, such as the exposed end of a riser. A plug fits inside female threads, such as an opening in a fitting. Choose based on what remains after removal, and confirm that the fitting material is suitable for the product.
Gather these materials:
- Compatible cap or plug: Match the actual irrigation fitting and material, including PVC, poly pipe, or another listed component.
- PTFE tape: Apply it sparingly to compatible male threads when the fitting design calls for a threaded seal. Wrap it in the tightening direction so it does not unwind inside the fitting.
- Thread sealant: Pipe dope can suit some materials. Do not combine sealants casually, and check compatibility with plastic and pipe material.
- Hand trowel or small shovel: A narrow tool gives better control around the riser and lateral line than forceful digging.
- Adjustable pliers: Use them on a stubborn head, with enough control to avoid crushing or twisting a fragile riser.
- Clean rag and small brush: Dirt in the threads can keep the cap from seating correctly.
- Water and flashlight: Use them to clear loose soil, inspect the connection, and spot seepage.
- Temporary marker or flag: Mark the location before backfilling so the capped point and possible branch route are easier to find later.
For a practical overview of household equipment, this expert-led tool guide can help you assemble a useful kit without buying specialty tools you will rarely use. Treat digging as a safety task too. If the work involves ladders, walls, or raised access elsewhere on the property, review suitable ladder safety equipment first.
The short video below demonstrates the general hands-on work. Use it as a visual reference, not as a substitute for matching the fitting or deciding whether the underground branch line also needs to be closed.
Executing the Cap-Off Process
Start by shutting off the irrigation zone or the system supply, depending on how your valves are arranged. Activate the zone briefly, if needed, to relieve pressure, then turn the controller off. Don't loosen a sprinkler head while the line is still pressurized. Water under pressure can turn a small fitting problem into a muddy excavation and can force dirt into the open connection.
Expose the head carefully. Practical irrigation guidance describes digging a small area around the head, approximately a 1 to 2 inch radius, before unthreading it, as outlined in this sprinkler head capping guide. Keep the trowel shallow as you approach the body. The goal is to expose the head and riser without nicking the lateral pipe or levering the fitting sideways.
Inspect before installing
Hold the sprinkler body steady and turn the head counterclockwise. If the riser begins twisting, stop and expose more of the connection. A twisted riser can loosen below grade, and forcing it may damage the lateral fitting.
Once the head is removed, inspect the male threads. Remove grit with a rag or soft brush, and look for flattened, cracked, or cross-threaded sections. A clean thread should accept the cap smoothly by hand. If it binds immediately, the problem may be compatibility or damaged threads, not insufficient tightening.
Apply PTFE tape only to clean, compatible male threads. Keep the tape away from the opening so loose material can't enter the line. Start the cap by hand and turn it until it seats. The connection should remain aligned, and you shouldn't need excessive force.
A tight cap isn't automatically a good cap. Over-tightening can crack a plastic fitting, distort the threads, or damage the riser. Those failures often create the slow leaks the repair was meant to eliminate.
The irrigation capping instructions also emphasize hand-tightening and checking the seal under pressure. After installing the cap, run the zone briefly before backfilling. Look and feel around the fitting for moisture, then shut the zone off and inspect again after pressure drops.
Backfill with the soil you removed, keeping rocks away from the threaded connection. Tamp the soil lightly in layers so the cap doesn't shift, but don't compact it aggressively against a brittle riser. Restore the turf or surface only after you're satisfied that the connection is dry.
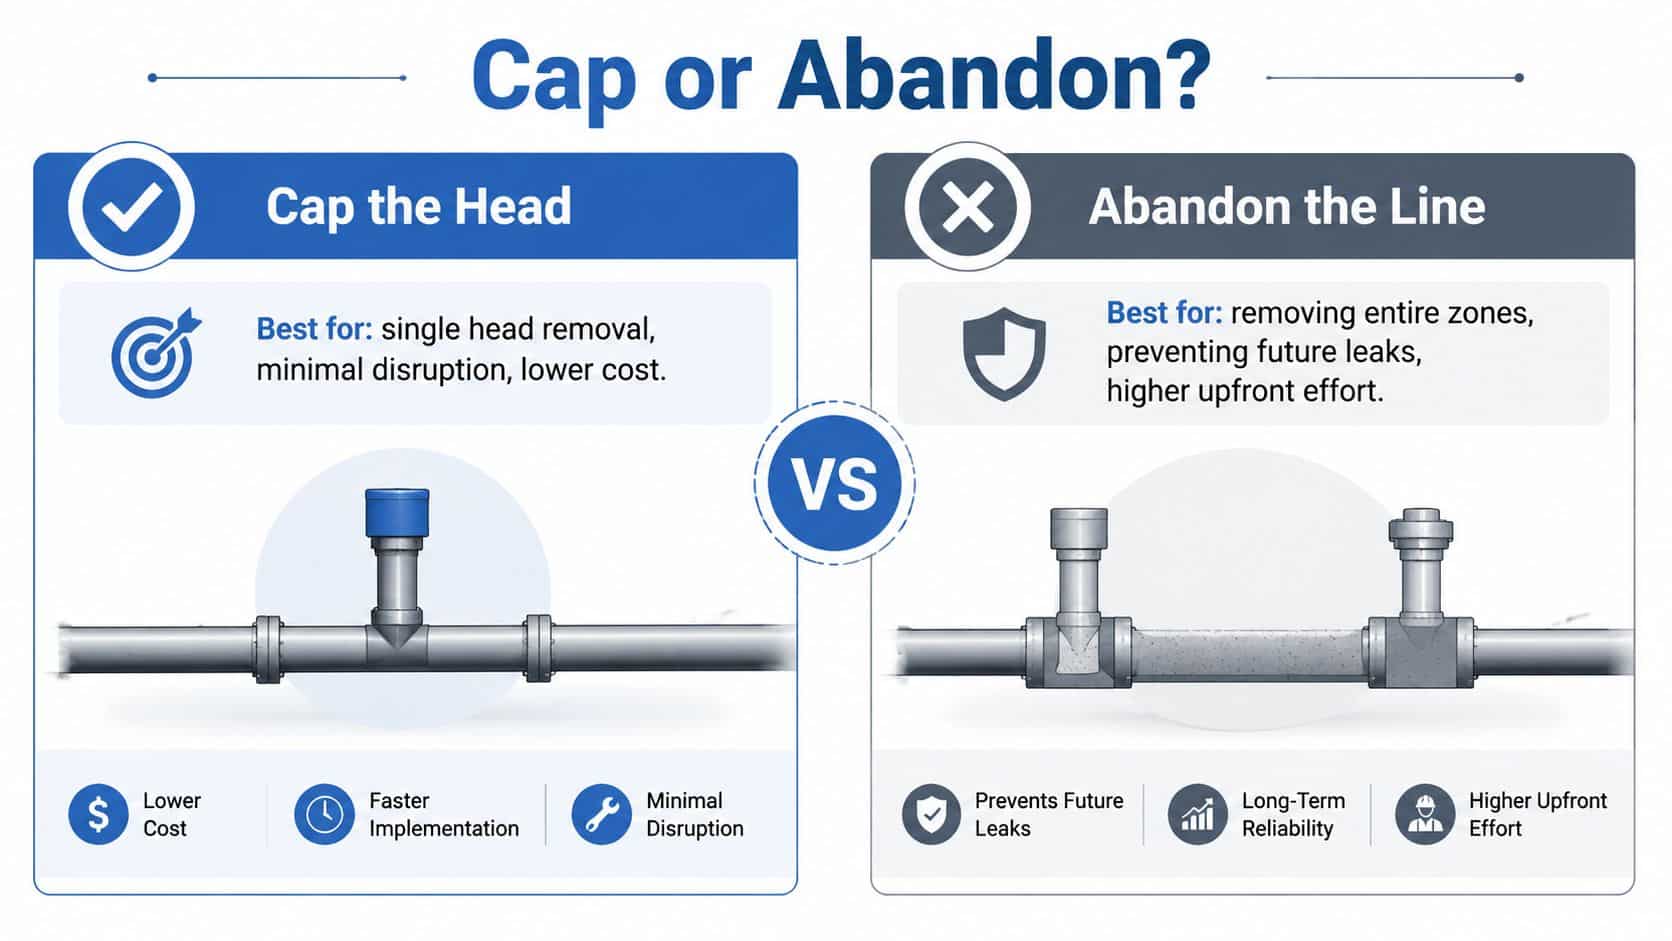
Capping the Head Versus Abandoning the Line
If you are moving a planter and may restore the sprinkler later, capping the head is usually the practical choice. The cap closes the opening at the riser, while the underground lateral stays connected to the zone and fills whenever the valve opens. Abandoning the branch requires tracing it, exposing a suitable section, and cutting and sealing the pipe farther upstream.
When a head cap makes sense
A head cap suits a single unwanted head when the lateral remains useful and the fitting can still be reached for service. It keeps the repair contained and leaves the connection identifiable for a future owner or technician. This approach also fits a temporary zone adjustment, such as changing a planting bed.
The buried branch will still be pressurized during each irrigation cycle. A sound cap and riser can handle that pressure, but an aging fitting, stressed pipe, or damaged thread creates a concealed leak point. A cap at the surface therefore controls the opening without removing the branch from service.
When line abandonment is better
A patio, concrete path, pool deck, or masonry feature can make a capped head inaccessible. Before that work is installed, isolating the lateral may provide better long-term control. The same choice applies when an entire irrigation zone is being removed or redesigned. A technician can trace the lateral, expose sound pipe, cut it, and install a compatible end closure or capped fitting.
This work requires accurate pipe identification. Cutting the wrong line can disable other heads, and buried irrigation layouts are often undocumented. Avoid blind excavation near utilities, structural footings, or established trees.
| Situation | More suitable approach | Main trade-off |
|---|---|---|
| One unwanted head, usable zone | Cap the head | Minimal excavation, branch remains connected |
| Temporary zone adjustment | Cap the head | Easy to reverse, but future inspection remains important |
| Entire zone removed | Abandon the line | More work now, fewer connected points later |
| Head beneath future hardscape | Consider line isolation | Better access planning, greater excavation |
| Damaged riser or lateral | Repair or reconfigure | A cap alone may conceal a larger failure |
The visible head does not always identify the right repair location. Buried water-line work also depends on access and pipe condition, as explained in this overview of water line repair for homes. Use the head cap when future access and branch use matter. Choose line abandonment when permanent construction will hide the connection or the branch no longer serves a purpose.

Testing Your Work and Troubleshooting Issues
Don't judge the repair by whether the sprinkler stops spraying. Judge it by whether the capped connection stays dry while the zone is operating and after the valve closes.
Turn the zone on for a short test cycle and watch the excavation. A good connection remains dry at the cap, riser, and nearby soil. If you see a bead of water forming, shut the system down, remove pressure, and inspect the threads rather than tightening harder.
Read the symptoms
- Slow seepage at the cap: The cap may be loose, cross-threaded, mismatched, or installed over dirty threads. Remove it, clean the connection, and check the fit. Fresh PTFE tape may help only when the threads are sound and compatible.
- Water emerging beside the riser: The lateral fitting or riser may be cracked below the visible connection. Expose more of the assembly before deciding that a new cap will solve it.
- Pressure loss across the zone: A capped head shouldn't create a new pressure problem when the connection is sound. Look for another leak, a valve issue, a damaged lateral, or a head that's still partially open.
- Unexpected activation: If water appears at the capped location only when the zone runs, the cap is not sealing or the line has another failed component. If the controller activates the zone unexpectedly, inspect scheduling and valve operation separately.
- Wet soil after irrigation: Soil can retain moisture after testing, so compare the area with nearby ground. Persistent saturation, a growing wet spot, or unusually lush growth deserves another inspection.
A post-installation check should include the capped fitting, the surrounding soil, and the rest of the zone. Walk the line while the system runs, then inspect again after the zone shuts off. Recheck the area over subsequent watering cycles and after dry weather, when unexplained dampness is easier to identify.
If the threads are damaged, the fitting is cracked, or the cap won't seat smoothly, replace the defective component. More tape won't repair missing thread material. Avoid burying the connection until you've confirmed that it holds pressure without seepage.
This same habit applies to other hidden water problems. A resource on dealing with a frozen drain pipe reinforces the broader maintenance principle: investigate moisture at its source instead of covering the visible symptom.
Recognizing When to Call a Professional
A single accessible head on a healthy irrigation system is often manageable for a careful homeowner. The job changes when several heads must be removed, the system has brittle or sun-damaged components, or the connection is tied into a main line or complicated valve arrangement.
Call an irrigation professional when you can't identify the pipe configuration, when excavation reveals cracked fittings, or when a cap continues to seep after correct installation. A professional can trace the lateral, isolate the appropriate branch, test the zone, and avoid disabling heads that still serve the area.
Commercial properties, rental communities, and HOA-managed sites may also have maintenance rules, contractor requirements, or approval processes. Before hiring, ask whether the technician works on your pipe material, whether they'll test the zone after the repair, and whether the estimate covers restoration of soil, turf, or hardscape. Don't choose solely on the promise of a quick cap.
The same judgment applies to work around rooflines and exterior structures. If a sprinkler problem is part of a larger property-maintenance project, use a qualified provider and follow the safety practices described in this guide to clean gutters safely, rather than combining unrelated high-risk tasks without proper equipment.
South Mountain Window Cleaning, LLC provides residential, commercial, and high-rise window washing across Phoenix, Scottsdale, Paradise Valley, Chandler, Tempe, Gilbert, and surrounding Arizona communities, with safety-trained technicians for demanding exterior work. Visit South Mountain Window Cleaning, LLC to request a fast, free quote for window cleaning and related exterior maintenance.