
You walk outside in Phoenix, look up at a gutter line, dryer vent, awning, or the shaded edge under a solar panel, and there it is. Twigs packed tight, feathers caught in the corners, droppings on the stucco, maybe birds flying in and out. A common first instinct is to knock it down and clean the mess.
That's where trouble starts.
Bird nest removal isn't just a housekeeping task. It's a legal question, a ladder safety question, and a sanitation question. On Arizona homes and commercial buildings, it also ties directly into exterior maintenance. Nests show up where water collects, where heat escapes, where ledges stay protected, and where routine cleaning has been delayed.
A good response is calm and methodical. Check whether the nest is active. Confirm whether removal is legal. Decide if the location is safe to access. Then remove, clean, and block the spot so you're not dealing with the same issue again next season.
Assess Before You Act: Is Removal Legal and Safe
You spot a nest tucked behind a gutter elbow or under the edge of a solar panel, grab a ladder, and assume the job will take five minutes. That is the point where small mistakes turn into legal trouble, a fall, or a contaminated mess spread across the wall below.
On Arizona properties, the first question is simple. Is the nest active, and are you allowed to remove it right now?
The U.S. Fish & Wildlife Service states that active nests generally cannot be removed without a migratory bird permit, and some inactive nests can still fall under other protections depending on species and circumstances. U.S. Fish & Wildlife Service guidance For homeowners and property managers, that means bird nest removal starts with identification and observation, not with tools.
What active means in plain English
A nest should be treated as active if it contains eggs, chicks, or young birds still being fed, or if adult birds are regularly returning to it. The National Audubon Society explains that many native bird nests are protected during active use, even when the nest looks unattended for part of the day. Audubon guidance on bird nest disturbance
That is why a quiet nest is not the same as an abandoned nest. Parent birds leave to forage, cool off, or stay out of sight. In Phoenix, I see this misunderstanding often around patio covers, vent hoods, and second-story ledges where people assume no movement means no problem.
Practical rule: If you cannot confirm a nest is inactive, treat it as active.
How to check without disturbing the nest
Start from the ground. Watch the area for a few minutes at different times of day if needed. Repeated trips by birds to the same ledge, vent, beam pocket, or roofline usually mean the nest is still in use.
If the location can be viewed safely without touching anything, use:
- A flashlight for dark vents or soffit gaps
- A phone camera zoom for high ledges and awnings
- A small inspection mirror for corners hidden behind trim or equipment
Look for:
- Eggs
- Chicks
- Fresh nesting material
- Regular bird traffic
Do not prod the nest, spray it, or pull material out to “check inside.” That can injure birds and create a legal problem fast.
Check the access risk, not just the nest status
A legal removal can still be an unsafe removal.
Nests often show up in the same places that already create service hazards: behind clogged gutters, above entry canopies, inside dryer or bath vents, under roof tiles, and beneath solar panels. On Phoenix homes, ladder setup on decorative rock, hot concrete, or uneven stucco bands is a common problem. Tile roofs add another layer of risk because one bad step can crack tiles, damage underlayment, or send someone sliding.
If access puts you near upper gutters or roof edges, use the same caution you would for how to clean gutters safely. In practice, the access issue is often what turns a simple cleanup into a job for a pro.
Sanitation matters too
Even an old, legal-to-remove nest can leave behind droppings, mites, and dusty debris on stucco, glass, screens, vents, and panel frames. That matters on homes where nest buildup overlaps with window cleaning, solar panel cleaning, or gutter maintenance, because disturbing the material can spread contamination across surfaces you still need to service. For cleanup basics after removal, review VirusFAQ's cleaning and disinfecting guide.
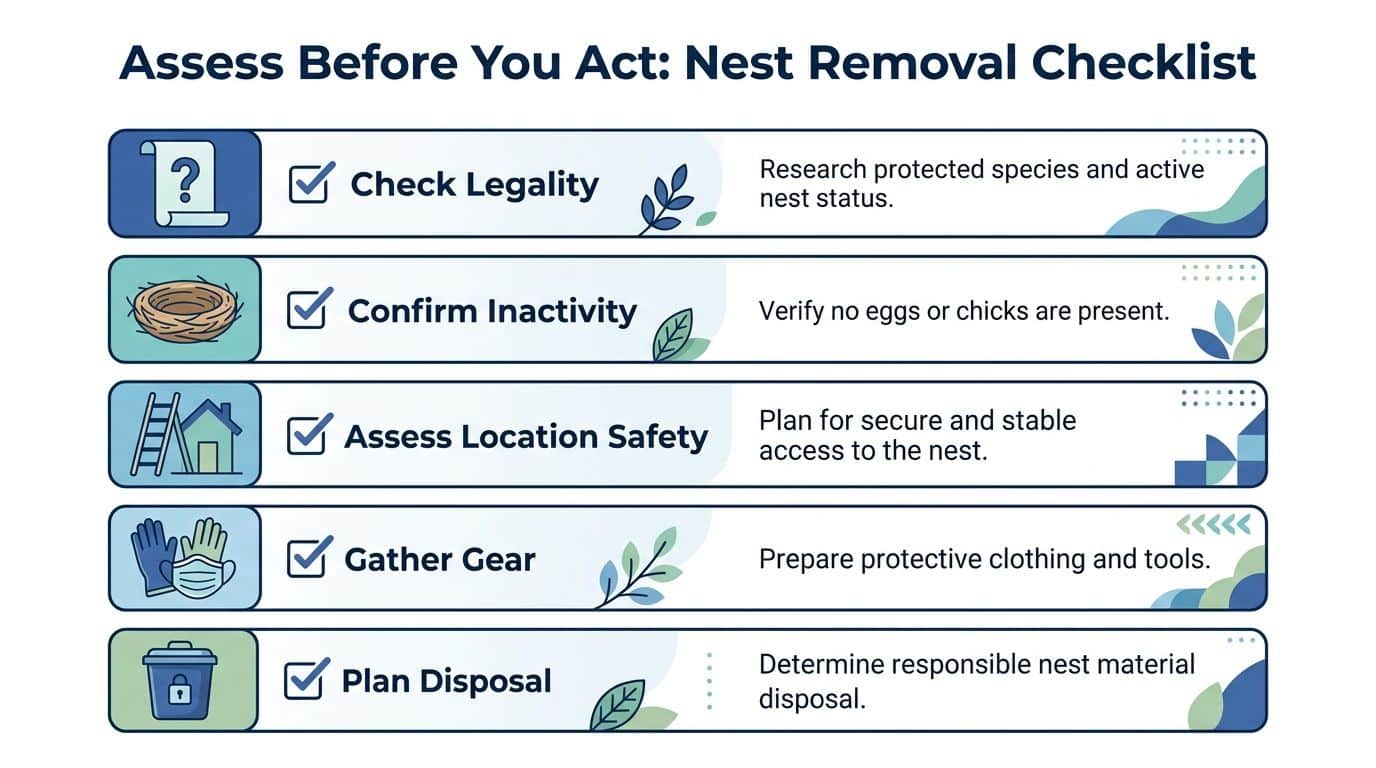
A quick decision screen
Before you remove anything, answer these in order:
- Can I confirm the nest is inactive without touching it?
- Do I know whether the species or location calls for added legal caution?
- Can I reach it without unsafe ladder work, roof walking, or leaning around fragile materials?
- Am I prepared to contain and clean the debris properly?
- Can I block the entry point or nesting surface after removal?
A single “no” is enough reason to stop and bring in qualified help.
Gearing Up for Safe and Sanitary Nest Removal
Old nests are dirty. That's not an insult to wildlife. It's just reality. Nest material can hold dried droppings, dust, insects, mites, and other contaminants, especially in vents, gutters, soffits, and protected ledges that stay warm and dry.
That's why safe bird nest removal starts with protection for the person doing the work.

The non-negotiable gear
Professional workflow guidance emphasizes this sequence: use heavy-duty gloves and an N95 mask, inspect for eggs or chicks, remove only when inactive, place the nest in a sealed bag, then disinfect and scrub the surface because nest material can harbor debris, bacteria, and parasites. professional nest removal workflow
For practical field work, the basic kit should include:
- Heavy-duty gloves. Thin disposable gloves tear too easily on twigs, wire, and vent edges.
- N95 mask. You don't want to breathe dust and debris when a dry nest breaks apart.
- Safety glasses or sealed goggles. Debris falls straight down when you loosen nest material overhead.
- Long sleeves and durable pants. They protect against scratches, mites, and dirty surfaces.
- Closed-toe shoes with traction. Especially important around gravel, dust, and irrigation overspray.
The tools that make the job cleaner
You don't need a truck full of equipment for a small inactive nest, but you do need the right tools staged before you start.
Keep these close:
- Flashlight or headlamp
- Small scraper or putty knife
- Stiff brush
- Seal-able trash bags
- Disinfectant and cleaning cloths
- Stable ladder if the location can be reached safely
The best setup is boring. Everything within reach, bag open before removal, cleaner ready before debris starts falling.
A common mistake is removing the nest first, then hunting around for trash bags and disinfectant while loose material blows across the roof or into landscaping.
Don't separate removal from sanitation
Nest removal without cleanup leaves behind the part that often causes the next problem. Residue, droppings, and nesting debris can stay packed into seams, vent hoods, gutter corners, and stucco texture. That residue is exactly why post-removal scrubbing matters.
If you want a basic reference for the cleaning side, VirusFAQ's cleaning and disinfecting guide is a useful general primer on how to think about surface cleaning and disinfection in a structured way.
The goal isn't perfection. The goal is controlled handling, sealed disposal, and a clean substrate so you're not leaving behind contamination or a ready-made nesting base.
The Step-by-Step Removal and Cleanup Process
Once you've confirmed the nest is inactive and the location is safe to access, the job becomes straightforward. Slow is better than fast. You want the nest to come off in one controlled lift if possible, not explode into dry debris across a roof line or down a wall.
Start with a controlled removal
Use your light and take one last look into the nest cavity. Then position your bag so you can move material directly into it.
For most exterior locations, this sequence works well:
- Loosen the outer edges first with a scraper or gloved hand.
- Support the bulk of the nest from underneath so it doesn't break apart.
- Place all material straight into a sealed bag.
- Check behind and under the nest base for leftover twigs, feathers, droppings, and insects.
- Seal the bag before moving on.
If debris falls into landscaping, gravel, or a lower ledge, collect that too. Leaving scattered nesting material around the same site invites another build.
How the approach changes by location
Gutters
Gutter nests often get packed into corners, downspout outlets, and spots where leaves already collect. Don't yank upward. That can smear debris deeper into the gutter channel. Lift the nest out in sections if needed, then clear the surrounding sediment and flush or hand-clean the area so water can move again.
Dryer and exhaust vents
Vent nests need extra caution. Sharp metal edges, confined space, and built-up lint make these messier than they look. Remove material carefully so it doesn't get pushed farther into the duct. If the vent has been restricted, inspect it closely before running the system again.
Eaves, awnings, and roof corners
These sites usually have droppings bonded to painted or textured surfaces. After nest removal, scrape lightly if needed, then scrub. Don't rely on a quick rinse. Residue left in the texture can continue to smell, stain, or attract birds.
If a nest site still looks and smells like a nest site, birds may treat it like one.
Cleanup is where most DIY jobs fall short
The bird control workflow matters here. After removal, the surface should be disinfected and scrubbed to reduce pathogen and parasite transfer. That applies whether the nest was in a gutter elbow, soffit pocket, vent hood, or beam pocket.
Use a measured cleanup process:
- Bag and remove debris first
- Scrub the attachment area
- Wipe or rinse away loosened residue
- Apply the appropriate disinfecting product according to label directions
- Inspect for staining, corrosion, or damage
This is also a good time to address droppings around the site. If the nesting area has left a wider mess on walls, sills, ledges, or hardscape, this guide on how to clean bird poop is worth reviewing before you start attacking stains the wrong way.
Don't skip the final inspection
Before you put the ladder away, look for the reason birds picked that location in the first place.
Check for:
- Open vent gaps
- Loose screen
- Gutter debris
- Ledges with accumulated droppings
- Cracks or voids in eaves and trim
- Protected shade pockets under solar panels or overhangs
Bird nest removal works best when the site leaves your maintenance list and enters your prevention list. If you stop at cleanup, you've only solved half the problem.
How to Prevent Birds from Rebuilding
The cheapest nest to remove is the one that never gets built.
That's especially true in Phoenix, where homes and commercial buildings offer exactly what birds want. Shade under panels, warm vent exhaust, protected eaves, decorative ledges, and gutters that don't see enough maintenance. Once birds identify a good site, repeated bird nest removal becomes a cycle. Clean it out, wait, repeat.
A better approach is exclusion.
Removal alone usually fails
Professionally, nest removal is usually paired with exclusion measures to prevent recurrence. Prevention may include gutter guards, plastic or mesh screening, and sealant, with post-removal prevention reported at about $1,350 to $1,700 per 200 square feet in some applications. Angi bird removal cost guidance
That pricing point matters for one reason. It shows where the true value is. You're not only paying to take away old material. You're paying to change the site so birds can't come back to the exact same micro-location.
What works on Arizona properties
Vents and utility openings
Use properly fitted covers or screening. Dryer vents, bathroom exhaust outlets, and mechanical penetrations are classic nesting targets because they're sheltered and warm. The fix has to preserve airflow while blocking entry.
Gutters and roof lines
Clean gutters regularly and install guards where recurring buildup creates a nesting base. Birds like stable material and hidden corners. A gutter packed with leaves and roof grit is an invitation.
Ledges and façade details
Generic advice often stops at spikes, but ledge shape matters. Product-side bird control guidance emphasizes exclusion devices such as bird slope, spikes, and vent covers for ledges and eaves, while also pointing out the broader need for cleanup and remediation after bird activity. bird slope and ledge deterrent overview
For parapets, decorative bands, and sign canopies, choose a deterrent that matches the exact surface shape. One-size-fits-all bird control usually looks bad and performs worse.
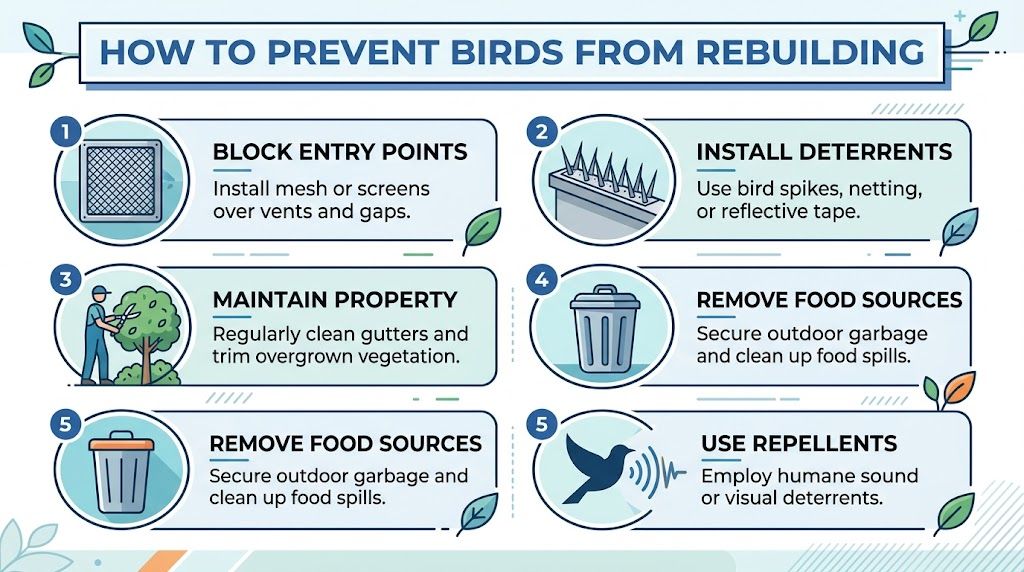
A quick visual can help if you're sorting through prevention options:
Solar panels
Under-panel nesting is one of the most stubborn recurring issues in the Valley. Solar arrays create shade, shelter, and a protected cavity. Once birds get under there, removal without perimeter screening is temporary. The durable fix is exclusion around the panel edges, followed by cleanup of droppings and debris beneath the array.
Prevention works best on a maintenance cycle
Exterior cleaning and bird control overlap at this intersection. Birds reuse advantage points. Property managers should think in cycles, not one-off events.
A practical cycle looks like this:
- Inspect problem areas before peak nesting activity
- Clean droppings, leaf litter, and old nesting debris
- Seal or screen access points
- Install deterrents only where repeated use justifies them
- Recheck after storms, roof work, and seasonal cleaning
That same thinking shows up in other facility settings too. If you manage larger commercial sites, these warehouse pest prevention strategies are useful because they frame exclusion as an operations issue, not just a cleanup task.
Don't ignore the easy wins
Some of the most effective deterrents are routine maintenance tasks people postpone:
- trimming vegetation away from roof access points
- cleaning debris from gutters
- securing trash and food waste areas
- washing droppings off ledges before buildup hardens
- keeping screens intact
Screen care matters more than many homeowners realize. Torn or loose screens don't just look rough. They can signal neglect around the same openings where birds test edges and gaps. If that's on your list already, this guide on how to clean window screens fits neatly into a broader prevention routine.
When to Call a Licensed Professional
You climb up to look at what seems like a small nest over a second-story entry, and the job changes fast. The issue is no longer just debris. It is fall risk, possible protected wildlife, contaminated droppings, and the chance of damaging a vent, roof edge, screen, or solar equipment while trying to save a service call.
That is usually the line between a homeowner task and a professional one. In Phoenix, I tell people to judge the job by access, legal status, and cleanup risk first. The nest size matters less than where it sits and what surrounds it.
Professional pricing varies because the work itself varies. A simple removal from an open, low-access area is one kind of job. A nest packed into a dryer vent, tucked behind signage, or built under solar panels is another. Once setup includes ladder work, roof access, contamination cleanup, disposal, and exclusion repairs, the cost goes up for good reason.
DIY vs. professional bird nest removal
| Scenario | DIY Approach | Call a Pro |
|---|---|---|
| Inactive nest at ground level or easy first-story access | Reasonable if you can confirm inactivity, use protective gear, and clean the site properly | Better if you're unsure about species, contamination, or disposal |
| Nest in a dryer vent or tight exterior opening | Possible for some homeowners, but only if access is simple and the duct hasn't been obstructed deeper inside | Best when vent restriction, damage, or hidden material is likely |
| Nest on a second-story roof edge, parapet, or awkward ladder position | Unsafe for DIY in most cases | Yes. Access and fall risk are the main issue |
| Nest under solar panels or on complex façades | Usually not practical | Yes. These areas often require specialty access and exclusion work |
| Active nest with eggs or chicks | No | Yes, or wait and consult the proper wildlife authority if required |
| Commercial buildings, retail centers, condos, high-rises | No | Yes. Liability, tenant safety, and repeat prevention make this a professional job |
A licensed pro makes sense when the nest is tied to another exterior system. Dryer vents, gutters, window frames, roof valleys, awnings, and solar arrays all create trade-offs. Remove the nest carelessly and you can crack a screen, loosen sealant, block drainage, or leave behind enough nesting material for birds to come right back.
Call a professional if any of these apply:
- You cannot verify that the nest is inactive
- The work involves a steep roof, long ladder setup, or fragile surfaces
- Droppings, parasites, or heavy debris are part of the cleanup
- The nest is inside a vent, under solar panels, or near electrical equipment
- The property is commercial, multi-unit, or tenant-occupied
- You need screening, sealing, or other exclusion work done right after removal
The best service calls solve more than the immediate mess. They address the entry point, clean the contaminated area correctly, and reduce the chance of repeat nesting during future window cleaning, gutter service, or solar panel maintenance.
If you are comparing providers, use the same screening standards you would for any exterior access contractor. Verify insurance, ask how they confirm nest status, and make sure they can explain cleanup and exclusion in plain language. This guide on how to hire the right window cleaning company in Phoenix is a good checklist for that process.
It also helps to review a broader guide to bird control solutions so you can tell whether a contractor is only offering removal or actually fixing the repeat-entry problem.
Frequently Asked Questions About Bird Nests
What if I find eggs or baby birds after I started checking the nest
Stop immediately. Don't move the nest, don't spray it, and don't try to relocate it by hand. Treat the nest as active and back out of the job. The safest next step is to wait until nesting is complete or consult the appropriate wildlife authority or permitted specialist if there's a serious safety issue.
Can I just blast the nest away with a pressure washer
Usually, no. Pressure washing can scatter contaminated debris, drive nest material deeper into vents or gaps, and damage paint, screens, sealant, or stucco. It also doesn't solve the legal issue if the nest is active. Pressure washing is a cleaning method, not a substitute for proper assessment and controlled removal.
How long do I have to wait before a nest is inactive
There isn't a one-size-fits-all timeline you should trust by guesswork. The reliable approach is field verification. A nest can look empty and still be in use. Timing should be based on nest stage, not appearance alone. Ornithological guidance on nest success and survival makes the same practical point for operators: apparent emptiness can be misleading, so status should be verified rather than assumed. Mayfield nest-survival paper
If you need help with bird-related exterior cleanup, hard-to-access nest areas, window washing, gutter cleaning, or solar panel cleaning in Phoenix and surrounding Valley communities, South Mountain Window Cleaning, LLC handles exterior maintenance with a safety-first approach. For homeowners, commercial properties, and high-rise buildings, the team can help you clean up the mess, protect vulnerable areas, and keep your property looking sharp.