
Giving your house a good power wash is one of the most satisfying home maintenance jobs you can do. It's a fantastic way to blast away built-up dirt, grime, and mold, making your home look fresh and preventing long-term damage. At South Mountain Window Cleaning, we understand that power washing involves using a high-pressure water spray—often mixed with the right detergents—to deep-clean everything from your siding and brick to concrete patios. For any homeowner in Phoenix, Scottsdale, or the surrounding areas, it's one of the fastest ways to bring back your home's original shine.
Why Power Washing a House Is a Smart Investment
Think of power washing as more than just a deep clean; it’s a critical part of protecting your property, especially here in the tough Arizona climate. Over the seasons, layers of dust from haboobs, sticky pollen, and ugly green algae can build up on your exterior. This doesn't just make your house look tired—it can actually cause the paint and other materials to wear out faster.
This is where a thorough wash really pays off. It's not just about looking good, it's about preserving the value of your home. A clean, well-maintained exterior can make a huge difference in your property's worth. If you're looking for other ways to make your home stand out, you can find some game-changing curb appeal ideas that often begin with a fresh, clean slate provided by power washing.
The Growing Demand for Exterior Cleaning
You don't have to take our word for it—the numbers show just how important this service has become. The global pressure washing industry has exploded past $3 billion, a clear sign that homeowners and businesses get the value. It’s not just an abstract number; real estate pros will tell you that a simple power wash can bump up a home's value by as much as 5-10%.
In this guide, we'll walk you through everything you need to know about tackling this project, whether you're a DIY warrior or thinking about hiring a pro. We'll cover:
- Getting Ready: How to protect your plants, windows, and light fixtures before you even turn the machine on.
- The Right Gear: Picking the right pressure washer, nozzles, and cleaning solutions for different surfaces.
- Washing Techniques: The best way to approach vinyl siding, brick, and wood without causing damage.
- DIY vs. Pro: Knowing when it's a job you can handle and when it's time to call in experts like us at South Mountain Window Cleaning, who serve Phoenix, Scottsdale, Paradise Valley, Chandler, Tempe, and Gilbert.
A professional power wash does more than just clean; it removes harmful contaminants like mold, algae, and mildew that can eat away at your home's exterior surfaces over time, preventing costly repairs down the road.
Whether you're gearing up for a weekend project or weighing your options, getting the process right is key. For a broader look at keeping your home's exterior in top shape, check out our guide on the best way to clean your house exterior.
How to Get Your Home Ready for Power Washing
Jumping straight into power washing without a game plan is like painting a room without taping the edges—you’re just asking for a mess. Getting your house ready isn't just a boring first step; it's hands-down the most important part of the whole job. A little bit of prep work up front can save you a world of headaches and costly repairs later.
Think of it as doing a quick but thorough walkthrough of your property. Your goal is to spot and shield anything that can't handle a blast of water hitting it at thousands of pounds per square inch. Rushing this is how you end up with shattered porch lights, fried electrical outlets, or a garden that looks like it went through a hurricane.
Secure and Protect Vulnerable Areas
Your home’s exterior has plenty of sensitive spots that were never meant to stand up to a pressure washer. Your first mission is to give them some armor.
Start by taking a slow walk around the house, keeping a sharp eye out for anything electrical. We're talking outdoor outlets, security cameras, fancy video doorbells, and all your light fixtures. Water and electricity are a seriously bad combination. Grab some quality waterproof tape or a roll of painter’s tape and plastic sheeting to create a solid, watertight seal over every single one.
Next up, your landscaping. Those delicate rose bushes, your vegetable garden, and the flower beds right up against the house are directly in the line of fire. The intense pressure can shred leaves and blossoms in an instant, and any detergent runoff can be bad news for your soil.
- Cover with Tarps: Gently lay some lightweight plastic tarps over your shrubs and flowerbeds. Use a few rocks or bricks to weigh down the edges so they don't blow away.
- Pre-Soak the Ground: Before you fire up the washer, give the soil and plants a good drink of water. When the ground is already saturated, it's far less likely to soak up any detergent.
- Move Everything Else: Haul any potted plants, patio furniture, grills, and yard art to a safe spot, well out of the spray zone.
A huge mistake we see people make is thinking their outdoor light fixtures are perfectly sealed. Most of them have tiny gaps where water can easily sneak in, leading to a short circuit or rust down the road. Always take the time to cover them completely.
Finally, button up the house itself. Go around and shut every window and door, then lock them. A powerful jet of water can easily blow an unlocked window open. Even a tiny gap can let a shocking amount of water inside, leaving you with soaked floors and water-stained trim.
Do a Thorough Pre-Wash Inspection
Once you've got everything protected, it's time to take a hard look at the surfaces you're about to clean. Power washing has a way of turning small, unnoticed issues into massive problems.
Hunt for any areas with peeling, flaking, or chipping paint. A high-pressure stream will rip that loose paint right off, leaving you with a much bigger scraping and patching project than you bargained for. If you find spots that are already peeling badly, you're better off scraping and sanding them first.
Check your siding for any cracks, loose panels, or damaged spots. Forcing water behind siding is a recipe for disaster. That moisture gets trapped in your wall cavities, creating the perfect breeding ground for mold, mildew, and rot. This is especially critical for materials like stucco, which can have hairline cracks that are hard to see but will soak up water like a sponge.
Get up close and inspect the seals and caulking around your windows and doors. If that sealant is old, cracked, or pulling away, high-pressure water will find its way inside. Make a note of any areas that need a fresh bead of caulk before you start spraying. This simple check can save you from serious water damage to your drywall and framing.
Gear Up for Your Own Safety
Okay, last step before the fun begins. Before you even pull the starter cord on that machine, you need to get yourself ready. Power washing isn't just about protecting your house; it's about protecting you. That powerful stream kicks up dirt, grime, and small debris at incredible speeds.
Here's your non-negotiable safety checklist:
- Safety Goggles: You absolutely need to protect your eyes from flying dirt, wood splinters, and chemical overspray.
- Sturdy Gloves: A good pair of gloves will improve your grip on the wand (it gets slippery!) and keep detergents off your skin.
- Non-Slip Boots: Things are about to get very wet and slick. Closed-toe, slip-resistant footwear is a must to avoid a nasty fall.
Taking the time to do this prep work sets you up for a smooth, successful, and damage-free project. It turns a risky chore into a controlled process, ensuring your home in Phoenix or Scottsdale gets a fantastic clean without any of the drama.
Selecting the Right Tools and Cleaning Solutions
Alright, you've prepped your house. Now comes the part where many DIY projects go sideways: choosing the right gear. Picking the wrong machine, nozzle, or detergent can quickly turn a satisfying cleaning job into an expensive headache. Success really boils down to matching the tools to your home's specific surfaces.
The two big numbers you’ll see are PSI (pounds per square inch) and GPM (gallons per minute). PSI is all about the force of the water stream, while GPM measures how much water is actually flowing. For pretty much any residential job, a machine in the 1,500 to 2,500 PSI range is your sweet spot. It's powerful enough to clean effectively but safer than those high-powered commercial units that can chew through vinyl siding, splinter wood, or damage soft brick.
Understanding Pressure Washer Nozzles
The nozzle you snap onto the end of the wand is just as important as the PSI setting. Most machines come with a set of color-coded tips, and using the wrong one is the fastest way to carve a permanent mark into your siding.
- Red Nozzle (0 degrees): This thing is a beast. It shoots a pinpoint jet stream that can cut through materials like a knife. Our advice? Never use the red nozzle on your house siding, wood, or any painted surface. Seriously, just leave it in the box.
- Yellow Nozzle (15 degrees): A step down, this tip creates a narrow fan of water. It’s got a place for blasting stubborn grime off hard concrete, but it’s still far too aggressive for most home exteriors.
- Green Nozzle (25 degrees): This is your workhorse. Often called the "washing" nozzle, it gives you a wider spray with less direct force. It’s perfect for cleaning most siding, decks, and outdoor furniture as long as you maintain a safe distance.
- White Nozzle (40 degrees): Even gentler, the white nozzle produces a wide, soft spray. This is what you’ll want for rinsing delicate surfaces like windows or vehicles. It’s great for when you need to be extra cautious.
- Black Nozzle (65+ degrees): This is the soap nozzle. It has the lowest pressure because its job isn't to blast, but to pull detergent from your machine's tank and apply a nice, even coat to the surface.
Before you pull the trigger, just take a moment to run through the prep steps one last time.
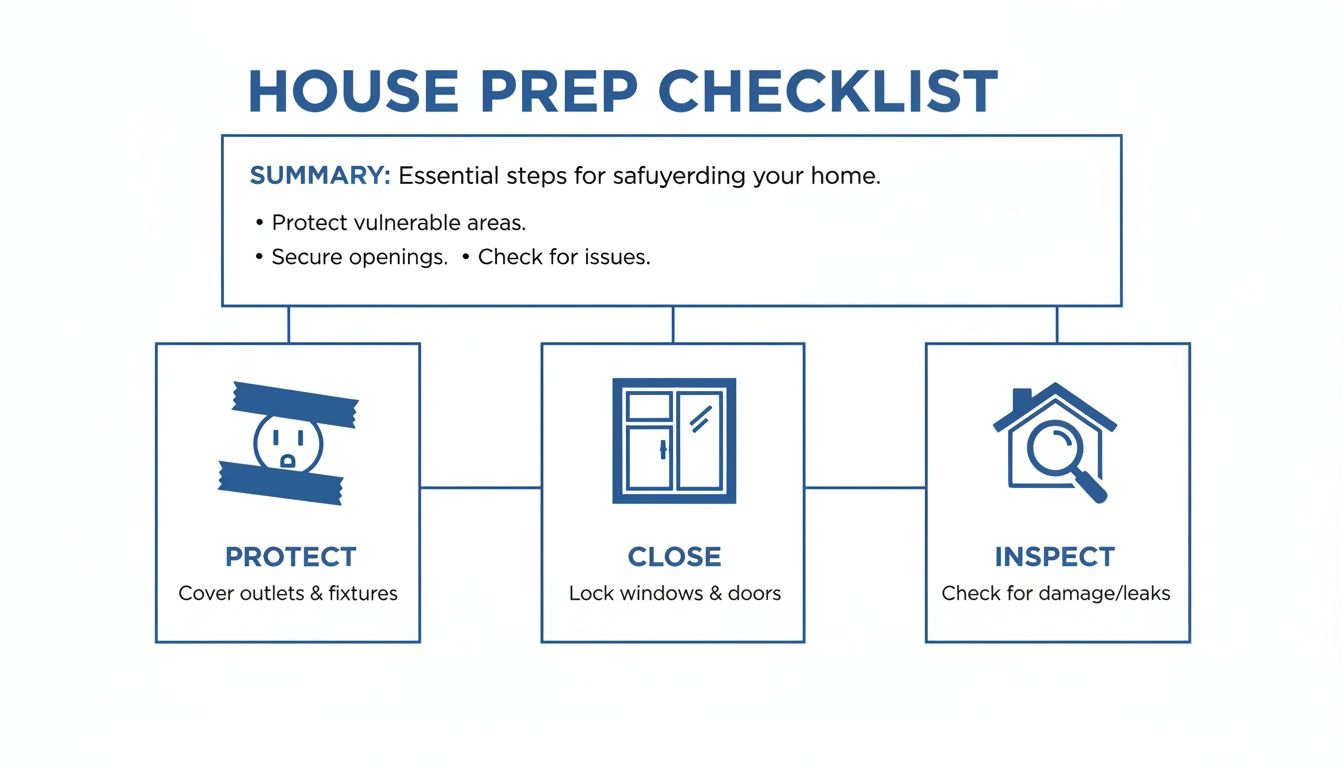
This simple Protect, Close, and Inspect routine is the foundation for a safe and successful wash every time.
Choosing the Right Cleaning Solution
Here’s a pro tip from our team: pressure alone doesn't do the real cleaning. You need a good cleaning solution to break down the dirt, mold, and grime. The goal is to let the detergent do the heavy lifting, not sheer force. This is the core idea behind soft washing, a technique that prioritizes chemical cleaning over high pressure. It's especially useful for delicate surfaces like the stucco we see all over Arizona. If you're curious, you can learn more about the soft wash method in our detailed guide.
Not all cleaners are the same, though. Picking the wrong one can be a waste of money or, worse, poison your landscaping.
Always look for biodegradable, eco-friendly detergents. These solutions are designed to break down naturally, posing a much lower risk to your lawn, garden, and the local waterways here in the Valley. Harsh chemicals can stick around in the soil and cause long-term damage.
Your cleaner should match the mess.
- All-Purpose Cleaners: Perfect for the general dust, dirt, and pollen that coats everything.
- Mold & Mildew Removers: If you’re seeing green or black stains, especially on the north-facing side of your home, you need something with a mildewcide to kill the growth completely.
- Degreasers: These are a must-have for tackling oil and grease spots on driveways or garage floors.
To take the guesswork out of it, here’s a quick-reference table our experts put together.
Power Washer Settings for Common House Surfaces
This chart will help you dial in the right settings for the most common surfaces around your home, ensuring you clean effectively without causing damage.
| Surface Type | Recommended PSI Range | Recommended Nozzle(s) | Best Detergent Type |
|---|---|---|---|
| Vinyl Siding | 1,300 – 1,600 PSI | Green (25°) or White (40°) | All-Purpose or Mildew Remover |
| Brick | 1,500 – 2,500 PSI | Green (25°) | Masonry Cleaner |
| Wood (Decks/Fences) | 500 – 1,200 PSI | White (40°) or Green (25°) | Wood-Safe Cleaner or Brightener |
| Stucco | 500 – 1,000 PSI (Soft Wash Only) | Black (Soap) & White (Rinse) | Gentle All-Purpose Cleaner |
| Concrete Driveway | 2,000 – 3,000 PSI | Yellow (15°) or Green (25°) | Degreaser for Stains |
By pairing the right pressure and nozzle with a surface-appropriate detergent, you’re setting yourself up for a pro-level clean without the pro-level repair bill.
Mastering Your Power Washing Technique
Power washing a house isn't about blasting away dirt with raw force. It's really about finesse and using the right technique for each surface. Every material on your home, from tough brick to delicate wood trim, is going to react differently to water pressure. Getting this right is the secret to a deep clean that doesn't cause expensive damage.
The core idea is to let your cleaning solution do the heavy lifting. The water stream is mostly just for applying that cleaner and then rinsing everything away. This simple shift in mindset is what separates a successful weekend project from a costly mistake.
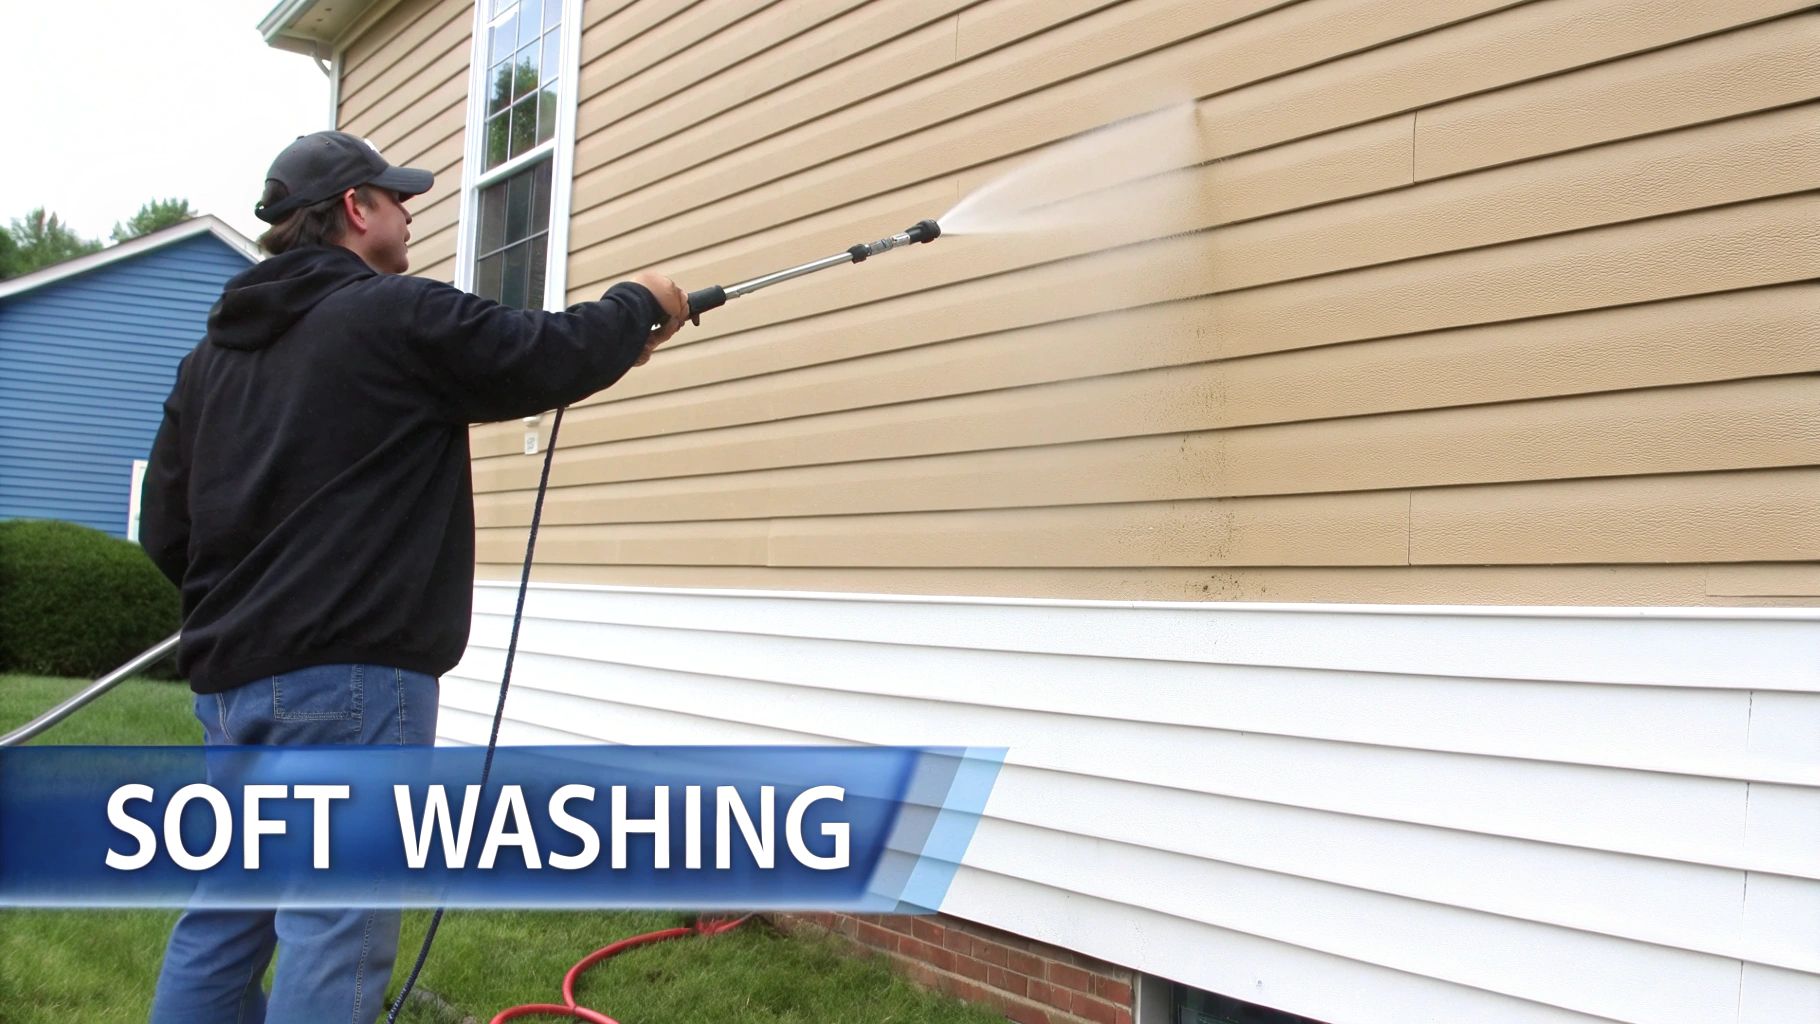
The Soft Wash Method for Siding
For most common siding materials like vinyl and aluminum, your best bet is soft washing. This technique pairs low pressure—usually under 500 PSI—with a good, surface-safe detergent. It’s hands-down the most effective and gentle way to lift away algae, dust, and grime without pitting the surface or forcing water behind the panels.
Here’s the right way to approach it:
- Apply Detergent from the Bottom Up: Grab your black soaping nozzle and start applying the cleaner at the lowest point of a wall, working your way up in sections. This clever trick prevents the detergent from running down the dirty surface and leaving "clean streaks" behind.
- Let it Dwell: Give the solution about 5 to 10 minutes to really work its magic. You’ll actually see the grime start to loosen and break down. Just don't let it dry, which can happen fast under the Arizona sun.
- Rinse from the Top Down: Now, switch over to a wider rinsing nozzle (the white or green one works great). Start rinsing from the very top of the wall and work your way down. This ensures you're washing all the dirt and soap away for a clean, uniform finish.
This "bottom-up, top-down" process is the key to getting professional-looking results on any type of siding.
Cleaning Tougher Surfaces Like Brick and Concrete
Hard surfaces like brick and concrete can definitely handle more pressure, but that doesn't mean you can go wild. They might be durable, but too much force can still chew up mortar joints or leave permanent "wand marks" etched in the concrete.
For brick, our team always starts with a lower pressure setting and the 25-degree (green) nozzle. Keep the wand moving in a steady, sweeping motion about a foot away from the surface. Only bump the pressure up slightly if you hit a really stubborn patch.
Concrete driveways and walkways are where you can use a bit more power. A 15-degree (yellow) or 25-degree (green) nozzle is usually perfect for lifting that deep-set dirt and old oil stains. For the best results, use a consistent, overlapping pattern like you're mowing the lawn.
Stucco is a completely different animal, though—it's far more delicate. If you have a stucco home, it’s worth reading our guide on if you can pressure wash stucco before you even think about starting.
One of the most common DIY mistakes is spraying directly at the surface at a 90-degree angle. This concentrates all the force in one small spot, maximizing the risk of damage. Always hold the wand at a 45-degree angle to the surface for a safer, more effective clean.
Handling Delicate Materials and Sensitive Areas
Wood decks, fences, and certain types of trim need an extremely gentle touch. Hitting them with high pressure will quickly cause splintering, gouging, and something called "furring," where the wood fibers get shredded and raised. For any wood surface, stick to the lowest pressure you can and use the 40-degree (white) nozzle. Always, always spray in the direction of the wood grain, never against it.
You also need to be extra careful around the sensitive areas of your house.
- Windows and Trim: Never spray directly at windows. The pressure can easily break the glass or, more commonly, damage the seals. That leads to those foggy, moisture-filled panes that are impossible to fix. Use low pressure and aim the spray at a downward angle to clean the surrounding trim without forcing water into tiny cracks.
- Soffits and Eaves: Be cautious when you’re spraying upward into soffits and vents. It’s incredibly easy to force water into your attic, which is just asking for mold and mildew to set up shop. A gentle rinse is all that’s needed here.
No matter what you're cleaning, consistency is what gives you that flawless, even finish. Keep a constant distance between the nozzle and the wall, and use broad, overlapping sweeps. Taking your time with these surface-specific techniques is how you get a fantastic result while protecting your home.
DIY Project vs. Hiring a Professional Service
Let's be honest, there's a certain satisfaction that comes from tackling a big home project yourself. Power washing can feel incredibly rewarding, but it's crucial to know when a job is better left to the pros. This decision isn't just about saving a few bucks; it’s about safety, getting the job done right, and protecting your home's value.
The real question comes down to the scope of the project and your own comfort level with the equipment. A simple, one-story home with tough vinyl siding? That could be a perfect weekend project. But the moment you start dealing with multiple stories or more delicate materials, the risks start to climb—fast.
When to Call a Professional Power Washing Service
Some situations are just no-brainers for hiring an experienced and insured team. If your home is two stories or more, the danger of using a pressure washer on a ladder is a serious risk. A professional crew shows up with the right safety gear, extension wands, and sometimes even lifts to clean those high spots without risking injury or damage to your property.
Another major factor is what your house is made of. Delicate surfaces need a knowledgeable touch to avoid permanent, costly damage.
- Historic Brick: It's surprisingly easy to blast away old mortar with the wrong pressure, which can seriously compromise your walls.
- Soft Wood Siding: Cedar and other soft woods can get splintered or gouged in a heartbeat if you're not careful.
- Stucco: This is a hugely popular finish here in Arizona, but it's notoriously fragile. It needs a gentle soft washing technique to prevent cracks and keep water from getting forced underneath.
Professionals bring commercial-grade equipment and a deep understanding of cleaning agents to the table. They can tackle stubborn stains like rust, efflorescence (those white, salty deposits on brick), and baked-on hard water spots that most DIY setups just can't handle.
For a more detailed look at this decision, check out our guide on why you should hire a professional to pressure wash your property.
Understanding the True Cost of a DIY Project
That daily rental fee for a pressure washer at the hardware store can be misleading. The "hidden costs" of a DIY job can stack up quickly, sometimes getting you surprisingly close to what you would have paid a professional from the start.
Think about the whole shopping list: you've got the machine rental, the specific detergents for different stains, protective gear, and maybe even extra hoses or attachments. More importantly, what's your time worth? A job that takes a pro just a few hours could easily eat up your entire weekend.
But the biggest hidden cost? The potential for damage. One wrong move can shatter a window, strip paint right off the wall, or force water behind your siding. The repair bills for that kind of mistake will make the cost of a professional service look like a bargain.
Arizona-Specific Challenges Best Left to the Pros
Here in the Phoenix area, our homes are up against some unique challenges thanks to the relentless sun and dusty conditions. That caked-on dust and the stubborn hard water stains from sprinklers are tough opponents for the residential-grade equipment you can rent.
A local, professional service like South Mountain Window Cleaning is already equipped to handle these regional headaches. We know exactly how to safely strip away years of sun-baked grime from homes in Scottsdale, Paradise Valley, and Chandler without damaging the surfaces underneath. The pressure washing industry is growing—projected to hit $4.5 billion by 2031—precisely because people need this kind of specialized, effective cleaning that protects their property.
At the end of the day, hiring a professional isn't giving up. It's making a smart investment in your home’s health and curb appeal, and it guarantees the job is done safely and correctly the first time around.
Common Questions About Power Washing a House
Even with a full game plan, it's totally normal to have a few questions pop up before you start power washing your house. Getting a straight answer can be the difference between a project you’re proud of and one that just creates a bigger headache. We’ve pulled together some of the most common questions we hear from homeowners around the Phoenix area to help you get started with real confidence.
These are the kinds of details that are easy to miss but make a huge impact on protecting your home and getting that crisp, clean look you’re after. Let's clear up a few things.
How Often Should I Power Wash My House?
This is probably the number one question we get, and the honest answer is: your house will tell you. For most homes here in dusty, sunny Arizona—from Scottsdale to Gilbert—an annual wash is a solid rule of thumb. The relentless sun has a way of baking grime right onto the surface, and our monsoon dust storms can leave a serious layer of dirt behind.
The best approach, though, is to just take a walk around your property. Keep an eye out for these tell-tale signs:
- Obvious layers of dirt and dust, especially under the eaves where rain can't reach.
- Spider webs and insect nests starting to take over the corners.
- Those ugly green or black streaks of algae and mildew, which love to grow on the north-facing walls that stay in the shade.
- Your paint just looks dull, faded, and tired.
If you’re nodding your head to any of these, it's definitely time for a good wash.
Can Power Washing Damage My Paint or Siding?
Yes, it absolutely can if you're not careful. This is the biggest risk with any DIY power washing job, and it’s where professional technique really shines. Using a nozzle that’s too narrow (like those red or yellow tips), cranking the pressure way too high, or just standing too close to the wall can wreck your exterior in a hurry.
We've seen it all: paint stripped clean off, vinyl siding cracked and riddled with holes, and wood splintered so badly it had to be replaced. This is exactly why the soft washing method is so important. It lets the right cleaning solutions do the heavy lifting instead of relying on brute force, making it the safest and most effective way to clean your home's exterior.
What Is the Difference Between Power Washing and Pressure Washing?
This one causes a lot of confusion because people use the terms interchangeably all the time. They are very similar, but there’s one key difference: heat.
A power washer uses heated water to blast away grime, while a pressure washer uses regular, unheated water from your spigot. That hot water gives power washing an extra punch against really stubborn, greasy stains, which is why you see it used more in commercial or industrial settings. For cleaning the siding on a typical house, a standard pressure washer (or a dedicated soft wash system) is all you need.
Should I Power Wash Before or After Painting?
Always, always, always wash before you paint. No exceptions. Think of it as the most critical prep step for a paint job that’s actually going to last.
Washing first does a few vital things:
- It gets rid of all the dirt, pollen, and grime that would otherwise get trapped right under your beautiful new paint.
- It blasts away any "chalking"—that dusty, powdery residue that forms on old, sun-beaten paint.
- Most importantly, it gives you a perfectly clean surface for the new primer and paint to grab onto.
If you try to paint over a dirty wall, you’re just throwing money away. The new coat is guaranteed to start peeling and chipping way sooner than it should. A good, thorough wash is what makes a fresh paint job look incredible and last for years.
Navigating the ins and outs of power washing can feel like a lot, but you don't have to go it alone. For a flawless, damage-free clean that protects your home's value, trust the experienced team at South Mountain Window Cleaning. We proudly serve homeowners across Phoenix, Scottsdale, Paradise Valley, and the entire Valley, delivering professional results with a 100% satisfaction guarantee. Schedule your free estimate today!