
You step onto a Phoenix patio after a monsoon and notice an orange streak running down the wrought-iron railing. Or you pull a wrench from a truck bed and find the head covered in red crust. The visible rust is only part of the problem. Moisture may have collected inside a joint, under a coating, or where irrigation spray repeatedly hits the metal.
The right way to remove rust from metal starts with reading the surface, not grabbing the strongest chemical or fastest grinder. A removable hand tool, a fixed balcony rail, and a rust-stained window frame need different methods, different containment, and different finishing steps. The work also has to protect nearby glass, stucco, stone, paint, landscaping, and pool water from abrasive dust, acid, and rusty runoff.
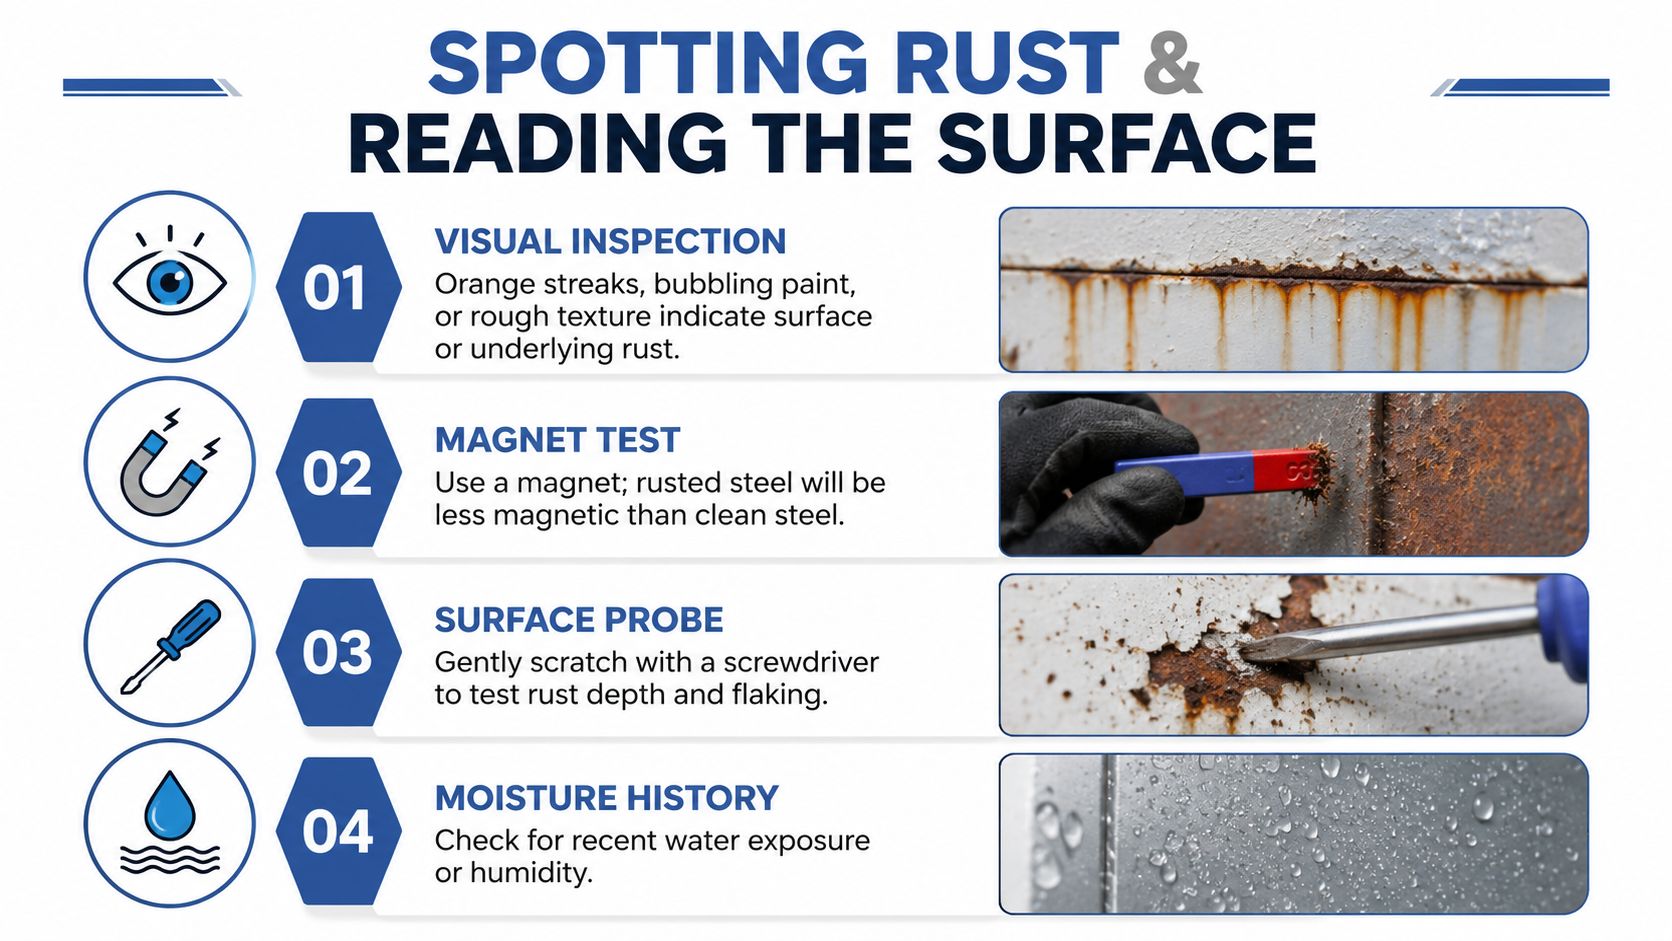
Spotting Rust and Reading the Surface
A property manager once found orange trails below several railing joints after a wet spell. The rails looked mostly intact from a distance, but a closer inspection showed rust concentrated at welds and beneath the lower bar, where water stayed longer than it did on the exposed faces. That small detail changed the plan from quick surface cleaning to targeted preparation and sealing.
Rust isn't one condition. Flash staining can look like a thin orange film transferred from a fastener or runoff. Surface oxidation usually feels rough but remains relatively firm. Scale forms loose, layered flakes that lift under a scraper or stiff brush. Deep pitting leaves small cavities and an uneven profile, even after the loose material has been removed.
White bloom and red dust also tell different stories. A pale or white deposit can indicate mineral residue or corrosion associated with a coated or mixed-metal assembly, while loose red powder points to active iron oxidation. A smooth section with light orange discoloration may clean up quickly. A pitted section won't regain its original shape just because the color is gone, and it will need protection after cleaning.
Inspect the places that hold water
On installed metal, check more than the obvious face:
- Joints and welds: Look for hairline openings, bubbling coatings, and rust bleeding from seams.
- Undersides: The underside of rails and brackets often stays damp longer and collects abrasive dust.
- Drain holes: Blocked openings can turn a hollow railing or frame into a moisture trap.
- Fasteners: Screws, bolts, and washers may be the actual source of the orange trail.
- Contact points: Inspect where steel meets masonry, glass, concrete, or another metal.
A magnet can help identify steel, but it doesn't replace a surface assessment. Gently probing a loose area with a screwdriver can reveal whether the corrosion is a brittle film or a deeper loss of material. Don't probe aggressively on a load-bearing railing, stair component, or thin decorative panel.
Before choosing a method, answer four questions: What metal is this? Is it structural or merely decorative? Is a coating still present? Where will water, dust, and dissolved rust go? If you're evaluating a metal door or garage assembly, a resource such as this 2026 garage door selection guide can also help you compare material types before treating the surface.
Matching the Method to the Metal and the Mess
Rust removal falls into three established families: mechanical abrasion, chemical dissolution, and electrochemical reduction. Conservation practice has long separated these approaches. The Smithsonian's conservation guidance describes small mechanical tools such as fine steel wool, light oil, glass bristle brushes, and rust erasers for lightly corroded iron, while larger work uses wire cup wheels, radial brushes, emery paper, and abrasive blasting (conservation methods for iron).
Mechanical work is the practical choice for a fixed railing, gate, stair stringer, or steel frame. Brushing and sanding give direct control, and abrasive blasting can handle heavy scale when the site can contain the media and protect surrounding finishes. The drawback is that aggressive abrasion can alter the profile, remove sound coating, or damage thin sheet metal.
Chemical treatment is more useful for detached hardware, tools, and intricate parts. Vinegar, citric acid, oxalic acid, and commercial removers can reach crevices that a flat abrasive can't. A conservation paper describes a 15% acid solution as a widely used standard-strength starting point in restoration work (conservation paper on acid rust removal). That doesn't make every acid suitable for every metal. Bare aluminum and galvanized coatings require particular caution, and runoff must be controlled.
Electrolysis belongs in a controlled container with removable parts. It loosens corrosion from rusted tools, bolts, hinges, and small cast-iron pieces without grinding away as much sound metal. It isn't a convenient treatment for an installed gate or railing.
| Method | Best For | Ideal Metals | Key Drawback |
|---|---|---|---|
| Mechanical | Scale, pitting, fixed structures | Steel and iron | Dust, noise, surface change |
| Chemical | Small parts and intricate shapes | Compatible steel and iron | Runoff, residue, metal compatibility |
| Electrolytic | Heavy rust on detached parts | Suitable ferrous parts | Requires electricity, water, and containment |
For a surface-specific decision, compare the practical options in rust removal methods. The method that works in a bucket may be the wrong choice beside a stucco wall or finished window.
Mechanical Rust Removal on Fixed and Installed Metal
Fixed metal requires a preparation plan before the first brush touches it. Balcony railings, security gates, exterior handrails, stair stringers, and window frames can't be carried to a sink, so the crew has to manage dust, filings, runoff, and nearby finishes in place.
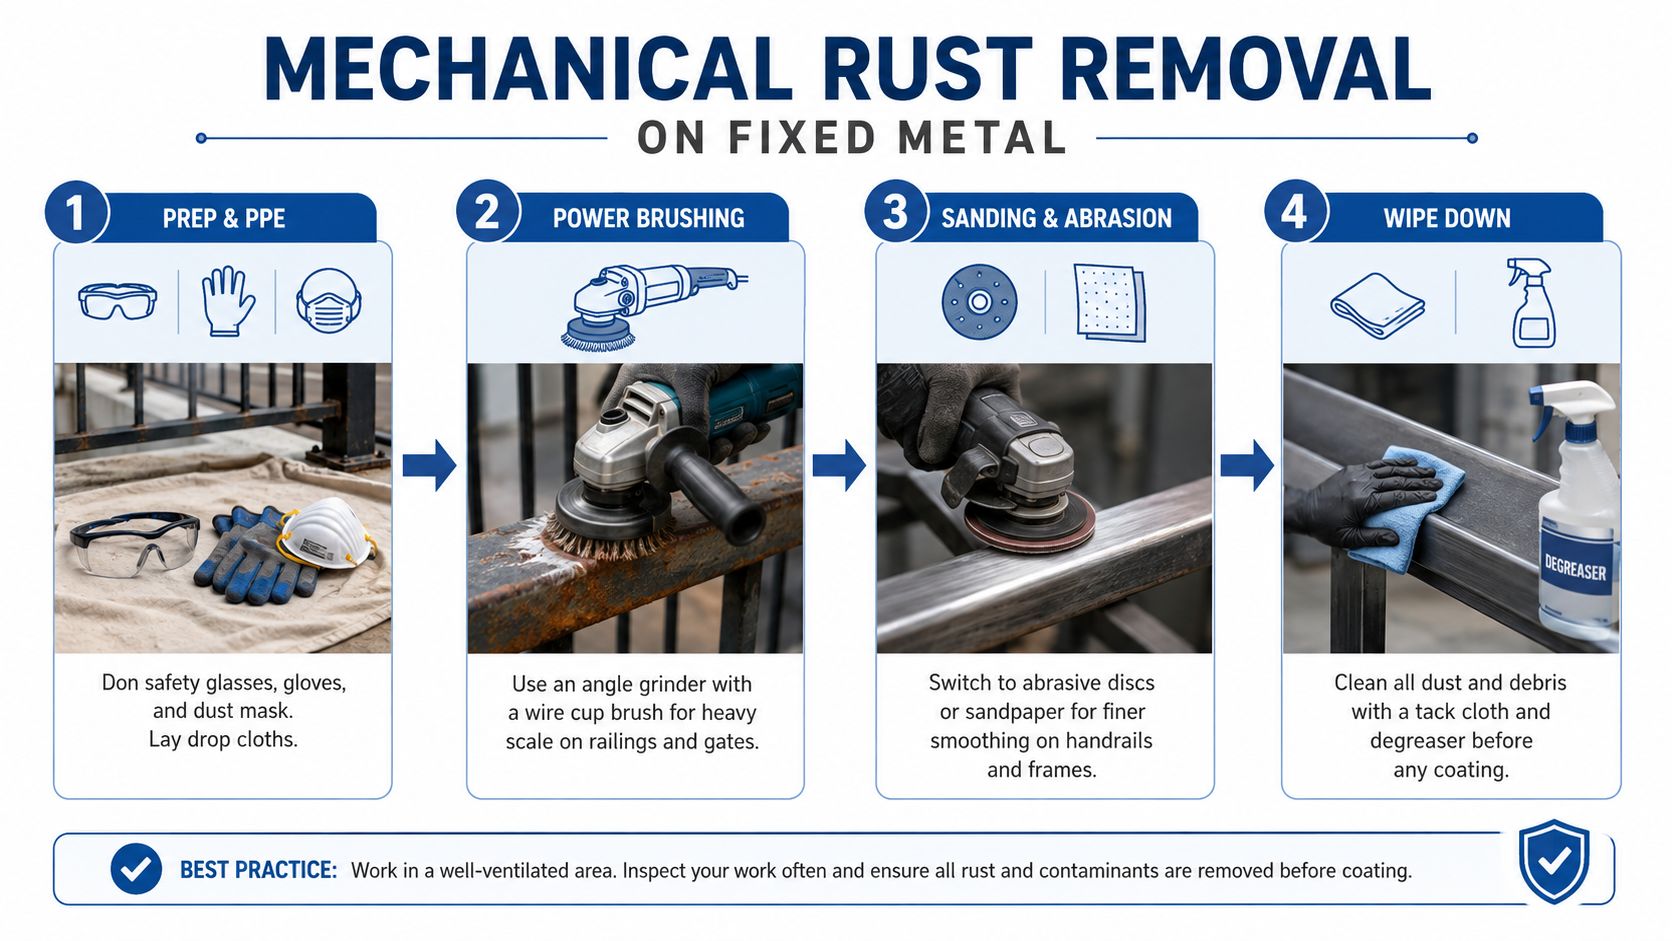
Start with sealed safety glasses, an N95 or P100 respirator, nitrile gloves under mechanic gloves, hearing protection when using an angle grinder, and long sleeves that block flying dust. A grinder can throw sharp rust scale and hot particles well beyond the immediate work area, especially around corners and welds.
Lay clean drop cloths or plastic sheeting below the work. Tape adjacent glass, shield painted stucco, and cover planters, pool edges, outdoor furniture, and light-colored paving. Rust fines can leave fresh stains when they settle on damp surfaces, so containment isn't cosmetic. It keeps the cleanup from becoming a second restoration job.
Use the least aggressive tool that will work
- Stainless or brass wire brush: Remove loose scale and powder first. A hand brush gives excellent control around glass, painted edges, and decorative details.
- Nylon abrasive flap wheel: Use it for remaining surface scale when you need more cutting action without immediately attacking the surrounding finish.
- 80- to 180-grit sanding discs: Reserve these for areas where pitting or stubborn residue demands a flatter, cleaner profile.
Work with the grain when the metal has a directional finish. Keep a grinder moving so heat doesn't burn coatings, discolor bare steel, or transfer heat toward glass. Let the tool do the work rather than forcing it into the surface. Excess pressure removes sound metal and can make a small repair look visibly gouged.
After brushing and sanding, vacuum or wipe up dry debris before rinsing. Rinse filings away from landscaping instead of letting them dry on leaves, stucco, or concrete. On a large steel surface, industrial guidance recommends staged preparation, trialing the process on representative areas, and checking residual rust, roughness, and coating adhesion before committing to the full job (industrial surface preparation guidance).
The following video shows the general power-tool approach, but fixed work still needs site-specific containment and protection:
Chemical Rust Removal with Household and Pro Acids
Chemical treatment makes sense when the part can be removed, contained, and rinsed without damaging its surroundings. It reaches threads, recesses, and small openings better than a sanding disc, but an acid that behaves well on carbon steel may stain, etch, or attack aluminum, galvanized coatings, stone, or paint.
For light rust on steel or iron, white vinegar is the mild starting point. A removable part can sit in a vinegar bath for 30 minutes to several hours, depending on the severity of the corrosion. Check it rather than leaving it unattended, then scrub the loosened residue, rinse thoroughly, and dry immediately.
Citric acid is another controlled option for cast iron and tool parts. A practical bath uses 2 to 4 tablespoons per liter of warm water, with a 1 to 4 hour dwell time. The solution needs enough contact to soften the oxide, but the part still requires a mechanical follow-up. Acid doesn't rebuild metal lost to pitting.
Oxalic acid suits stubborn, tannin-stained rust where a metal part sits near stone or wood, but it demands careful handling and complete neutralization. After treatment, rinse fully, follow with a baking-soda rinse where the product instructions allow it, rinse again, and dry every recess. Commercial removers may contain phosphoric or hydrochloric acid. Brush-on products suit a fixed, localized area with controlled masking, while immersion products suit detached parts that can be fully contained.
Chemical choices at a glance
| Chemical | Best For | Mix / Concentration | Typical Dwell Time | Safety Level |
|---|---|---|---|---|
| White vinegar | Light rust on steel and iron | Use as supplied | 30 minutes to several hours | Moderate |
| Citric acid | Tools and cast iron parts | 2 to 4 tablespoons per liter of warm water | 1 to 4 hours | Moderate |
| Oxalic acid | Stubborn, stained rust near compatible surfaces | Follow product directions | Follow product directions | High |
| Commercial phosphoric remover | Controlled treatment and conversion | Follow label directions | Follow product directions | High |
| Hydrochloric-acid remover | Industrial-strength localized work | Follow label directions | Follow product directions | Very high |
Wear nitrile gloves, splash goggles, a suitable respirator where the product label requires it, and work with strong ventilation. Never combine acids with bleach or other cleaners. A bleach safety data sheet Australia is a useful reminder that chemical compatibility and protective equipment need to be checked before products share a work area.
Acid residue can keep working after the visible rust disappears. Neutralize and rinse according to the product label, flush surrounding areas under control, and dry the metal with clean towels or compressed air. The guidance on cleaning brick with muriatic acid also reinforces why masonry protection and runoff planning matter when acidic products are used near buildings.
Electrolysis for Heavy Rust on Small Parts
Electrolysis is suited to a rusty part that can come off the property and fit inside a plastic tote. Bolts, hand tools, hinges, and small cast-iron pieces often benefit when brushing would take too long or remove too much of the original surface.
Set the part in water with washing soda as the electrolyte, using about 1 tablespoon per gallon of water. Place a sacrificial anode made from rebar or sheet steel in the bath, keeping it from touching the workpiece. The rusty part connects to the negative side and acts as the cathode. The anode connects to the positive side and corrodes instead.
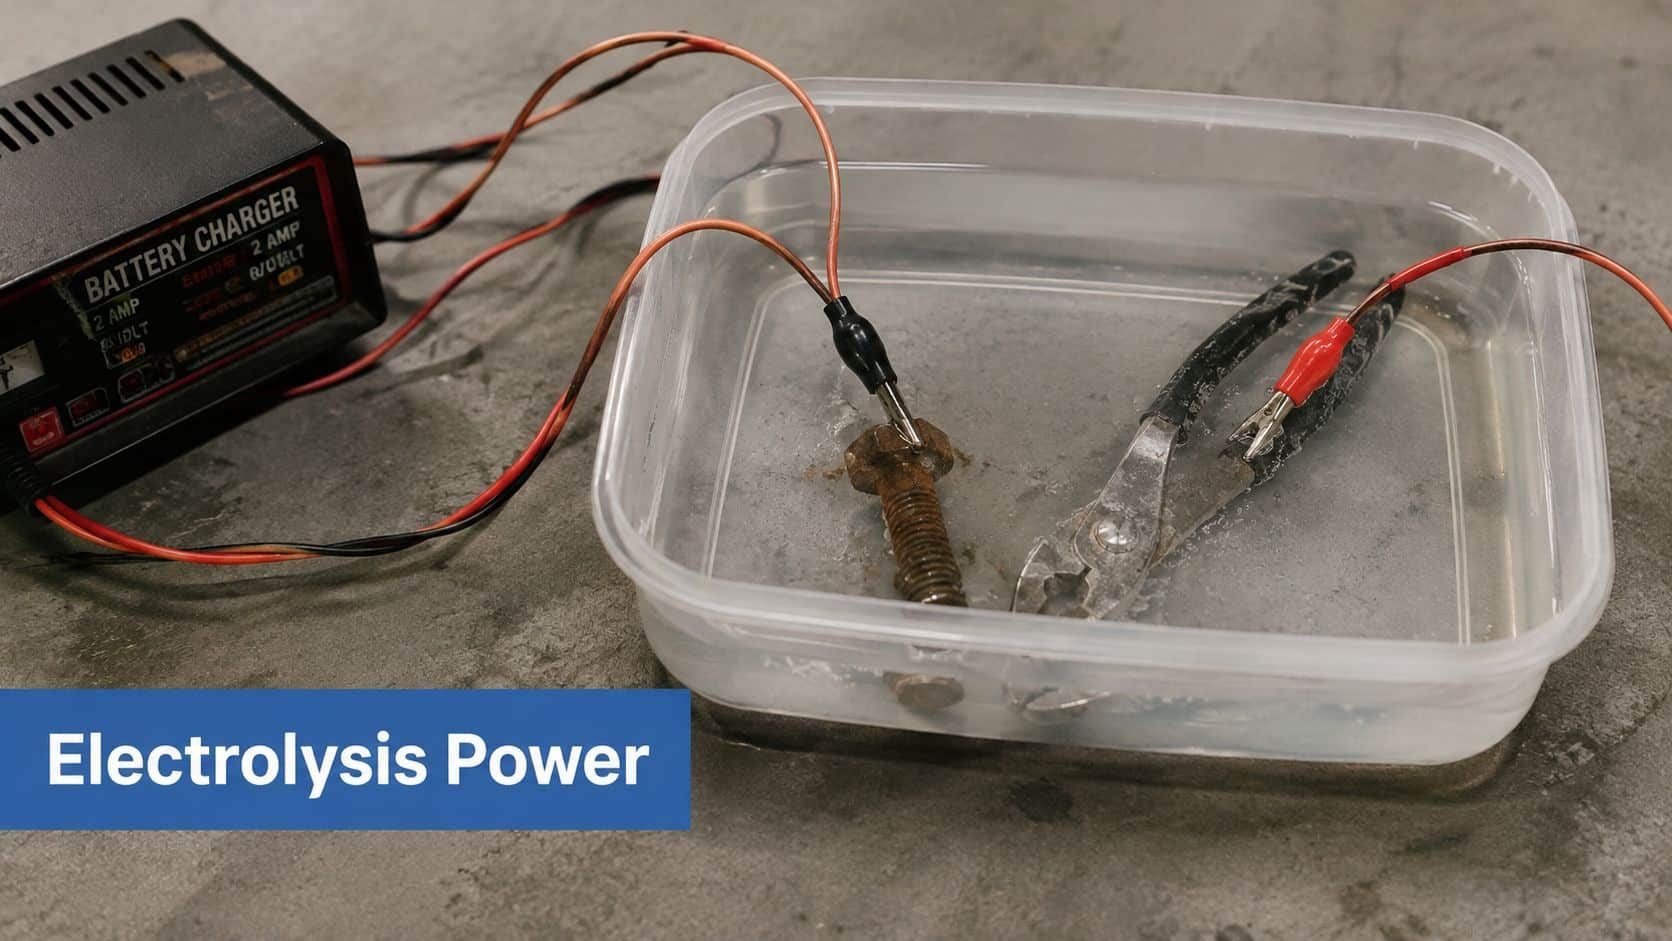
A 12V battery charger or variable DC power supply can provide the source. Keep the charger itself away from the water, work outdoors or in a well-ventilated area, and keep the setup away from flammable materials. The process produces hydrogen off-gassing, so don't run it in an enclosed room.
Polarity matters: Connect the rusty part as the cathode. Reversing the connections can damage the part instead of cleaning it.
Disconnect power before reaching into the bath. Electrolysis loosens and converts the corrosion rather than dissolving it, so remove the part, scrub away the blackened or softened residue, rinse it, and dry it immediately. Blow water out of threads and hinge pockets with compressed air.
This method is worth the setup for a valuable or heavily rusted removable part with recoverable metal underneath. It isn't worth improvising around an installed railing, a structural fastener, or a part whose coating, plating, or alloy is unknown. Zinc-plated and brass components also require caution because electrolysis can damage finishes or create an unsuitable reaction.
Stopping Rust from Coming Back After You Clean It
Rust prevention starts before the cleaned metal looks finished. Moisture trapped in seams, threads, welds, or underside channels can bring back orange corrosion quickly. One experimental study found that controlled pretreatment can prevent flash rust and re-corrosion for up to 72 hours, provided the surface is protected and processed within that period (study on controlled pretreatment).
Blow out crevices with compressed air, then wipe the metal with a clean, dry rag. Check fastener heads, drain holes, lap joints, and the backs of rails. Let the surface cure fully in ventilated, dry conditions before applying a coating.
Build the protection around the metal
A rust-converting primer may suit stable steel with suitable remaining corrosion. Outdoor steel often benefits from a zinc-rich primer. Bare aluminum and galvanized metal generally need an etching primer made for that substrate. Use a direct-to-metal enamel or exterior-rated urethane as the topcoat when the product system allows it.
Arizona properties have specific exposure points. Pool splash, irrigation overspray, shaded north-facing rails, and dust held against a joint can keep corrosion active despite the dry climate. On fixed metal, control the surrounding water and runoff as carefully as the coating. Protect nearby glass, painted walls, stone, and landscaping while rinsing or treating the surface.
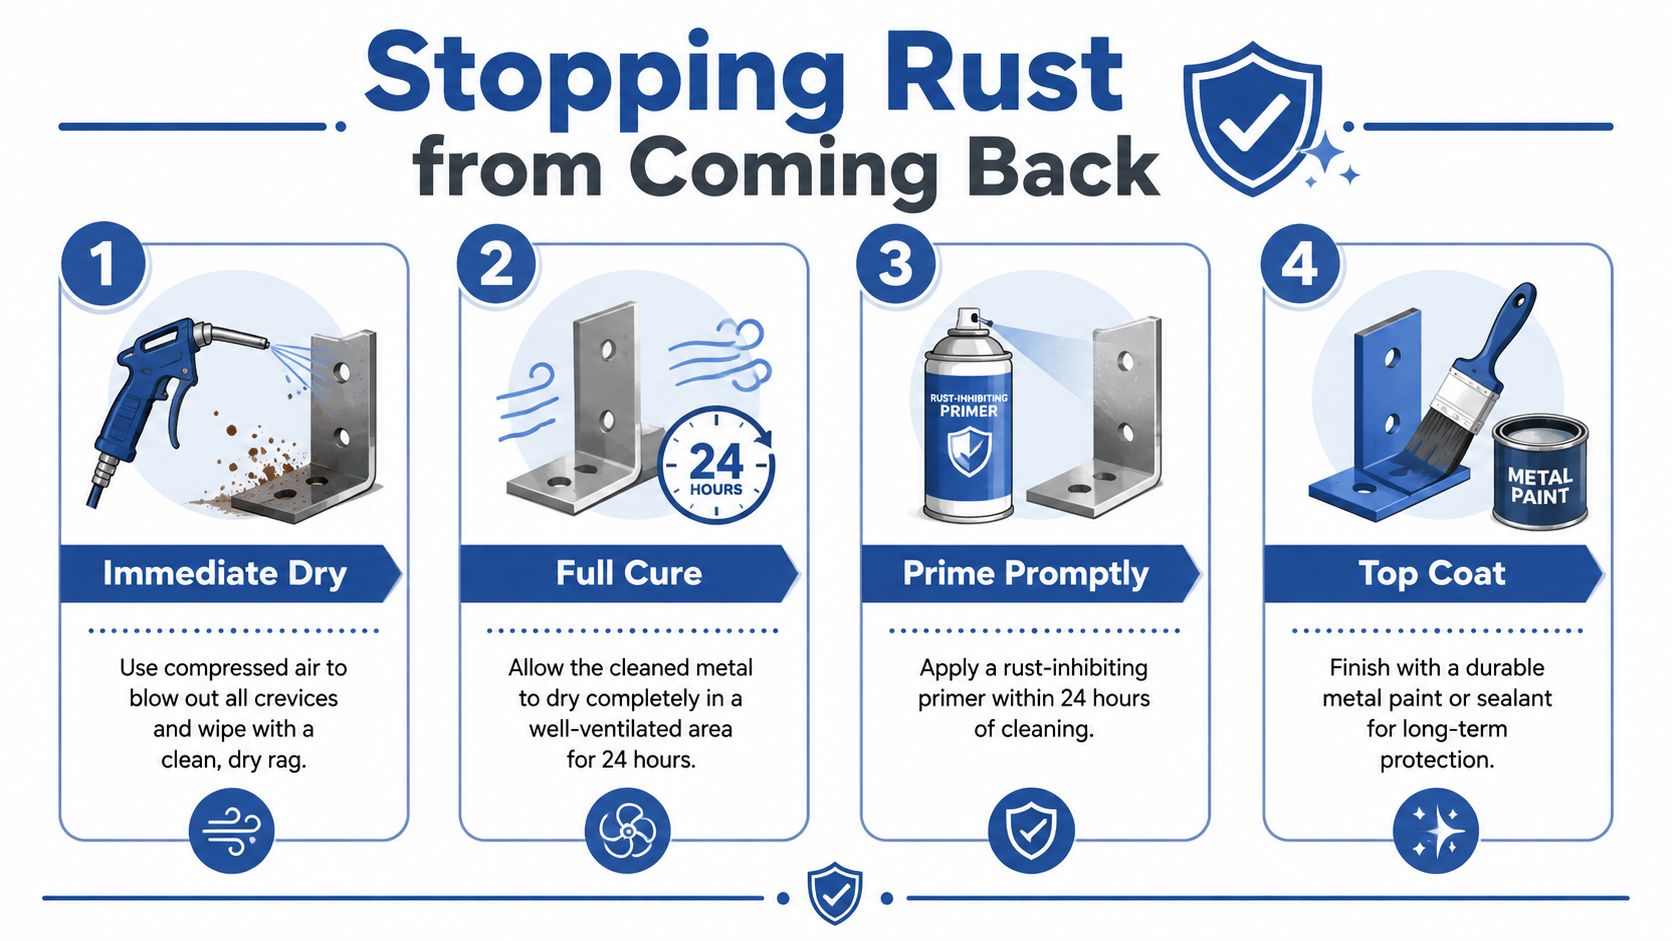
Use this field checklist after removal:
- Dry promptly: Blow out crevices and wipe the surface before moisture settles.
- Prime the same day: Apply a compatible primer while the metal is clean and stable.
- Follow the coating system: Respect the product's recoat and curing directions.
- Inspect return points: Check welds, fasteners, joints, and undersides first.
- Correct the water source: Adjust irrigation heads, repair leaks, and stop repeated splash.
- Control runoff: Collect or redirect rinse water so it cannot stain adjacent surfaces or wet the metal again.
For a broader seasonal routine, follow this rust prevention plan for metal. These vehicle corrosion prevention methods also reinforce the value of removing contaminants and protecting exposed metal. For installed surfaces, the working sequence is dry, prime, topcoat, then reduce the moisture source.
When a Professional Rust Removal Service Is Worth It
DIY rust removal is reasonable for a small detachable part, a lightly oxidized tool, or a surface where you can safely contain every product and particle. Professional help makes more sense when the metal is large, fixed, structural, difficult to reach, or surrounded by surfaces that a grinder or acid could damage.
That includes balcony railings, security gates, stair components, window frames, exterior fasteners, and rust trails on façades. A fixed object can't be submerged, and wrapping it in vinegar-soaked cloth doesn't solve runoff control, staining, or the need to protect adjacent glass and paint. A professional crew can also recognize when rust is more than a cosmetic issue, particularly around load-bearing joints or thinned sections.
What a responsible site visit includes
A useful assessment should address:
- Surface condition: The technician identifies scale, pitting, coatings, mixed metals, and possible structural concerns.
- Method selection: The proposal explains why brushing, sanding, chemical treatment, blasting, or another approach fits the site.
- Protection plan: Drop cloths, masking, runoff collection, landscaping protection, and cleanup should be discussed before work begins.
- Process control: Larger projects should include a small trial area and checks for cleanliness, profile, and coating adhesion. NIST's feasibility work highlights why visual inspection alone can miss residual rust on blast-cleaned steel (NIST rust measurement study).
- Scope and finish: The quote should state whether it includes neutralization, drying, primer, topcoat, and final cleanup.
High-rise and exterior window work adds a separate access issue. OSHA guidance says employees should clean exterior glass from inside with their feet firmly on the floor whenever possible. If that isn't practical, workers need protection against falling through the opening with a personal restraint system attached to a secure anchorage (OSHA enforcement guidance). For suspended-access work, fall-protection rules and anchor requirements must be handled by qualified professionals, not improvised from a window opening (window-cleaning safety guidance).
When comparing rust removal services near me, ask who protects glass and landscaping, how runoff is handled, what coating system follows cleaning, and whether the crew carries appropriate insurance and safety equipment. South Mountain Window Cleaning has experience with Arizona properties where desert dust, irrigation overspray, railings, gates, and window frames create recurring maintenance challenges.
South Mountain Window Cleaning, LLC offers rust removal along with residential, commercial, and high-rise exterior cleaning in Phoenix, Scottsdale, Paradise Valley, Chandler, Tempe, Gilbert, and nearby Arizona communities. If rust is staining your railings, fasteners, façade, or window areas, visit South Mountain Window Cleaning, LLC to request a fast, free quote and discuss a controlled removal and prevention plan.