
Arizona brick gets dirty in a very specific way. Dust settles into the face of the wall, irrigation leaves mineral marks near the base, old mortar smears show up after a repair, and a patio that used to look sharp starts looking tired. At that point, muriatic acid starts to sound like the fast answer.
Sometimes it is effective. It can strip off mortar residue, efflorescence, and grime that soap and water won’t touch. It can also scar brick, damage mortar, fog nearby surfaces, and create a safety problem fast, especially in Phoenix heat. That’s why professionals treat cleaning brick with muriatic acid as a controlled procedure, not a casual weekend project.
Inquiries into acid washing often arise from one of two situations. The first is cosmetic. A brick wall, courtyard, storefront, or chimney just looks dull and blotchy. The second is post-construction cleanup. There are thin mortar smears or cement haze that never got removed correctly the first time. Muriatic acid can help in both cases, but only when the brick type, mortar, dilution, timing, weather, and rinse process all line up.
If you’re deciding whether to do this yourself, think of this as a field briefing from someone who knows how ugly a bad acid wash can get. The goal isn’t to scare you away from every cleaner. The goal is to make sure you don’t turn a dirty wall into a permanently damaged one.
The Temptation of a Muriatic Acid Clean
A lot of brick cleaning jobs start with frustration. You wash the wall. It still looks blotchy. You scrub a white deposit. It comes back. You notice old mortar tags from a remodel, and every time the sun hits the wall just right, they stand out more.
That’s when muriatic acid enters the conversation because it has a reputation for doing what mild cleaners can’t. On new masonry, hydrochloric acid based cleaners are widely known for cutting through mortar residue and efflorescence. The strongest versions of brick acid are commonly sold at 36% concentration, while typical muriatic acid is often around 30-32% hydrochloric acid and may contain iron impurities that can affect appearance, according to this chemistry overview of brick acid concentrations and dilution practices.
Why people reach for it
The appeal is simple:
- It acts fast. Acid reacts with cement residue and mineral deposits much faster than a basic detergent.
- It looks decisive. A wall that didn’t respond to brushing suddenly changes.
- It seems cheap at first. One bottle feels easier than a full cleaning plan.
That’s exactly why it gets overused. People assume stronger means better. On brick, stronger often means less control.
Field reality: Muriatic acid is the cleaner people choose when they’re already out of patience. That’s also when mistakes happen.
What Arizona adds to the risk
In the Valley, dirt isn’t the only issue. Brick deals with airborne dust, hard water splash, strong sun, and fast surface heating. A cleaner that might be manageable in mild weather gets less forgiving when the wall is hot and moisture evaporates quickly.
That matters because acid washing is a timing job. Pre-wetting has to stay effective. Dwell time has to stay short. Rinsing has to be immediate and thorough. When the wall starts drying faster than you can control, the procedure stops being routine and starts becoming risky.
The real trade-off
Used correctly, muriatic acid can remove stubborn residues. Used carelessly, it can bleach light brick, roughen the surface, and weaken mortar joints. It’s best understood as a last-resort cleaner for the right masonry, not a universal answer for every stained brick surface.
That distinction matters more than most online how-to guides admit.
Your Non-Negotiable Safety and Preparation Checklist
Before anyone opens a container, the job either gets safer or more dangerous based on setup. Most acid damage doesn’t start at the scrubbing step. It starts earlier, when someone skips protection, fails to isolate nearby surfaces, or guesses the brick can handle acid because it “looks solid.”
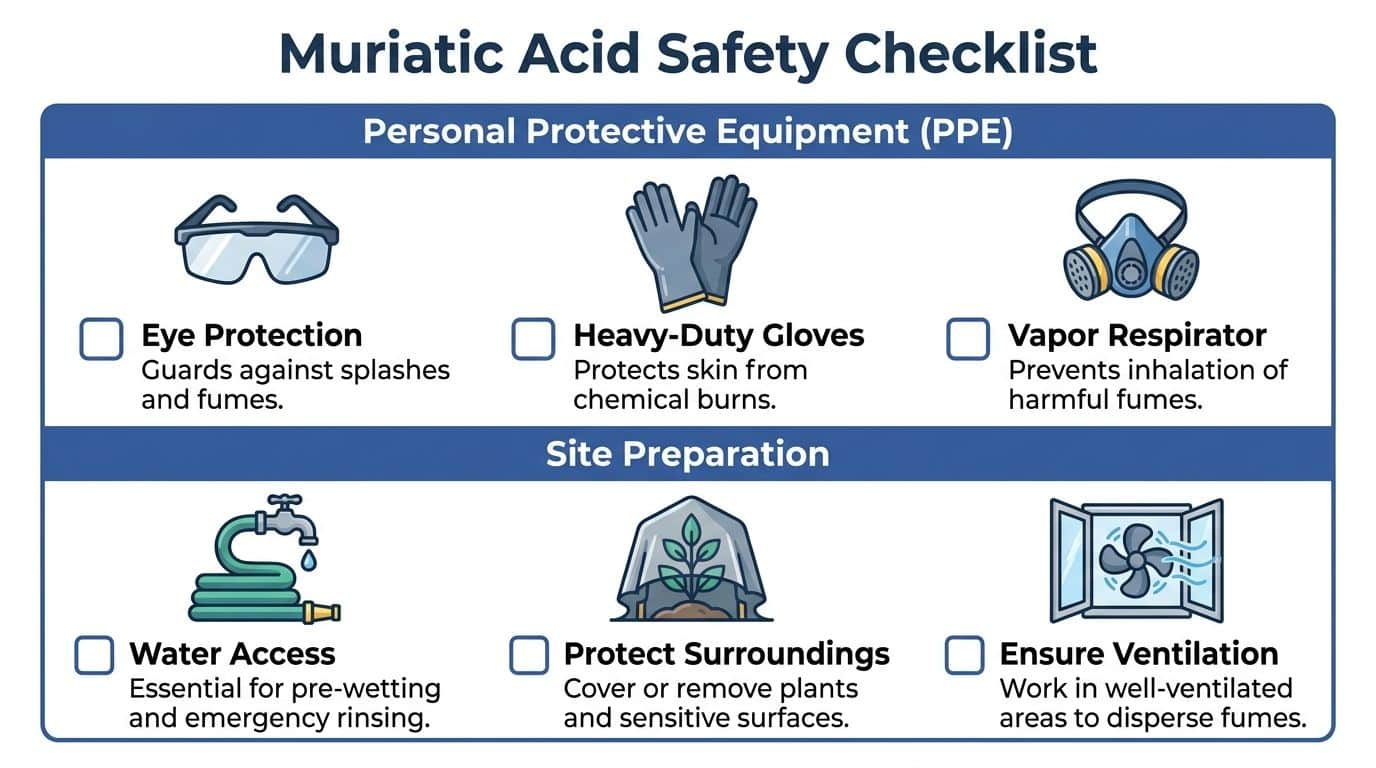
Wear the gear that matches the chemical
Muriatic acid isn’t a nuisance cleaner. It can burn skin, injure eyes, and create dangerous fumes. Basic household gloves and casual eyewear aren’t enough.
Use this checklist before you mix anything:
- Eye protection: Wear sealed splash-resistant eye protection. Acid doesn’t need a big spill to cause a serious eye injury. A flick from a brush is enough.
- Heavy-duty gloves: Use chemical-resistant gloves that can handle direct contact. Skin burns happen fast, especially around wrists and the backs of the hands.
- Vapor respirator: Fumes matter. If you’re in a tight courtyard, near a recessed entry, under an overhang, or working where air movement is poor, you need proper respiratory protection rated for acid vapors.
- Protective clothing: Long sleeves, long pants, and footwear that won’t absorb splashes are part of the job, not an extra precaution.
Prepare the site like runoff is guaranteed
Even careful application creates splash, drip, and runoff. If you haven’t planned for where that liquid goes, you haven’t prepared the job.
- Water access: Keep a hose or a full water source immediately available for pre-wetting, rinsing, and emergency flushing.
- Protect surroundings: Cover or move vulnerable items. Plants, painted trim, metal fixtures, glass, frames, and decorative stone can all be damaged by acid contact or overspray.
- Ventilation: Work only where fumes can disperse. Closed garages, enclosed breezeways, and partially shaded alcoves are bad places to learn how strong muriatic acid smells.
- Drain awareness: Know where your rinse water is headed before you start. A wall that drains toward adjacent stucco, concrete coatings, or edging can create a second damage zone.
If you can’t explain where the acid will go after it leaves the brick, you’re not ready to apply it.
The patch test decides the whole job
The single most important prep step is a small, controlled test patch in an inconspicuous area. Not near the center of the wall. Not on the most visible elevation. Somewhere hidden enough that a failure won’t define the property.
This isn’t optional. Data cited in Prosoco’s guidance on brick cleaning notes that DIY muriatic acid applications have a 25-40% failure rate due to etching or staining on untested brick surfaces. That number should stop anyone from “just trying a little” across a full wall.
What to check during the test patch
Use the patch to answer practical questions:
- Does the brick darken, bleach, or turn uneven after rinsing?
- Does the mortar soften, streak, or lighten faster than the brick face?
- Are there nearby materials getting hit by runoff or mist?
- Does the wall absorb the cleaner too fast, even after pre-wetting?
If the patch reacts badly, that’s your answer. Don’t negotiate with it.
When preparation tells you to stop
A DIY acid wash is a bad idea when any of these are true:
- The brick is historic or unknown
- The mortar is soft, sandy, or visibly aged
- The wall includes mixed materials
- The surface is light-colored and appearance matters
- You can’t keep the work area wet, controlled, and fully rinsed
Those jobs go sideways fast because the problem isn’t just dirt. The problem is uncertainty.
The Professional Method for Applying Muriatic Acid
A Phoenix brick wall at 10 a.m. in June can dry faster than a DIYer can scrub it. That matters, because muriatic acid only stays predictable when the wall stays wet, the section stays small, and the rinse starts on time. In Arizona heat, those controls are harder to hold than people expect.
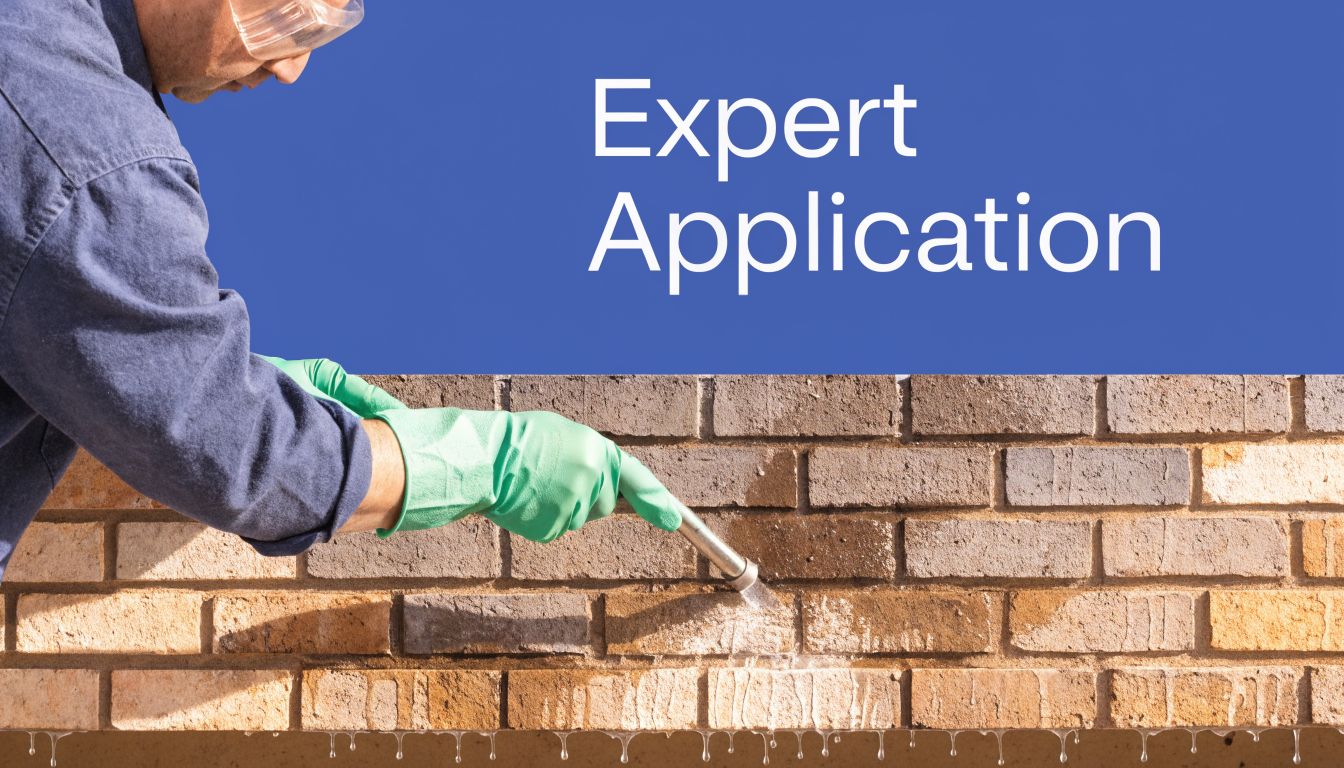
Start with full saturation
Pre-wet the brick until the surface and mortar joints are uniformly damp. A light mist is not enough. Dry spots pull acid deeper into the wall, especially on older brick and thirsty mortar, and that is where etching and uneven color start.
On Arizona homes, I want the runoff path wet too. Hot masonry, reflected sun, and low humidity speed up evaporation, so a wall that looked ready thirty seconds ago may already be drying out by the time acid touches it.
A bucket and acid-resistant brush give better control than aggressive spraying. That slower method is usually the safer one on detailed facades, entry columns, and any wall near painted trim, metal, or glass.
Mix correctly and keep it weak
Always add acid to water. Never add water to acid. The wrong order can flash heat back at the bucket and throw acid where you do not want it.
For many brick-cleaning situations, contractors start around a 1:10 dilution and adjust only if the test area proved the brick can handle it. The right mix is the weakest one that removes the residue in a short contact window. If it takes a hotter mix and more dwell time to get results, the wall is already telling you acid may be the wrong tool.
Use a dedicated plastic container and tools that can handle acid contact. Household gear fails fast in this work.
Apply in small, controlled sections
Keep each section tight enough that you can watch it the whole time, scrub it, and rinse it before anything starts to dry. On most residential walls, that means working a small patch, not chasing a whole elevation.
That is especially true with post-construction residue. Mortar smear, hard-set grout haze, and general soil do not respond the same way. If the issue is leftover masonry residue rather than dirt, our guide to cleaning mortar off brick explains why cure stage and residue type change the method.
Use this application routine:
- Brush the solution on instead of flooding the wall
- Keep the brick wet during the full contact period
- Agitate lightly with an acid-resistant bristle brush
- Watch mortar joints first, because they often fail before the brick face does
- Stop immediately if you see rapid lightening, roughness, or blotchy reaction
Fast results are not always good results. On brick, a wall that changes too quickly is often being damaged.
Control dwell time with a timer
Do not judge dwell time by eye. Set a timer.
A common working window is about 3 to 6 minutes for light staining or mortar smears, assuming the wall was pre-wet properly and the dilution is mild. Longer contact raises the chance of surface erosion, joint damage, and color change. In Arizona sun, even that short window can shrink on a warm wall, which is one reason experienced crews start early, work shaded sides first, and reject bad conditions instead of forcing the job.
Rinse immediately and rinse heavily
The rinse stops the reaction. If the rinse is weak, the acid keeps working in the pores and joints after the visible foam is gone.
Flood the treated area with plenty of water from the top down. Rinse adjacent materials too, especially window frames, sills, painted surfaces, and anything below the work zone that could catch runoff. Acid splash travels farther than people think, and on mixed-material exteriors, one mistake can turn a brick-cleaning job into a glass, paint, and metal restoration problem.
This is the point where DIY acid washing usually stops making financial sense. On Arizona properties, the speed of drying, the risk to surrounding finishes, and the liability from runoff make professional, insured handling the smarter call on anything beyond a very limited, low-visibility spot.
Neutralization Rinsing and Responsible Cleanup
The wall can look clean and still be chemically active.
That happens when acid stays in the face of the brick, in the mortar joints, or in the runoff line below the work area. On Arizona masonry, that risk goes up fast because heat drives off rinse water and leaves residue behind sooner than many DIY cleaners expect.
Neutralize the surface, not just the stain
Water flushing removes a lot of material, but it does not always stop the reaction completely. A standard field method is to apply a baking soda and water solution over the treated section, then rinse again until the surface and runoff are fully flushed. Keep the neutralizer light and even. Saturate the cleaned area and the path where the runoff traveled.
Treat and neutralize in small sections. That keeps control of the chemistry and gives you a better chance of clearing joints, ledges, and low spots before they dry.
Acid washing without neutralization leaves unfinished chemistry in the wall.
Rinse with volume, direction, and restraint
Start at the top and flush downward with plenty of water. The goal is removal, not force. High pressure can scar mortar, drive residue deeper into weak joints, and spread contaminated spray onto glass, frames, paint, or stone below.
Brick cleaning rarely happens in isolation. On Phoenix-area homes and commercial buildings, acid runoff often reaches stucco bands, coated trim, metal doors, and windows within seconds. If you want a broader look at how surrounding materials should be handled during exterior cleaning, this guide on how to pressure wash a house safely around mixed surfaces gives the bigger picture.
Arizona heat shortens your margin for error
A cleanup process that is manageable in mild weather gets harder on hot brick. Warm masonry flashes off water faster. Fumes get harsher around courtyards, entries, and low-airflow side yards. Runoff dries sooner and leaves stronger residue on anything it touches.
That is why experienced crews do not treat cleanup as a final spray-and-go step. We watch wall temperature, shade patterns, wind, drain paths, and nearby finishes before the first acid ever touches the brick. If conditions are wrong, postponing the work is the safer call.
Responsible cleanup includes the ground, drains, and adjacent surfaces
Contain runoff. Rinse tools, brushes, and PPE where residue will not stain finished surfaces or enter the wrong drain. Check the base of the wall, slab edges, decorative concrete, and planting areas for splash or pooled solution. Those are common miss points on DIY jobs, especially in dry Arizona conditions where residue can set up quickly and show later as etching, discoloration, or dead vegetation.
This is one of the clearest dividing lines between a small controlled test spot and a full acid wash. Once runoff management becomes part of the job, insured local service is usually the smarter option.
How DIY Acid Washing Goes Wrong and Causes Permanent Damage
Most failed acid washes don’t fail dramatically in the first minute. They fail in a sequence. The mix is a little too hot. The wall isn’t wet enough. One section sits too long. The rinse is uneven. The wall dries. Then the damage becomes visible.

The three failure patterns seen most often
Acid burn
This is the classic overreaction problem. The cleaner doesn’t just remove residue. It attacks the surface of the masonry. On light-colored brick, that can show up as pale, chalky, or uneven areas that don’t wash out later.
The worst part is that people often think the wall is “still drying” and wait. What they’re seeing is permanent change.
Etching and rough texture
Etching leaves the brick face rougher than before. That roughness doesn’t just change the look. It changes how the wall behaves. Research summarized in Natural Handyman’s discussion of muriatic acid damage to masonry notes that acid-etched bricks can exhibit 20-30% higher water absorption, which leads to faster dirt accumulation and recurring efflorescence problems.
That’s the hidden cost of a harsh cleaning. The wall may look brighter right after the wash and get dirtier faster after that.
Mortar damage
Mortar joints are often more vulnerable than the brick itself. If they’re softer, older, or lime-rich, the acid can eat at them first. That leaves shallow erosion, uneven joint color, and weak-looking lines between units.
The mistakes that cause the damage
Some errors are predictable:
- Using too strong a mix
- Skipping the test patch
- Letting acid dry on the surface
- Working too large an area at once
- Cleaning in high heat
- Failing to neutralize completely
If you want a wider view of when high-pressure exterior cleaning should be softened or modified, this comparison of pressure washing vs soft washing for your Phoenix home helps frame the same core issue. Matching the method to the material matters more than brute strength.
Some brick damage shows up immediately. Some shows up after the next rain, the next irrigation cycle, or the next dust season.
Why the wall often looks worse later
Porosity changes are part of the reason. Once the surface has been opened up by acid, it can hold more moisture and contaminants. In Arizona, that often means dust sticks faster, sprinkler minerals leave stronger marks, and salts migrate back to the surface more visibly.
That’s why a bad acid wash is so frustrating. It doesn’t just fail to solve the problem. It can create a maintenance cycle the wall didn’t have before.
Safer Alternatives and When to Call Your Phoenix Exterior Pro
Muriatic acid isn’t the only way to clean masonry, and for many brick surfaces it shouldn’t be the first way. Safer alternatives include mild detergents, masonry-specific cleaners, and buffered products designed for particular residue types. They may work more slowly, but slow and controlled is often the right answer on finished brick.
Where acid should already be off the table
The strongest line in the sand involves sensitive masonry. The U.S. National Park Service’s Preservation Brief 1 warns against muriatic acid for historic or sensitive masonry because it can dissolve lime-based mortars and cause irreversible damage. The Brick Industry Association also prohibits unbuffered muriatic acid on most modern light-colored brick because of acid burn risk, as outlined in the National Park Service preservation guidance on cleaning masonry.
That means a lot of attractive brick doesn’t belong in an acid-wash experiment.
Better first options for many properties
Before acid, consider whether the issue is:
- Surface dust and grime, which often respond to standard exterior washing
- Mineral staining, which may need a targeted cleaner instead of a blanket acid application
- Mortar smears, which require residue-specific treatment
- Adjacent stone or tile contamination, where the wrong chemistry can damage a different material entirely
If your project includes masonry next to tile or natural stone, this guide on cleaning stone tiles the right way is a useful companion because many owners accidentally choose one cleaner for surfaces that shouldn’t be treated the same way.
Brick cleaning options compared
| Method | Effectiveness | Risk Level | Best For |
|---|---|---|---|
| DIY muriatic acid | Strong on stubborn mortar residue and some mineral deposits when the brick is compatible | High | Limited situations where the masonry has been tested and the user can manage dilution, ventilation, runoff, and neutralization |
| DIY masonry-safe cleaner | Moderate to good, depending on the stain | Lower | Routine dirt, lighter staining, and maintenance cleaning where preserving the surface matters most |
| Professional exterior cleaning service | Chosen to match the stain, brick type, and surrounding materials | Lower for the owner because the work, equipment, and site control are handled by trained technicians | Visible brick on homes, storefronts, mixed-material exteriors, and properties where appearance and liability matter |
When hiring a pro is the smarter move
For Phoenix-area owners, the call usually becomes obvious when any of these apply:
- The brick is decorative, light-colored, historic, or part of a high-visibility facade
- The wall sits next to glass, stucco, painted trim, or natural stone
- The job is above ground level or spread across a large elevation
- You don’t know what caused the stain
- You need the wall cleaned without creating a second repair project
A qualified exterior cleaning company should understand runoff control, brick compatibility, weather timing, and safer alternatives before anyone even discusses acid. If you’re comparing methods for the whole building envelope, this overview of how to clean house exterior helps place brick cleaning in the bigger maintenance picture.
The biggest advantage of a pro isn’t just labor. It’s judgment. On brick, that’s what prevents a cleaning job from turning into a restoration problem.
Frequently Asked Questions About Acid Washing Brick
Can muriatic acid remove paint from brick
Not reliably, and it’s a poor choice for that problem. Paint removal usually needs a dedicated stripper, a mechanical method, or a restoration approach matched to the coating and the brick. Acid can react unpredictably with paint residue and make the surface look worse.
Will muriatic acid damage new mortar joints
It can. Fresh mortar is vulnerable, and rushing acid into a post-repair cleanup is one of the easiest ways to scar the work. Follow masonry product guidance for cure timing and don’t treat new joints casually.
Is brick acid different from muriatic acid
Yes. Brick acid is commonly sold at 36% concentration, while typical muriatic acid is often around 30-32% hydrochloric acid and may contain iron impurities, according to the earlier chemistry reference. That difference affects performance and appearance, which is one reason random store-bought acid isn’t automatically the right cleaner.
Can I just use a stronger mix if the stain is stubborn
That’s usually the wrong move. Stronger acid increases the chance of etching, discoloration, and mortar damage. A stubborn stain often means the cleaner is wrong for the stain, not that the dose is too weak.
Is DIY really cheaper
Only if nothing goes wrong. If you damage visible brick, mortar, nearby glass, stucco, or landscaping, the repair bill quickly outweighs whatever you saved on materials. The risk side of the equation is what most DIY budgets leave out.
If your brick exterior needs attention and you want the safest path for your property, South Mountain Window Cleaning, LLC can help you evaluate the surface, the staining, and the right cleaning method for Arizona conditions. For homes, storefronts, and commercial buildings across Phoenix, Scottsdale, Paradise Valley, Chandler, Tempe, and Gilbert, it’s often better to start with trained eyes than with acid.