
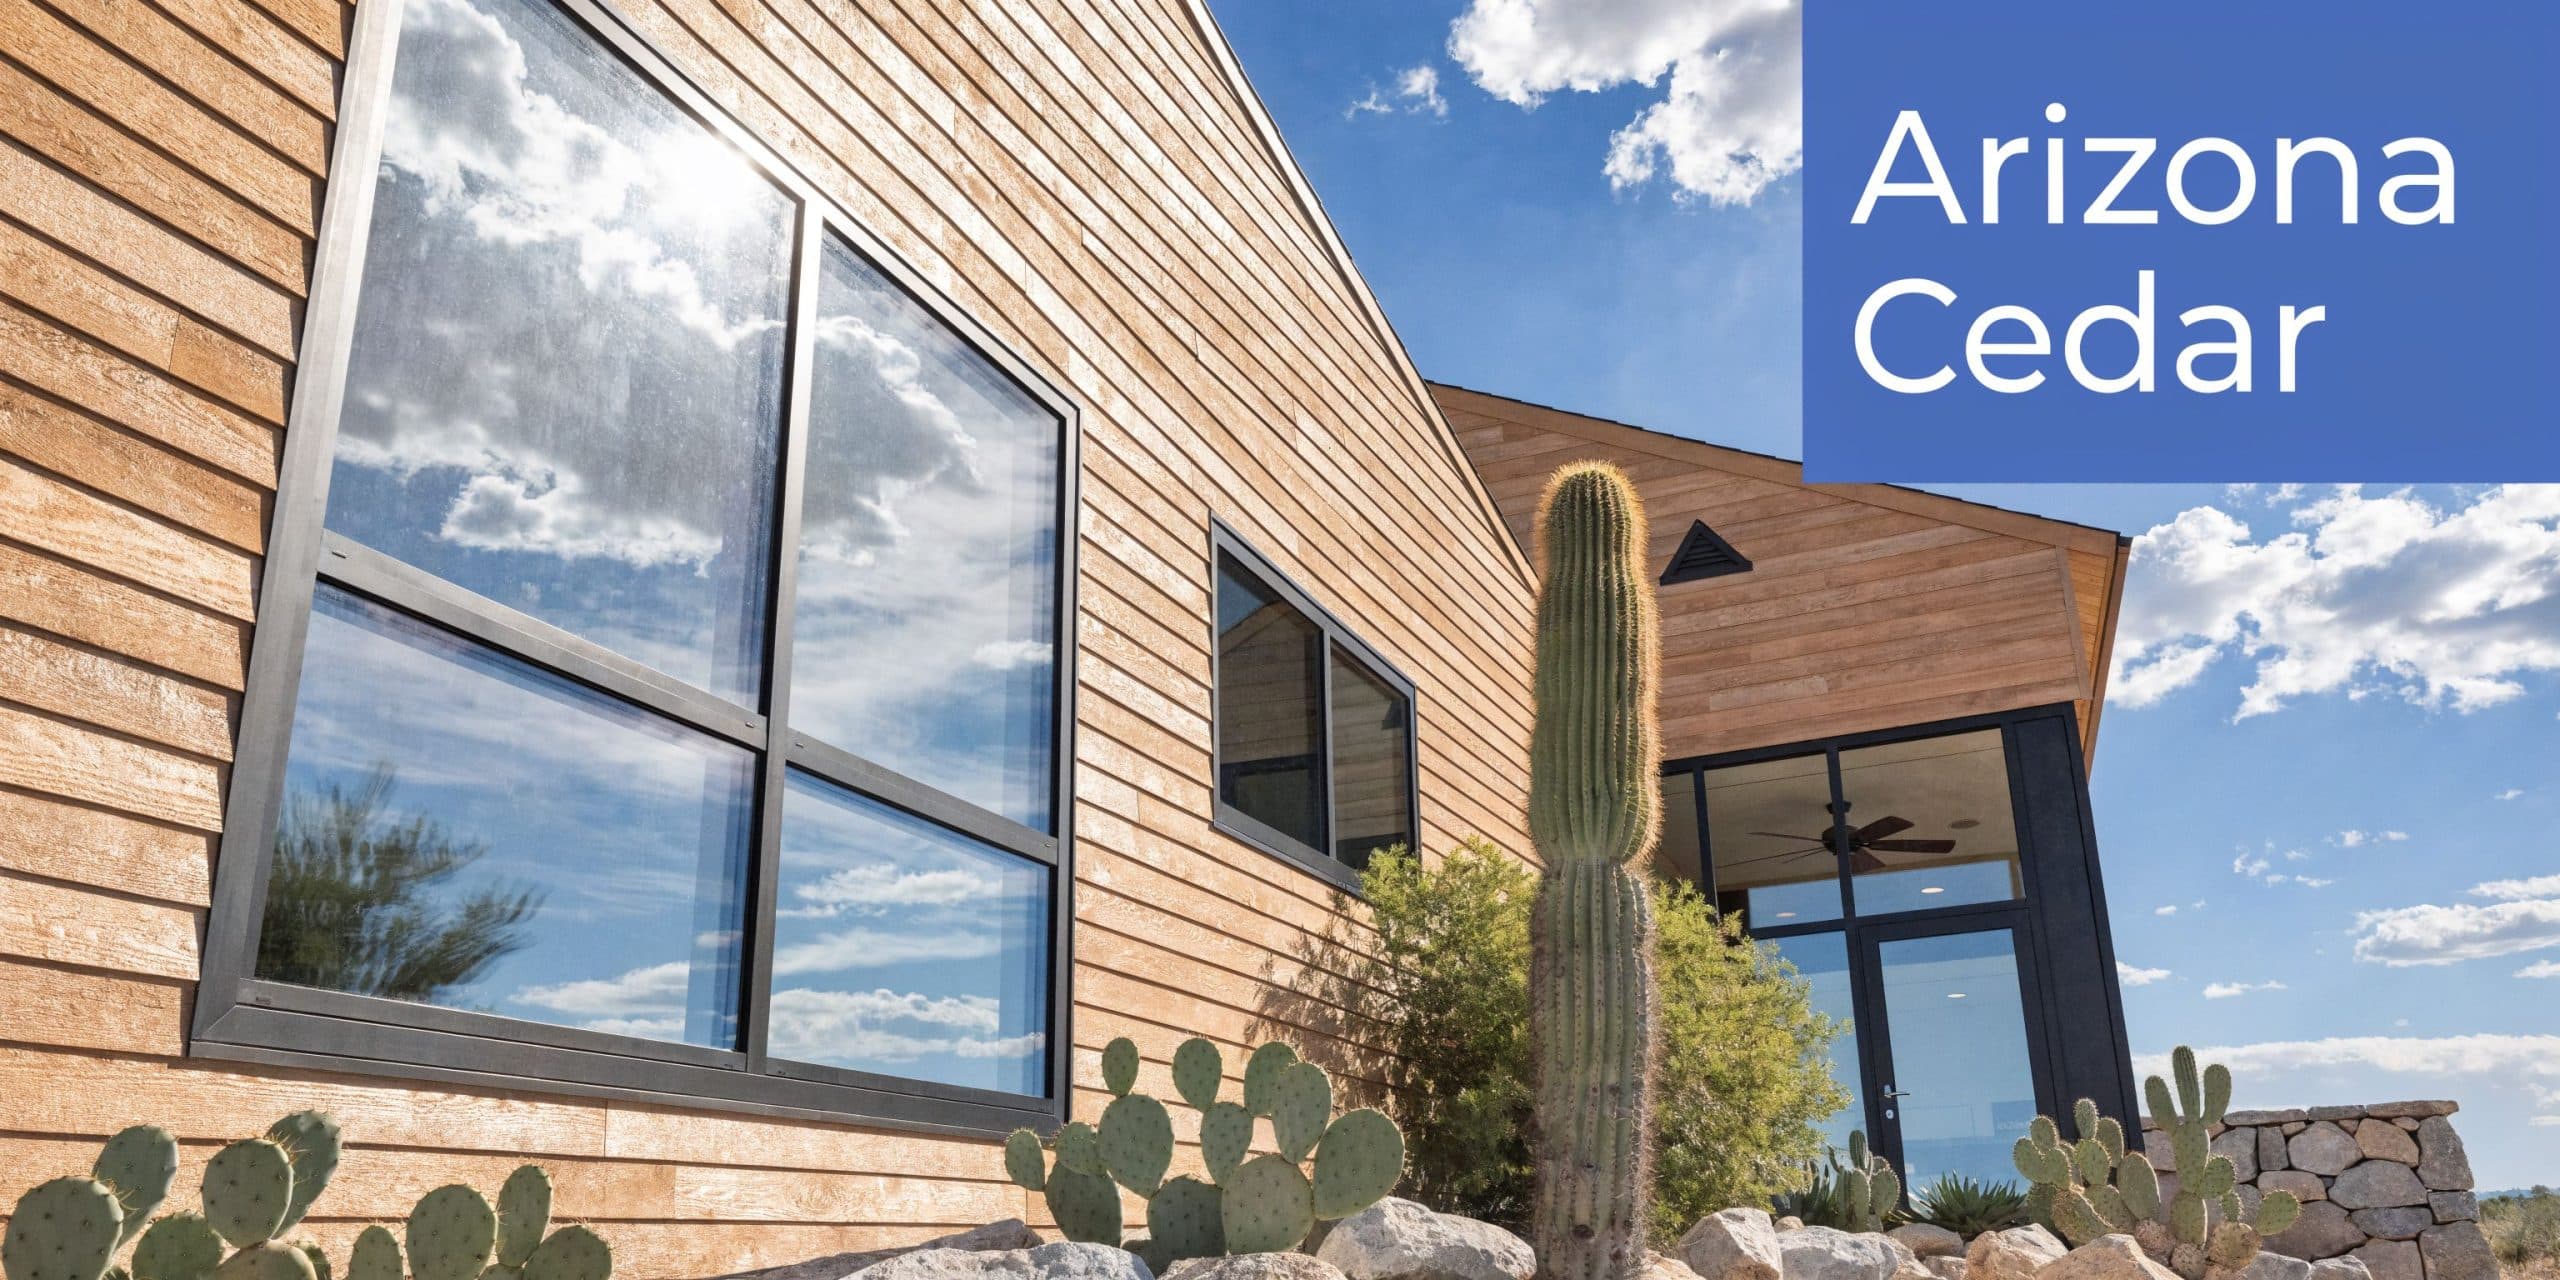
Cedar looks right at home in Arizona until the climate starts working against it.
A homeowner in Phoenix or Scottsdale usually notices the same sequence. The siding still has that warm, high-end look from the curb, but the south-facing wall starts to look dull first. Dust settles into the grain. The color gets uneven. A few boards feel dry to the touch. Then the question comes up: is this normal weathering, or the start of real damage?
That question matters because cedar is not forgiving when maintenance gets delayed. It is a premium cladding material, but in the Valley, it needs a plan that respects sun, dust, and heat. Cedar siding maintenance in Arizona is less about cosmetic touch-ups and more about timing, cleaning method, and protecting the wood before the finish gives out.
Protecting Your Cedar Siding in Arizona's Climate
Arizona is hard on exterior wood. In Phoenix, Scottsdale, Paradise Valley, and the rest of the Valley, cedar deals with relentless UV exposure, airborne dust, sharp temperature swings, and long dry stretches that pull moisture from the surface. A generic maintenance schedule written for a mild or humid climate does not hold up well here.
Why Arizona cedar ages differently
The first problem is sun exposure. South- and west-facing walls take the brunt of it. The finish breaks down faster there, and once that protective layer starts to fail, the wood underneath dries out and fades fast.
The second problem is dust. Arizona dust does more than make siding look dirty. It sits in surface texture, holds grime, and can turn a small maintenance issue into a broader cleaning and recoating job. Homes near open lots, active roads, or new construction feel this even more.
Then there is water in the wrong places. Arizona is dry most of the year, but when moisture does show up from monsoons, sprinklers, or shaded damp areas, cedar can struggle if the finish has already worn thin.
The impact of neglecting maintenance
Well-maintained cedar siding has a typical lifespan of 20 to 40 years, while neglected installations can enter a “downward spiral” after 4 to 6 years, with mold, warping, and cracking becoming much more likely, according to this cedar siding lifespan guide.
That is the core trade-off with cedar. It can age beautifully for decades, or it can start failing much sooner if owners treat it like painted stucco or fiber cement.
Practical takeaway: In Arizona, cedar siding maintenance works best when owners clean gently, inspect often, and protect exposed elevations before bare wood appears.
What good care looks like
A sound maintenance routine is not complicated, but it does need consistency. It usually includes annual inspection, low-pressure washing instead of aggressive pressure cleaning, and timely re-staining or sealing on the sides that burn up first. If you are already planning broader exterior care, it helps to review a house-washing schedule like this guide on how often you should power wash your house, then adjust your cedar care upward for Arizona exposure.
Cedar rewards owners who stay ahead of failure. Once boards start splitting, cupping, or holding moisture, the work gets more expensive and less cosmetic.
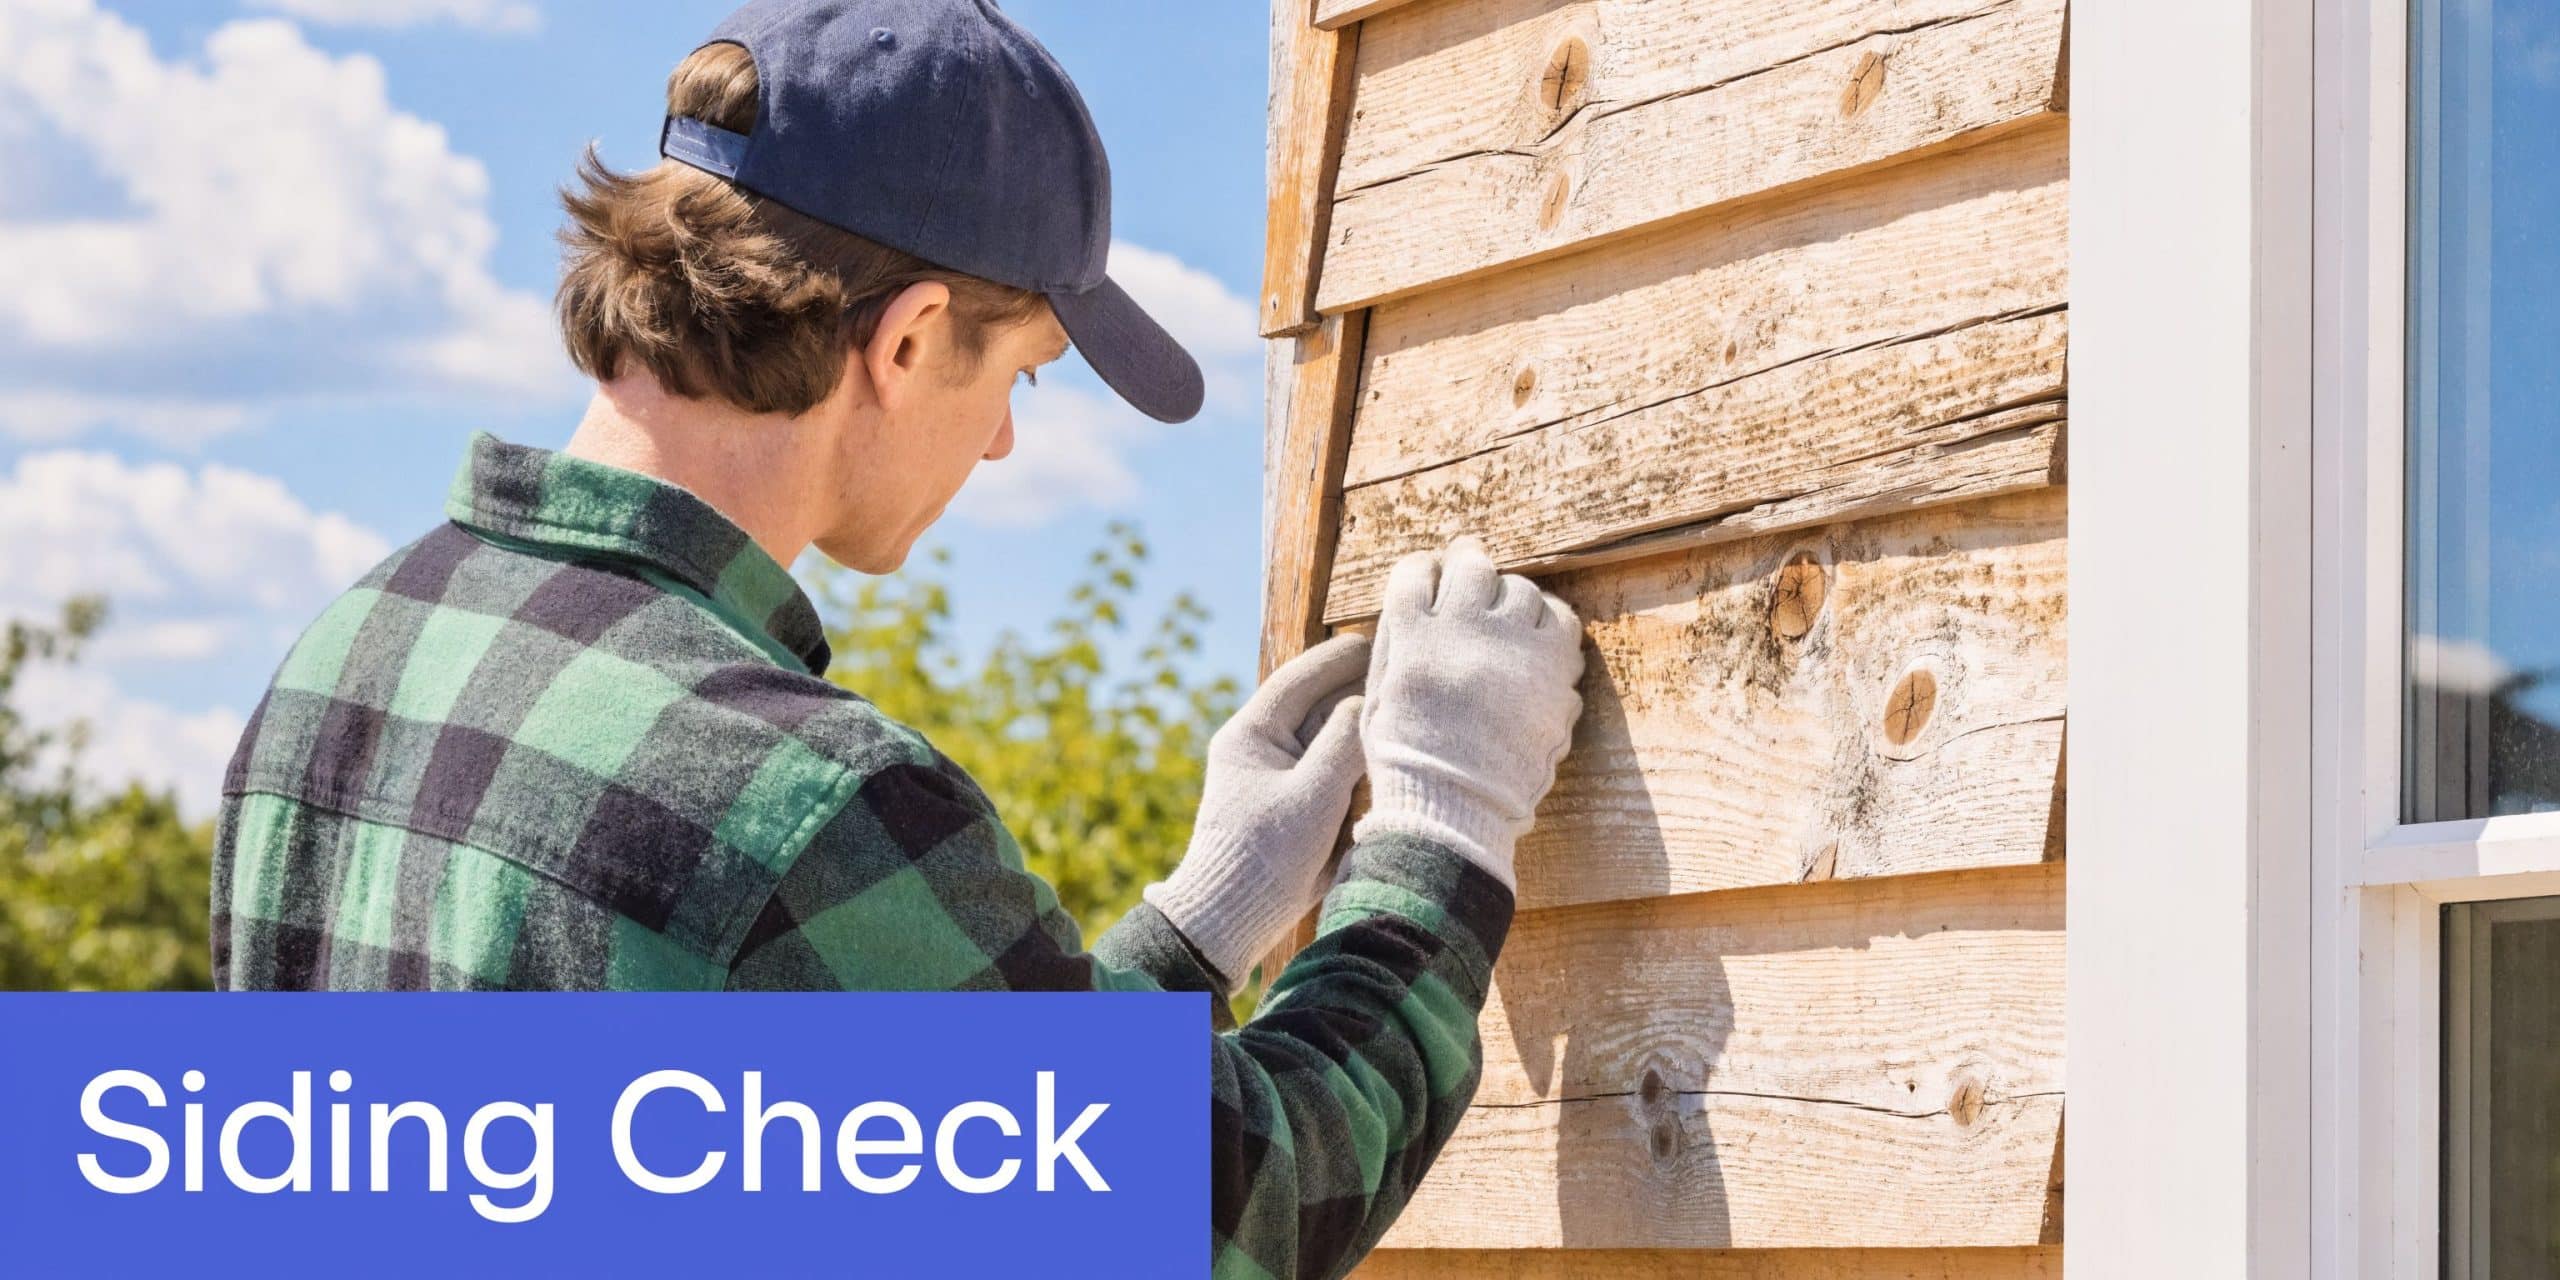
Your Annual Cedar Siding Inspection Checklist
Most cedar problems are visible early. You do not need a contractor’s background to catch them. You do need to know what you are looking for, and you need to check the whole house, not just the front elevation.
For owners who like to review exterior systems as one annual task, a broader complete exterior home maintenance checklist is a useful companion. Cedar just deserves a closer, more material-specific look than most siding types.
Start with the sunniest walls
Begin on the south- and west-facing sides. In Arizona, they usually tell the story first.
Look for color that appears washed out, patchy, or noticeably lighter than sheltered areas. Run your hand lightly across the surface. If the finish looks tired and the wood feels dry or rough, it usually means the protective layer is wearing away.
Pay attention to visual inconsistency. Cedar often fails unevenly. You may see stronger color under eaves and duller, more exposed boards below.
Next step: Mark the elevations that look most exposed. Those areas set the urgency for cleaning and recoating.
Check for cracks, splits, and movement
Move closer and inspect individual boards. Look at board ends, knots, butt joints, and lower courses where stress shows up first.
Use this quick field checklist:
- Hairline cracks: Small surface checks can be manageable, but they should be monitored so they do not deepen.
- Warping or cupping: Boards that no longer sit flat can start shedding water poorly and may expose gaps.
- Open joints: Separation around seams and trim lines can let water move where it should not.
- Loose fasteners: Nails backing out or boards shifting out of plane are signs that the siding is under stress.
A small crack is not the same thing as a failed wall. But several boards with movement in the same area usually point to a larger moisture or finish issue.
Look for mildew and shaded moisture problems
Arizona is dry, but shaded faces, sprinkler splash zones, and tight side yards can still support mildew. This is common on walls that get less direct sun or hold dust and organic residue.
Look for dark spotting, greenish staining, or streaking under trim, window edges, and lower laps. The issue may look minor at first, but cedar does not benefit from letting biological growth sit in the grain.
Tip: If a wall stays damp longer than the rest of the house after a rinse or storm, inspect that area more closely. Cedar usually signals drainage and airflow problems before it signals structural trouble.
Inspect caulking, sealants, and trim transitions
The siding itself may be fine while the surrounding details are failing. Check where cedar meets windows, doors, belly bands, corner trim, penetrations, and masonry.
You are looking for:
- Shrunken sealant: Gaps at trim lines let water behind the siding.
- Cracked caulk: Brittle caulk often shows up before surrounding finish failure.
- Failed transitions: Flashing and trim intersections deserve special attention after monsoon season.
Owners often focus on the field of siding and miss the edges. In practice, edge details are where many preventable problems begin.
Do not ignore insects and localized damage
Cedar is valued for its natural resistance, but any wood product can become vulnerable when neglected, cracked, or left exposed. Scan for small holes, frass, softened areas, or repeated bird pecking.
This is also where binoculars help. For two-story homes, inspecting upper gables and hard-to-reach trim from the ground is safer and still productive.
Build the inspection into your routine
One clean annual walkthrough beats waiting for obvious failure. Many owners tie it to spring cleaning or post-monsoon exterior work. For a wider planning framework, this annual home maintenance checklist helps organize the timing.
If you keep notes, keep them simple. Date the inspection, list the walls with highest exposure, and record any changes from the prior year. That gives you a working history instead of guessing from memory.
The Professional Soft Wash Cleaning Method
Cedar does not respond well to brute force. The cleaning method matters as much as the cleaning frequency.
A lot of siding gets damaged by someone treating cedar like concrete, block wall, or a driveway. That approach strips fibers, roughens the face, and can push water where it should never go. For cedar siding maintenance, the professional standard is a controlled soft wash, not aggressive pressure washing.

Why pressure causes problems
According to this cedar cleaning methodology reference, the professional standard for cleaning cedar is low-pressure soft washing, using under 500 PSI, while high pressure above 1500 PSI can damage wood fibers in 60 to 80 percent of cases and force water into seams, which can lead to rot and premature failure: cedar cleaning best practices.
That tracks with what exterior pros see in the field. Cedar is a softer wood. Once the surface is furred up by too much pressure, the siding holds dirt faster, sheds finish unevenly, and becomes harder to maintain on the next cycle.
What a proper wash looks like
Professional cedar cleaning is more methodical than expected. It is not just spraying the wall and hoping the wood brightens up.
A careful process usually includes:
Inspection before water hits the wall
Cracks, failed caulk, open joints, and soft spots need to be identified first. Washing over damage can make a minor issue worse.A gentle pre-wet
The surface gets rinsed lightly to loosen dust and reduce uneven chemical absorption.A cedar-safe cleaning solution
Mild, non-harsh cleaners are applied so grime, mildew, and environmental buildup release without stripping the wood.Soft agitation where needed
Soft-bristle brushes help in stubborn sections, especially around textured grain, trim transitions, and protected lower areas.A controlled rinse
The rinse removes residue thoroughly without blasting the surface or driving water behind boards.
The difference is discipline. Good cedar cleaning removes contamination while protecting both the finish and the wood structure.
Arizona changes the cleaning approach
Arizona homes often need more attention to dry dust, windborne buildup, and heavily exposed elevations. A shaded wall with mildew staining needs one treatment mindset. A sun-baked wall coated in fine dust needs another.
That is why experienced cleaners do not use one blanket setting for every side of the house. They adjust dwell time, rinse pattern, brush use, and working sequence depending on exposure, finish condition, and how much loose dust is embedded in the grain.
Key point: The goal is not the strongest spray. The goal is the cleanest surface with the least stress on the cedar.
Here is a practical comparison.
| Method | What it does well | What it risks |
|---|---|---|
| Garden hose rinse | Light surface dust removal | Often leaves embedded grime and uneven results |
| Consumer pressure washer | Fast removal of visible dirt | Easy to scar fibers, leave lap marks, and force water into seams |
| Professional soft wash | Controlled cleaning with low surface stress | Requires proper equipment, product knowledge, and restraint |
If you are weighing the difference between the two service styles, this overview of pressure washing vs soft washing for your Phoenix home gives useful context.
What not to do on cedar
The biggest mistakes are predictable.
- Using a narrow-tip pressure nozzle: This concentrates force and can etch the wood.
- Cleaning too close to the wall: Even moderate equipment becomes risky when the wand is held too near.
- Skipping the rinse discipline: Cleaner left in seams or on trim can create its own problems.
- Washing without inspecting first: Existing cracks and failed seals do not improve under water pressure.
- Treating all siding the same: Cedar needs a different touch than stucco, painted fascia, or pavers.
A quick demonstration helps make the technique easier to visualize.
Where professionals earn their keep
The technical part is only half of it. The other half is judgment.
Pros know when the wall only needs cleaning, when cleaning should stop because the finish is failing, and when a board issue calls for repair before any wash work continues. They also know how to protect windows, plants, nearby finishes, and upper-story access points while keeping the cedar intact.
That is why cedar siding maintenance is one of those jobs where “stronger” is usually worse. The best result comes from a lighter hand and a better process.
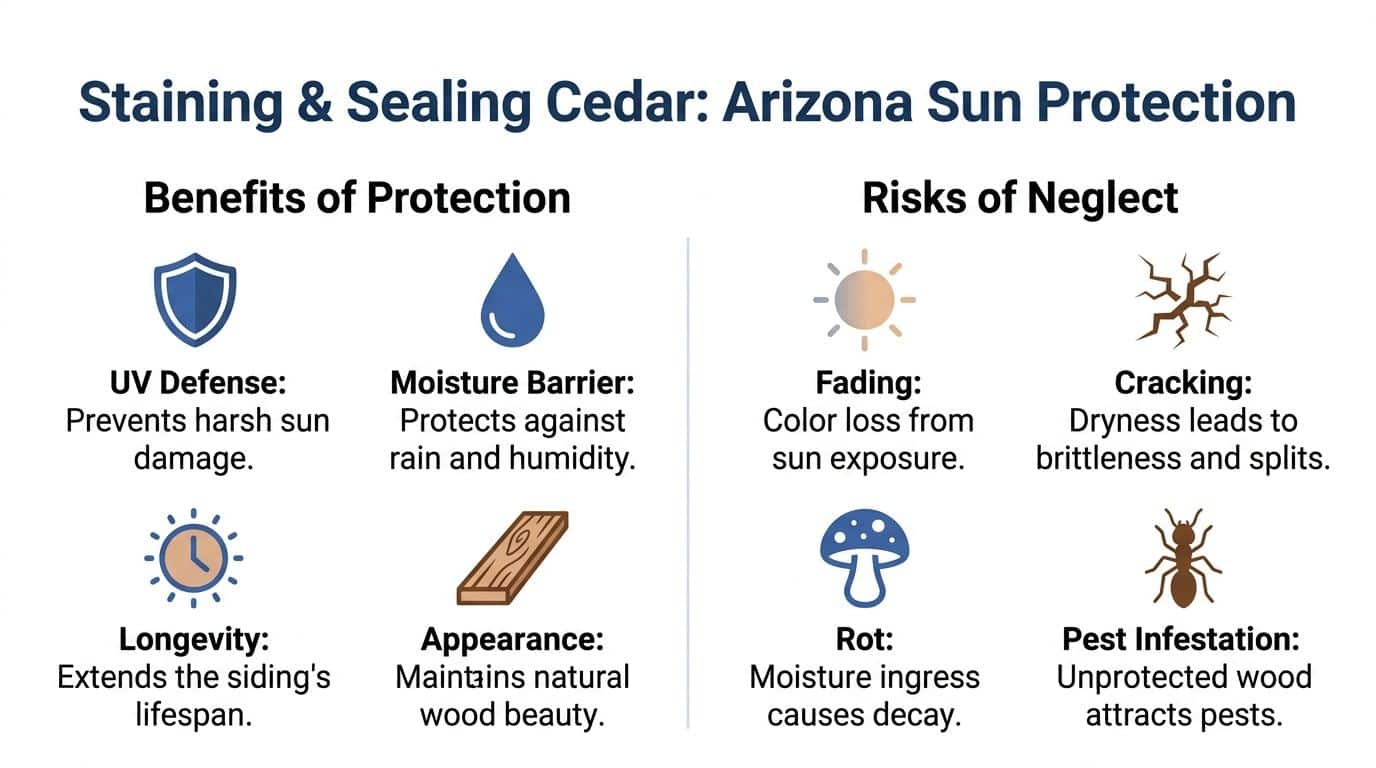
Staining and Sealing to Beat the Arizona Sun
Cleaning restores the surface. Staining and sealing protect it. In Arizona, that protection window matters because UV exposure can break down a cedar finish faster than many owners expect.
Once cedar starts showing bare timber on exposed sides, you are no longer just preserving appearance. You are trying to stop the wood from drying out, moving, and opening the door to more expensive repairs.
Timing matters more than color preference
In high-UV climates like Arizona, cedar siding demands re-staining or sealing every 2 to 3 summers to combat degradation, and neglect can allow bare timber to emerge, leading to warping and cupping, according to this cedar maintenance cost and timing guide: cedar siding restaining frequency in Arizona.
That timeline is especially relevant for the walls that take the hardest sun. A house may not need every elevation treated at exactly the same moment, but exposed sides should never be judged by the best-looking wall on the property.
Choosing the right finish
The right product depends on the look you want and how much maintenance you are willing to accept.
Transparent finishes
These keep the cedar grain front and center. They appeal to owners who chose cedar for its natural variation and warmth.
The trade-off is straightforward. Transparent products usually show wear sooner, especially on intense sun exposures. They can look excellent, but they ask for more attentive upkeep.
Semi-transparent stains
This is often the sweet spot for cedar in Arizona. You still see wood character, but you gain more pigment and better UV screening than a clear finish provides.
For many homes, semi-transparent stain offers the best balance of appearance and protection. It hides minor weathering better than a clear product without giving cedar a flat, painted look.
Solid stains
Solid stains offer the strongest visual coverage. They are useful when the siding already has color variation, previous finish inconsistency, or cosmetic blemishes you want to unify.
The trade-off is aesthetic. Once you go solid, the look moves closer to paint and farther from natural cedar grain.
Oil-based versus water-based thinking
Owners often ask which chemistry is best. The answer depends on the siding’s current condition, the existing coating, and the desired finish.
In practice:
- Oil-based products often penetrate well and can complement cedar’s natural look, but they may require attentive maintenance on harsh exposures.
- Water-based products can offer easier cleanup and good color retention, but they still depend on proper prep and compatible application.
- Cedar-specific systems matter more than marketing language. Product fit is more important than broad category loyalty.
If you are comparing materials before a project, browsing specialty protective coatings can help you understand how different finish systems are positioned for wood protection.
Tip: Match the product to the wall condition, not just to the sample board. A fresh cedar display and an exposed Arizona wall are two different test environments.
Surface prep decides the outcome
Most stain failures are prep failures first.
A surface that still holds dust, chalky residue, embedded grime, or leftover cleaner will not accept finish evenly. The result is blotchy color, poor adhesion, and early wear on the most exposed sides.
A good prep routine usually includes:
- Cleaning first: Remove dust, mildew, and contamination before any coating is applied.
- Letting the wood dry properly: Cedar should not be sealed while holding excess surface moisture.
- Spot repairs before coating: Fillers, replacement boards, and caulk corrections should happen ahead of finish work.
- Testing a small area: This confirms color, absorption, and appearance on the actual wall.
Application method changes the look
Sprayers, stain pads, and brushes all have a place.
Spraying can speed up coverage, especially on larger walls, but cedar often benefits from back-brushing so the product works into the grain and lap edges evenly. Brushing is slower, but it gives excellent control around joints, trim, and texture variation.
On higher-end cedar jobs, application technique often separates an acceptable finish from a polished one. Lap marks, flashing, and uneven absorption are usually signs that the wall was rushed.
What owners should watch for after sealing
A fresh stain job should look even, intentional, and appropriate to the species. It should not look muddy, thick, or plastic.
After application, keep an eye on:
- Fast fading on one elevation
- Uneven sheen
- Dark moisture-prone patches
- Dry spots where stain did not soak in evenly
These are early clues that a wall may need more than maintenance next time. It may need repair, product adjustment, or a different prep strategy altogether.
Arizona rewards owners who treat cedar finish as a protective system, not a decorative afterthought.
Smart Repairs and Advanced Maintenance Strategies
Not every cedar problem calls for a full replacement. A lot of siding can be stabilized early if the issue is isolated and the repair matches the material.
The challenge is knowing when a repair is local and when it points to a broader finish, moisture, or installation problem. Good cedar siding maintenance includes both.
Small repairs that make sense
Minor defects can often be handled without turning the project into a major exterior renovation.
For example, a small crack in an otherwise sound board may be a candidate for filler and refinishing. A single split or damaged piece near a hose bib, downspout, or kick-out point may justify selective board replacement. Trim intersections with failed sealant can usually be corrected before damage spreads into adjacent siding.
The repair logic should stay simple:
- Repair surface defects when the board is sound and the issue is localized.
- Replace individual boards when damage is deeper, movement is obvious, or decay has started.
- Stop and reassess when several boards in one zone show the same symptom.
Cedar repairs go wrong when someone patches visible damage but ignores the reason it formed.
Practical rule: If the wood feels soft, repeatedly stays stained after cleaning, or keeps reopening after a cosmetic fix, stop treating it as a touch-up.
When selective replacement is the better move
Board replacement sounds straightforward, but cedar can be unforgiving if the installer damages neighboring pieces or creates a poor visual match. Grain pattern, board profile, stain absorption, and fastening all matter.
A good selective replacement does three things well:
- Removes the failed board without cracking adjacent material.
- Matches the replacement as closely as possible in profile and finish.
- Re-establishes proper water handling at the joint, trim, and fastener points.
That is why many owners can handle light maintenance but prefer skilled help once boards need to come off the wall.
The natural weathering option
There is also a less traditional strategy. Some owners intentionally let cedar weather to a silver patina rather than chasing an ongoing cycle of stain maintenance.
A contrarian view gaining traction is intentionally letting cedar weather to a silver patina, which can reduce maintenance by 80 percent, but this approach requires high-quality heartwood and may not be ideal in dusty climates like Arizona without careful management, according to this discussion of problems with cedar siding and the weathered look.
This is not the same as neglect. Intentional weathering still requires judgment. The wood quality has to be right. The exposure has to be understood. The property owner has to accept visual change as part of the plan, not as a surprise.
In Arizona, the main complication is dust. A silver patina can look sharp on the right architecture, but dust, runoff staining, and uneven exposure can make the result look dirty instead of intentionally aged. If someone is considering this route, initial prep and ongoing washing strategy matter more than people assume.
Arizona Cedar Siding Maintenance Schedule
| Season | Task | Pro Tip |
|---|---|---|
| Spring | Inspect sun-facing walls, check finish wear, wash off winter dust and debris | Start with the south and west elevations because they usually show finish fatigue first |
| Early summer | Review whether exposed walls need sealing or re-staining | Do not wait for the whole house to look bad before protecting the hardest-hit sides |
| Monsoon season | Watch for water intrusion, splashback, clogged drainage paths, and mildew-prone zones | Check around trim, windows, and lower walls after storms |
| Fall | Clean off dust buildup and inspect for cracks, gaps, and sealant failure | Fall is a good time to document changes so next year’s work is easier to plan |
| Winter | Schedule repairs, board replacement, and finish planning for the next cycle | Cooler weather often makes project coordination easier before peak heat returns |
Strategy beats reaction
The owners who spend wisely on cedar usually do not wait for dramatic damage. They treat repair work as part of a longer system. Clean what should be cleaned. Replace what has failed. Protect what still has life left in it. And if the weathered-cedar look is the goal, choose it deliberately.
That approach keeps cedar from swinging between over-maintenance and neglect.
DIY or Hire a Pro? Making the Right Call
Some cedar siding maintenance tasks are realistic for a careful homeowner. Others look manageable until the ladder comes out, the wall height changes, or the wrong equipment starts stripping wood fibers.
The right choice usually depends on three things: scale, risk, and finish quality.
When DIY can work
DIY makes sense when the task is limited, accessible, and low-risk.
A homeowner can often handle:
- Ground-level visual inspections
- Light spot cleaning with gentle methods
- Monitoring cracks, sealant issues, and finish wear
- Small touch-up work on easy-to-reach areas
- Documenting wall conditions for future maintenance
If the cedar is on a single-story section, the finish is still largely intact, and the goal is routine care rather than correction, a diligent owner may do fine.
DIY also works better for owners who are patient. Cedar punishes rushed work. If someone is willing to test small areas, use soft tools, and avoid overaggressive washing, the odds improve.
Where DIY starts to break down
Problems tend to show up when the project expands beyond simple upkeep.
A few common breaking points:
- Two-story or high-access walls bring real fall risk.
- Consumer pressure washers create easy opportunities for surface damage.
- Chemical handling gets trickier around windows, landscaping, and adjacent finishes.
- Uneven stain application becomes much more obvious across larger elevations.
- Repair judgment is harder than it looks when multiple boards show movement or finish failure.
At this stage, many cedar jobs become expensive for the wrong reason. The original issue may have been manageable, but the correction gets bigger after a poor wash, a patchy stain attempt, or water driven behind the siding.
The quality question
A useful way to decide is to ask what result you want.
If you want the wall to look “better than it does now,” DIY may be enough on a small scope. If you want a uniform, protected, low-risk result across the whole exterior, professional help becomes more compelling.
Professionals bring a few advantages homeowners usually do not have:
| Decision factor | DIY approach | Professional approach |
|---|---|---|
| Access | Limited by ladder safety and reach | Better equipped for taller, more complex elevations |
| Cleaning method | Often restricted to hose or consumer washer | Better control with cedar-appropriate soft wash systems |
| Diagnosis | Can spot obvious issues | Better at separating dirt, finish failure, and board damage |
| Efficiency | Slower, especially with prep and testing | Faster workflow with a repeatable process |
| Finish consistency | Harder to keep even across full walls | More consistent coverage and appearance |
Safety should carry more weight than people give it
Ladders, sloped ground, second-story walls, and wet surfaces create a bad combination fast. Add cleaning agents, hoses, and Arizona heat, and a “weekend project” can go sideways quickly.
Property managers and commercial owners face another layer. Once access equipment, liability, scheduling, and tenant or public exposure enter the picture, cedar maintenance becomes much less of a casual task.
That is one reason many owners choose professional support for the bigger jobs while still handling routine observation themselves.
Cost is not just the invoice
A lot of DIY decisions get framed as labor savings versus a service bill. That comparison is too narrow.
You also have to count:
- Your time
- Equipment you may only use once
- Risk of damaging a premium material
- The chance of needing a second attempt
- The cost of delayed repairs if the diagnosis is wrong
On cedar, a cheap mistake can be more expensive than a careful service call. That is especially true when the siding is already showing signs of finish wear, seam gaps, or localized failure.
A practical decision framework
Use this if you are on the fence.
DIY is usually reasonable if:
- The siding is easy to reach
- The work is limited in size
- You are using gentle methods
- The finish is mostly intact
- No boards appear soft, warped, or loose
Hire a pro if:
- The house is multi-story
- The wall needs full cleaning or re-staining
- You see board movement, repeated staining, or suspected moisture issues
- You are considering pressure equipment
- You want the job done once, correctly, and with lower risk
For homeowners comparing service value more broadly, this guide on why you might hire a professional to pressure wash your property adds useful perspective, especially for exterior surfaces that can be damaged by the wrong approach.
The best cedar maintenance plans are not built around pride of ownership alone. They are built around knowing which tasks are safely manageable and which ones deserve professional hands.
If your cedar siding is fading, collecting heavy dust, or showing signs of finish wear, South Mountain Window Cleaning, LLC can help you evaluate the surface and handle exterior cleaning with the care Arizona wood siding requires. For homeowners and property managers across Phoenix, Scottsdale, Paradise Valley, Chandler, Tempe, and Gilbert, working with a licensed, bonded, and insured exterior cleaning company is often the safest way to protect curb appeal without risking avoidable damage.